
:max_bytes(150000):strip_icc():format(webp)/how-to-choose-your-ideal-phonecase-ca91460721b143b0b0ae61b5baf11b3c.jpg)
Updated Streamline Your Content How to Make Reaction Videos Quickly with Filmora for 2024
Streamline Your Content: How to Make Reaction Videos Quickly with Filmora
How to Make a Reaction Video Easier Than Ever With Filmora

Liza Brown
Mar 27, 2024• Proven solutions
With several video-sharing platforms and billions of videos on those platforms, it is very difficult and competitive to make your mark and have an identity. There are hundreds of categories of videos that you can find on the platforms like Youtube, Dailymotion, Vimeo, and more. Among all those categories, reaction videos are one of the most popular categories. It allows a person to review another person’s opinion, view, or idea about any particular issue or instance. Most of the video-sharing platforms enable their users to make all kinds of reaction videos without any restriction. Having such a huge competition makes it hard to stand out and attract viewers.
Have you ever seen videos where the reactor has a transparent background instead of the rectangle box in the corner? They look nice and engaging, right? The process of making such videos will require so many materials such as a green screen, stand, and other materials to support it. It is difficult for everyone to afford all these and secondly, it is very difficult to carry from one place to another.
With Filmora X, you can create such transparent background reaction videos without such expensive material. Filmora has launched a new feature name AI Portrait that uses artificial intelligence to create amazing and cool effects. It uses the latest technology to separate the background and humans in the footage to help you remove the background with a single click. So, let’s get started with the process of making stunning reaction videos with Filmora’s AI Portrait.
You might be interested in:
Step 01: Open Filmora X. If it is not already installed on your PC, you can download it from here and install it on your PC.

Step 02: Import the video that you want to react to and your reaction video. If you have not already recorded your reaction, then record it first using any camera or smartphone.

Step 03: Place both of these videos into the timeline. Make sure to place your reaction above.

Step 04: Select your reaction video on the timeline and go to the “Effects”. Here you will find a new folder named “AI Portrait”, open it. Here you will find multiple AI portrait effects.

Step 05: Our goal is to remove the background of the reaction. To do that, we will use Human Segmentation. Drag and drop Human Segmentation into the reaction video. If you haven’t purchased this effect already, it will ask you to buy it to export the video. But you want to try it first, click on “Try It.”

Step 06: Once the effect is successfully applied to the video, its background will be removed automatically.

Step 07: Adjust the video by making it smaller and place it in the bottom left corner of the screen. Your reaction video is ready to be uploaded on video-sharing platforms.

Step 08: To make your video look cool and stunning, you can also add multiple other effects to your reaction. AI portrait allows you to add a border around the character to make it look more visible and separate it from another video. Go to the AI portrait and drag Human Border Effect and drop it into your reaction. It will create an outline around the character and make it look more visible.

Step 09: In some instances, you might need to change the position or size of your reaction. You can easily do that by applying the Keyframes to it. If you feel like changing the part of your reaction at some point in the video, go to that point in the timeline and click on the keyframe button above the timeline.

Step 10: Once you click on the keyframe, it will add a keyframe to the video. Now move forward into the timeline to a point and adjust your character’s position by dragging it. Let’s move it to the bottom right corner. It will add another keyframe to the video in the timeline. Now the character will change its position from the left corner to the right corner once it reaches that specific point in time.

Conclusion
AI Portrait allows you to create wonderful effects using artificial intelligence. This is one of the best uses of AI to make stunning reaction videos. It will not only save you a lot of time but will also help you save a lot of money by helping you remove the background of your video without expensive materials such as a green screen and other materials related to it.


Liza Brown
Liza Brown is a writer and a lover of all things video.
Follow @Liza Brown
Liza Brown
Mar 27, 2024• Proven solutions
With several video-sharing platforms and billions of videos on those platforms, it is very difficult and competitive to make your mark and have an identity. There are hundreds of categories of videos that you can find on the platforms like Youtube, Dailymotion, Vimeo, and more. Among all those categories, reaction videos are one of the most popular categories. It allows a person to review another person’s opinion, view, or idea about any particular issue or instance. Most of the video-sharing platforms enable their users to make all kinds of reaction videos without any restriction. Having such a huge competition makes it hard to stand out and attract viewers.
Have you ever seen videos where the reactor has a transparent background instead of the rectangle box in the corner? They look nice and engaging, right? The process of making such videos will require so many materials such as a green screen, stand, and other materials to support it. It is difficult for everyone to afford all these and secondly, it is very difficult to carry from one place to another.
With Filmora X, you can create such transparent background reaction videos without such expensive material. Filmora has launched a new feature name AI Portrait that uses artificial intelligence to create amazing and cool effects. It uses the latest technology to separate the background and humans in the footage to help you remove the background with a single click. So, let’s get started with the process of making stunning reaction videos with Filmora’s AI Portrait.
You might be interested in:
Step 01: Open Filmora X. If it is not already installed on your PC, you can download it from here and install it on your PC.
Step 02: Import the video that you want to react to and your reaction video. If you have not already recorded your reaction, then record it first using any camera or smartphone.
Step 03: Place both of these videos into the timeline. Make sure to place your reaction above.
Step 04: Select your reaction video on the timeline and go to the “Effects”. Here you will find a new folder named “AI Portrait”, open it. Here you will find multiple AI portrait effects.
Step 05: Our goal is to remove the background of the reaction. To do that, we will use Human Segmentation. Drag and drop Human Segmentation into the reaction video. If you haven’t purchased this effect already, it will ask you to buy it to export the video. But you want to try it first, click on “Try It.”
Step 06: Once the effect is successfully applied to the video, its background will be removed automatically.
Step 07: Adjust the video by making it smaller and place it in the bottom left corner of the screen. Your reaction video is ready to be uploaded on video-sharing platforms.
Step 08: To make your video look cool and stunning, you can also add multiple other effects to your reaction. AI portrait allows you to add a border around the character to make it look more visible and separate it from another video. Go to the AI portrait and drag Human Border Effect and drop it into your reaction. It will create an outline around the character and make it look more visible.
Step 09: In some instances, you might need to change the position or size of your reaction. You can easily do that by applying the Keyframes to it. If you feel like changing the part of your reaction at some point in the video, go to that point in the timeline and click on the keyframe button above the timeline.
Step 10: Once you click on the keyframe, it will add a keyframe to the video. Now move forward into the timeline to a point and adjust your character’s position by dragging it. Let’s move it to the bottom right corner. It will add another keyframe to the video in the timeline. Now the character will change its position from the left corner to the right corner once it reaches that specific point in time.
Conclusion
AI Portrait allows you to create wonderful effects using artificial intelligence. This is one of the best uses of AI to make stunning reaction videos. It will not only save you a lot of time but will also help you save a lot of money by helping you remove the background of your video without expensive materials such as a green screen and other materials related to it.
Liza Brown
Liza Brown is a writer and a lover of all things video.
Follow @Liza Brown
Cutting 3GP Files Made Easy: A Beginner’s Tutorial
3GP Cutter: How to Cut 3GP Files

Ollie Mattison
Mar 27, 2024• Proven solutions
3GP(3GPP file format) is a multimedia container format used by mobile phones. It is a simplified version of the MP4 format and was designed to make file sizes smaller so mobile phones could support video. In this article, we will introduce a very easy-to-use tool: Wondershare 3GP cutter and splitter, which can be used to split large 3GP video clips into smaller files, or to extract key messages from any videos with a .3gp extension. Follow the steps we are about to outline and you will have no issues with your 3GP video cutting experience.
To get started, download and install this smart 3GP cutter -Wondershare Filmora (for Win and Mac) . And then follow the step-by-step tutorial below to chop your 3GP files.
Download Mac Version ](https://tools.techidaily.com/wondershare/filmora/download/ )
How to cut 3gp file with Wondershare Filmora (originally Wondershare Video Editor)
1. Add 3GP files to Wondershare 3GP cutting tool
There are two different ways for you to add 3GP files to this 3GP splitter. Hit the “Import” button on the main menu of the interface to browse your computer and then import your wanted 3GP files to this app’s album. Or you can also add your files by directly dragging and dropping them into this app’s album.

2 Cut 3GP video clips
Drag one of the source 3GP files from the album to the timeline at the bottom. And then move the top of the red Time Indicator to put it at one point you want, click the scissor-like icon, move the Time Indicator to another point, and hit the scissor icon again. In this way, you can split the 3GP file into several clips.
If you want to chop a big 3GP file into several small-size files, at this time, you need to save the whole project for backup purpose. Then, import the saved project again and again to delete redundant clips to just export the only one into a single file each time.
But if you want to cut out some unwanted segments or to extract some parts you want, just hit the clips you don’t want and click the “Delete” icon.

3 Export the rest 3GP clips
When everything is done, just press the “Create” button to export the new file. At this time, a pop-up window will pop up to let you select an output method. If you still want to keep the file in 3GP format, just go to Format category and choose 3GP as the output format. After that, you can find the output file according to the output path.
Wondershare 3GP Cutter and splitter also lets you to directly upload to any of those popular video sharing sites such as Youtube, Facebook, Vimeo etc. or to export to any popular mobile devices.

Also check out below video tutorial on how to cut/trim/split 3GP files step by step:
Second part, other free 3GP cutters for users
Wondershare 3GP Cutter allows you to not only cut or trim your 3GP videos, but also offers you a variety of other cool editing features so that you are able to easily make Hollywood-like movies at the ease of your home. If however, you are just looking for some free and simple 3GP Cutting tools, say you don’t have any other editing needs, then these following free 3GP cutters will be worth your consideration. We’ve listed three of them which we consider as the best for your reference.
2.) Free Video Cutter
Free Video Cutter is a free cutting tool which enables you to cut your 3GP video with ease. Not only does the software support 3GP but it can also cope with several other video formats. The cutting process itself is simple, it takes into account audio and even subtitles and lets you worry only about the precise point you wish to cut your video, as a good cutting application should do.

3.) Moo0 Video Cutter
Another very easy to use program which supports 3GP. It creates a copy of the section you want to cut and retained, leaving you worry free to do what you wish with the original file. Video formats supported are less than Free Video Cutter. Be sure to check if your original file is supported if you are cutting video clips other than 3GP.

4.) Weeny Free Video Cutter
This program adds another useful talent to the mix, being able to convert cuts to another format on the fly, and even adjust frame rates, audio settings and so on. As you may expect, with these added features the interface of this video cutter is a little busier, but it is still straightforward to operate and anyone can start cutting videos within five minutes of starting to use it. A well featured piece of software than can cut your 3GP files and many other video formats too.

These are the best 3GP Cutters we recommend for you. If you know any of other cutters that are better than those four that we’ve covered, or have any questions when you use these 3GP cutting tools, feel free to leave your comments below.
Ollie Mattison
Ollie Mattison is a writer and a lover of all things video.
Follow @Ollie Mattison
Ollie Mattison
Mar 27, 2024• Proven solutions
3GP(3GPP file format) is a multimedia container format used by mobile phones. It is a simplified version of the MP4 format and was designed to make file sizes smaller so mobile phones could support video. In this article, we will introduce a very easy-to-use tool: Wondershare 3GP cutter and splitter, which can be used to split large 3GP video clips into smaller files, or to extract key messages from any videos with a .3gp extension. Follow the steps we are about to outline and you will have no issues with your 3GP video cutting experience.
To get started, download and install this smart 3GP cutter -Wondershare Filmora (for Win and Mac) . And then follow the step-by-step tutorial below to chop your 3GP files.
Download Mac Version ](https://tools.techidaily.com/wondershare/filmora/download/ )
How to cut 3gp file with Wondershare Filmora (originally Wondershare Video Editor)
1. Add 3GP files to Wondershare 3GP cutting tool
There are two different ways for you to add 3GP files to this 3GP splitter. Hit the “Import” button on the main menu of the interface to browse your computer and then import your wanted 3GP files to this app’s album. Or you can also add your files by directly dragging and dropping them into this app’s album.
2 Cut 3GP video clips
Drag one of the source 3GP files from the album to the timeline at the bottom. And then move the top of the red Time Indicator to put it at one point you want, click the scissor-like icon, move the Time Indicator to another point, and hit the scissor icon again. In this way, you can split the 3GP file into several clips.
If you want to chop a big 3GP file into several small-size files, at this time, you need to save the whole project for backup purpose. Then, import the saved project again and again to delete redundant clips to just export the only one into a single file each time.
But if you want to cut out some unwanted segments or to extract some parts you want, just hit the clips you don’t want and click the “Delete” icon.
3 Export the rest 3GP clips
When everything is done, just press the “Create” button to export the new file. At this time, a pop-up window will pop up to let you select an output method. If you still want to keep the file in 3GP format, just go to Format category and choose 3GP as the output format. After that, you can find the output file according to the output path.
Wondershare 3GP Cutter and splitter also lets you to directly upload to any of those popular video sharing sites such as Youtube, Facebook, Vimeo etc. or to export to any popular mobile devices.
Also check out below video tutorial on how to cut/trim/split 3GP files step by step:
Second part, other free 3GP cutters for users
Wondershare 3GP Cutter allows you to not only cut or trim your 3GP videos, but also offers you a variety of other cool editing features so that you are able to easily make Hollywood-like movies at the ease of your home. If however, you are just looking for some free and simple 3GP Cutting tools, say you don’t have any other editing needs, then these following free 3GP cutters will be worth your consideration. We’ve listed three of them which we consider as the best for your reference.
2.) Free Video Cutter
Free Video Cutter is a free cutting tool which enables you to cut your 3GP video with ease. Not only does the software support 3GP but it can also cope with several other video formats. The cutting process itself is simple, it takes into account audio and even subtitles and lets you worry only about the precise point you wish to cut your video, as a good cutting application should do.
3.) Moo0 Video Cutter
Another very easy to use program which supports 3GP. It creates a copy of the section you want to cut and retained, leaving you worry free to do what you wish with the original file. Video formats supported are less than Free Video Cutter. Be sure to check if your original file is supported if you are cutting video clips other than 3GP.
4.) Weeny Free Video Cutter
This program adds another useful talent to the mix, being able to convert cuts to another format on the fly, and even adjust frame rates, audio settings and so on. As you may expect, with these added features the interface of this video cutter is a little busier, but it is still straightforward to operate and anyone can start cutting videos within five minutes of starting to use it. A well featured piece of software than can cut your 3GP files and many other video formats too.
These are the best 3GP Cutters we recommend for you. If you know any of other cutters that are better than those four that we’ve covered, or have any questions when you use these 3GP cutting tools, feel free to leave your comments below.
Ollie Mattison
Ollie Mattison is a writer and a lover of all things video.
Follow @Ollie Mattison
Take Your Videos to the Next Level: 10 Best Premiere Pro Transitions
Premiere Pro Transitions: List of 10 Best Transition Plugins

Benjamin Arango
Mar 27, 2024• Proven solutions
There is no doubt to say that Premiere Pro is leading the market these days with its feature rich platform and interactive user interface. This production and editing software tool contains amazing video transition effects.
If you want to spend some time to develop classic professional looking movies at home then Premiere Pro transition can help you with great results.
The article below contains complete details about the 10 best Premiere Pro transitions you can use, and how to apply transitions to video in Premiere Pro. Keep reading to get best assistance.
You may also like: How to Add Text and Title in Adobe Premiere Pro
Part 1: 10 Best Premiere Pro Transition to Download
Although, Premiere Pro contains so many transition effects in its library but still if you need more transitions. Adobe Premiere Pro allows so many transitions to work effectively on its platform. Some of the best free ones are discussed as below:
1. FilmImpact
FilmImpact.net contains 4 transitions in its downloadable free pack whereas 6 demos are available with its paid version. Although, most of the Premiere Pro users love to create excellent effects with stock transitions like Film Dissolve etc. but still if you need something more intricate and eye-catching then these 4 free transitions from FilmImpact.net are useful for you. This plugin helps users to find best solution within their host application so it is good to apply this attractive effect in your videos.

2. Coremelt
The great news for crazy video makers is that Coremelt Free contains 44 transition effects for Premiere Pro users. Some of the most common are: Filmic transitions, light effects, instant montage presets and 10 text presets. This wide set of transitions can make your dreams come true within very less time on your favorite editing tool itself.

3. Motion Array
It possesses so many interactive tools for editing photos and videos instantly. The wide range of transition effects available on Motion Array allows users to develop their customized videos with ease. You can simply drag and drop transitions from this plugin and see amazing results on your clips.

4. Orange83 Smooth Transition
Just like its name, it includes 10 presets to use including smooth slide, spin, wipe, whipe and zoom. You can drag them to your videos that you want to edit. You can also edit these transitions to make it better and fit your videos well.
5. Transition Designer Free Wipe
This Premiere pro transitions are some common transition styles you can use. However, it may make your videos look excellent if you can use the best Premiere Pro transitions properly. Just import the plug ins to start adding transitions.
6. Glitch & Distortion Presets for Premiere Pro
These are 5 free glitch and distortion preset for Premiere. You just need to drag and drop the transition onto clips to create the effects. Its compatibility is 100%, so you don’t need to worry about the premiere effects. It is completely free to use.
7. Travel Film Transition Pack
This pack includes 4 versions of the travel film transitions to use, including Luma Fade, Quick Zoom w/ Motion Blur, Smooth Spin W/ Motion Blur and Smooth Warp Transition. You can use it to make transitions better.
8. Video Hive
It has more than 100 Premiere Pro transitions to use. They are 100% ready to use. After importing, you can also easily edit them, like chaning color, size and font. If you like it, just have a try.

9. Smooth Spin Blur Rotation Transition
This Premiere Pro transition is offered by Justin Odisho. He is a YouTuber with huge fans, so the quality of this transition is high. If you want to edit your YouTube video or vlog, this spin transition is a surefire as it’s interesting and fun to use.

10. Slice Transitions
This slice transition is in simple and clean style. It is full HD with high quality effects. Basically, you just need to drag and drop to your video to start adding it in Premiere Pro. Besides, you can preview it easily to see if you like it or not.

Part 2: How to use transitions in Premiere Pro
Now, is there any Premiere transition you like? If you have picked one, now let’s to add it to Premiere Pro. Here are few easy to follow steps for your Premiere Pro transition effects.
Step 1: Go to Effects panel
Go to Premiere Pro interface and select Effects panel from available options. Now from the available transition folders, pick the one that suits your project editing needs. The types of numbers of transitions available in effects panel will depend upon the version of Premiere Pro that you have installed in your system. Some of the most common transition effects are listed below:
- Zoom: Zoom transition helps to work on a selected potion of screen and it brings scene in or out in a selected proportion from whole screen.
- Slide: In this sliding motion type transition effect, one scene floats over another.
- Wipe: This one is quite interesting where one shot complete replaces the selected another shot while travelling from one portion of the frame to another.
- Iris: The iris transition effect is a newer one where an artificial effect is created to reflect the actual opening and closing motion of camera iris during shooting.
- 3D Motion: Such type of transition effects tries to manipulate selected clips in the space. For instance, if you apply flip over transition in this 3D motion category then one clip will simply flip over screen in such a manner that secondary clip below it gets revealed in appealing manner.
- Dissolve: In this type of transition effect, one scene completely melds into another scene. You can describe such type of blends with terms like fade out and fade in from or to a bank image.
Effects folders usually contain stylistically similar kind of transitions, but the result different appearances are on screen.

Step 2: Add transition to Premiere Pro
Now click on your desired transition and hold for a while; drag it on the video that you want to edit in the clip panel. Drop your selected transition in the specified position of the video clip bar. These transitions can be easily placed at starting position of lip, between overlapping portion of video clips as well as at end of the clip.

Step 3: Make adjustment
Now click on the left and right edges of transition and then drag them to make extended or shortened as per need. Note that, every transition use to have default time length so you can adjust their positions accordingly.

Check this video tutorial to know more details:
Conclusion
If you are tired of using Adobe Premiere, why not choose Wondershare Filmora ? It is a professional video editing software that can power up your story. It is easy to use compared with Premiere. You will have more control over video transitions. Auto color correction and automatic audio sync can help you save a lot of time. So, if you want to experience a new way to edit video, just download Wondershare Filmora now!
Benjamin Arango
Benjamin Arango is a writer and a lover of all things video.
Follow @Benjamin Arango
Benjamin Arango
Mar 27, 2024• Proven solutions
There is no doubt to say that Premiere Pro is leading the market these days with its feature rich platform and interactive user interface. This production and editing software tool contains amazing video transition effects.
If you want to spend some time to develop classic professional looking movies at home then Premiere Pro transition can help you with great results.
The article below contains complete details about the 10 best Premiere Pro transitions you can use, and how to apply transitions to video in Premiere Pro. Keep reading to get best assistance.
You may also like: How to Add Text and Title in Adobe Premiere Pro
Part 1: 10 Best Premiere Pro Transition to Download
Although, Premiere Pro contains so many transition effects in its library but still if you need more transitions. Adobe Premiere Pro allows so many transitions to work effectively on its platform. Some of the best free ones are discussed as below:
1. FilmImpact
FilmImpact.net contains 4 transitions in its downloadable free pack whereas 6 demos are available with its paid version. Although, most of the Premiere Pro users love to create excellent effects with stock transitions like Film Dissolve etc. but still if you need something more intricate and eye-catching then these 4 free transitions from FilmImpact.net are useful for you. This plugin helps users to find best solution within their host application so it is good to apply this attractive effect in your videos.
2. Coremelt
The great news for crazy video makers is that Coremelt Free contains 44 transition effects for Premiere Pro users. Some of the most common are: Filmic transitions, light effects, instant montage presets and 10 text presets. This wide set of transitions can make your dreams come true within very less time on your favorite editing tool itself.
3. Motion Array
It possesses so many interactive tools for editing photos and videos instantly. The wide range of transition effects available on Motion Array allows users to develop their customized videos with ease. You can simply drag and drop transitions from this plugin and see amazing results on your clips.
4. Orange83 Smooth Transition
Just like its name, it includes 10 presets to use including smooth slide, spin, wipe, whipe and zoom. You can drag them to your videos that you want to edit. You can also edit these transitions to make it better and fit your videos well.
5. Transition Designer Free Wipe
This Premiere pro transitions are some common transition styles you can use. However, it may make your videos look excellent if you can use the best Premiere Pro transitions properly. Just import the plug ins to start adding transitions.
6. Glitch & Distortion Presets for Premiere Pro
These are 5 free glitch and distortion preset for Premiere. You just need to drag and drop the transition onto clips to create the effects. Its compatibility is 100%, so you don’t need to worry about the premiere effects. It is completely free to use.
7. Travel Film Transition Pack
This pack includes 4 versions of the travel film transitions to use, including Luma Fade, Quick Zoom w/ Motion Blur, Smooth Spin W/ Motion Blur and Smooth Warp Transition. You can use it to make transitions better.
8. Video Hive
It has more than 100 Premiere Pro transitions to use. They are 100% ready to use. After importing, you can also easily edit them, like chaning color, size and font. If you like it, just have a try.
9. Smooth Spin Blur Rotation Transition
This Premiere Pro transition is offered by Justin Odisho. He is a YouTuber with huge fans, so the quality of this transition is high. If you want to edit your YouTube video or vlog, this spin transition is a surefire as it’s interesting and fun to use.
10. Slice Transitions
This slice transition is in simple and clean style. It is full HD with high quality effects. Basically, you just need to drag and drop to your video to start adding it in Premiere Pro. Besides, you can preview it easily to see if you like it or not.
Part 2: How to use transitions in Premiere Pro
Now, is there any Premiere transition you like? If you have picked one, now let’s to add it to Premiere Pro. Here are few easy to follow steps for your Premiere Pro transition effects.
Step 1: Go to Effects panel
Go to Premiere Pro interface and select Effects panel from available options. Now from the available transition folders, pick the one that suits your project editing needs. The types of numbers of transitions available in effects panel will depend upon the version of Premiere Pro that you have installed in your system. Some of the most common transition effects are listed below:
- Zoom: Zoom transition helps to work on a selected potion of screen and it brings scene in or out in a selected proportion from whole screen.
- Slide: In this sliding motion type transition effect, one scene floats over another.
- Wipe: This one is quite interesting where one shot complete replaces the selected another shot while travelling from one portion of the frame to another.
- Iris: The iris transition effect is a newer one where an artificial effect is created to reflect the actual opening and closing motion of camera iris during shooting.
- 3D Motion: Such type of transition effects tries to manipulate selected clips in the space. For instance, if you apply flip over transition in this 3D motion category then one clip will simply flip over screen in such a manner that secondary clip below it gets revealed in appealing manner.
- Dissolve: In this type of transition effect, one scene completely melds into another scene. You can describe such type of blends with terms like fade out and fade in from or to a bank image.
Effects folders usually contain stylistically similar kind of transitions, but the result different appearances are on screen.
Step 2: Add transition to Premiere Pro
Now click on your desired transition and hold for a while; drag it on the video that you want to edit in the clip panel. Drop your selected transition in the specified position of the video clip bar. These transitions can be easily placed at starting position of lip, between overlapping portion of video clips as well as at end of the clip.
Step 3: Make adjustment
Now click on the left and right edges of transition and then drag them to make extended or shortened as per need. Note that, every transition use to have default time length so you can adjust their positions accordingly.
Check this video tutorial to know more details:
Conclusion
If you are tired of using Adobe Premiere, why not choose Wondershare Filmora ? It is a professional video editing software that can power up your story. It is easy to use compared with Premiere. You will have more control over video transitions. Auto color correction and automatic audio sync can help you save a lot of time. So, if you want to experience a new way to edit video, just download Wondershare Filmora now!
Benjamin Arango
Benjamin Arango is a writer and a lover of all things video.
Follow @Benjamin Arango
Beginner-Friendly Video Editing Software: Top Free Options
Top 15 Free Video Editing Software for Beginners [Very Easy to Use]
Ollie Mattison
Mar 27, 2024• Proven solutions
If you are not a video-making expert, own a video studio, or have a video specialist to trim and shoot video features, then don’t worry!
We are here to take you on the tour of the easiest video editing software that would promise a professional-looking end-product despite being absolutely inexperienced!
In my opinion, an ideal video editing software should be easy for everyone to get started. It could be simple video editing software, but it at least contains all the basic features you want. My recommendation is Wondershare Filmora, which compromises usability and capability to the best. It not only comes with all common video editing tools at your fingertips but also features you may need to bring your videos to the next level.
- 15 Best Easy Video Editing Software
- Basic Features You Need in an Easy Video Editing Software
- Why Video Editing Matters Nowadays?
- Basic Video Editing Terms You Should Know
Watch Video to Take a Quick View of the 18 Best Video Editors
Filmora Video Editor is an expert in creating and editing videos with outstanding functions and features. The easy-to-use interface will help you much! It offers versions for Windows, Mac, Android and iOS! Worth to have a try!
Try Free Video Editor Try Free Video Editor Try Free Video Editor Learn More >
15 Best Easy Video Editing Software
Below are the brief detail of easy video editors for PC, giving you more editing scalability than mobile-based editing apps. So if you are seeking easy video editing software for YouTube or website then look no further!
1. Wondershare Filmora - Easy Video Editing Software, Unlimited Video Sharing
Compatibility: Windows, Mac, Android, iPhone and iPad.
Wondershare Filmora paves the way to share videos instantly with family and friends, whatever it’s on YouTube, computer, mobile devices, or TV, you’ll choose your way.
For Win 7 or later (64-bit)
 Secure Download
For macOS 10.14 or later
Secure Download
You can directly upload the video to YouTube, as well as an optional message sending to Facebook and Twitter.
Preset profiles are included in output videos for playing on mobile devices like iPhone, iPad, iPod, PSP, etc. No further conversion required. A build-in DVD tool allows you to burn video to a high-quality DVD for watching on TV with your home DVD player.
Filmstock Stock Media Library ](https://filmstock.wondershare.com/creative-theme-tutorial?spm=rs.filmora%5Fweb&source%5Fchannel=seo%5Farticle )
Download the free trial version of Wondershare Filmora for your Mac/Windows version below, start to make your stunning home movies today!
2. Blender
Compatibility: Windows, Mac, and Linux.
This is free and open-source software, originally designed as a 3D animation suite but also has a use video editor. This editor lets you carry out basic actions like video cutting and video splicing. Hence, it is an easy video cutter and easy video joiner. It can also perform more advanced tasks such as video masking.
3. Lightworks
Compatibility: Windows, Mac, and Linux.
Lightworks is a free easy to use video editing software that comes with High precision video trimming, 720p video export for YouTube, Multicam support, and support of a large range of video formats. Its free version has ample features enough for most of the users. Although the paid pro version costs $25 a month.
4. Shotcut
Compatibility: Windows, Mac, and Linux.
Shotcut is a free, open-source video editing software, packed with ample features with wide range video formats support, timeline editing, 4K HD resolution support, and have several tutorials video.

Wondershare Filmora Video Editor
Filmora - No Watermark Video Editing Software
• Easily edit and export video files without watermark
• offers popular effects and filters for making your video professional
• Cross-platform supported - (Windows, Mac, iOS, Android)
Try Video Editor without Watermark Try Video Editor without Watermark Try Video Editor without Watermark Learn More >
5. VSDC
Compatibility: Windows
VSDC, an easy video editing software for windows, is a free video editing software, having an easy-to-learn powerful suite of features including audio editing and color correction. Although a paid version, pro, costs $19.99, having visual waveform, image stabilization and voice over support.
6. Machete Lite
Compatibility: Windows
Machete Lite is a free yet the simplest video editing software perfect for simple editing tasks. Only AVI and WMV files are supported in its free version. Its full version costs $19.95 having audio editing and more file type support, unlike the free version.
7. Avidemux
Compatibility: Windows, Mac, and Linux
Avoided is the simplest video editing software, perfect for beginners. It allows performing simple editing features like Encoding, simple cutting, and filtering with an easy-to-use interface.
8. Hitfilm Express
Compatibility: Windows and Mac
HitFilm Express is a free video editing software with features ranging from basic editing features like trimming, audio editing, and slicing to advance tools and features. Its free version supports over 180 special effects. There’s a built-in YouTube uploading.
Finding a Way to Edit Video for Free? Try This Out!
Filmora Video Editor brings you all the convenience of editing videos with handy functions. You can make your creative ideas into realize! More importantly, your edited video can export without a watermark!
Try It Free Try It Free Try It Free Learn More >
9. iMovie
Compatibility: Mac
If you are a beginner and searching for a good video editing software to get your hands clean on editing then iMovie editor is perfect for you. It is an easy video editing software for mac having an easy drag and drop interface. Features like Video trimming, split-screen, audio editing, pre-made transitions library, and 4K resolution support.
10. Openshot
Compatibility: Windows, Mac, and Linux
It is a free open source video editing software with an easy-to-use interface. Features like unlimited layers and tracks, time-mapping, real-time previews, trimming, snapping, clip resizing, curve-based keyframe animations etc. It offers more than enough features for free software.
11. Movie Maker
Compatibility: Windows
It is an easy video maker and editing software for beginners which can be downloaded from any third-party and use it to make and share high-quality movies.
12. Lumen5
Compatibility: Windows and Mac
It’s a perfect web-based video editing tool, best for Social Media promotion Campaigns with an easy drag-and-drop interface.
![]()
A cross-platform for making videos anywhere for all creators

Why your video editing isn’t good enough? How about some creative inspo?
- 100 Million+ Users
- 150+ Countries and Regions
- 4 Million+ Social Media Followers
- 5 Million+ Stock Media for Use
* Secure Download

13. Adobe Spark
Compatibility: Windows and Mac
Adobe Sparks is also a web-based easy video editor, similar to Lumen5. It offers an easy user interface but is a little restricted when it comes to offering a bank of images and footage to use.
14. Videopad
Compatibility: Windows
VideoPad is a simple video editing software for beginners, maybe not suitable for professional use. It has features like 3D Video Editing, Sound Effects and pre-made transitions Library, Reduce Camera Shakes and Multiple Resolutions export support.
15. Freemake
Compatibility: Windows
Freemake is a free video converter that is used to convert and alter videos that can modify and convert videos, embed videos to websites, and extract audio from video clips simply and fast. It supports above 500 video file formats and is compatible with multiple audio and image file formats for slideshows and video clip creation.
Basic Features You Need in an Easy Video Editing Software
A software having:
- Easy montage maker
- Easy video cutter
- Easy video joiner
- Compositing multiple elements together
- Color grading
- Motion tracking
- Stabilization
- Titles
- Background replacement
- Basic color correction
- Cross dissolves and fade-to-black transitions
- Audio crossfades
- Audio level adjustment using keyframes
- Auto synchronization of additional audio tracks
- Image position adjustment using keyframes
- Footage speed adjustments
- Basic color correction
- Footage bins for roughly organizing imported footage
Why Video Editing Matters Nowadays?
If videos aren’t a primary focus of your content marketing plan, the probability is it’s soon going to be certain! Every next production is turning into video-based content, be it content marketers or SEOs.
Around 50% of the content marketers are using Facebook and YouTube channels for the sake of video distribution since online activity spent on watching videos is 50%.
Moreover, by 2021, video is going to be projected to account for more than 80% out of all internet traffic.
Therefore, it has become a need to focus on video content if you are looking to grow the organic traffic of your publications.

Filmora Free Video Editor
Create AI-Generated Video with Filmora
Filmora Free video editor offers a ChatGPT plug-in and AI tools to enhance your creative vision. Make your idea into reality.
Try It Free Try It Free Try It Free Learn More >
Basic Video Editing Terms You Should Know
Below are some of the important yet basic terms that you should know related to videography in general and video editing in specific as well, whether you are a beginner or professional.
Aspect ratio:
The aspect ratio is the ratio of width and height of a video. Examples of the most used aspect ratios are: 4:3, 16:9, 1.85:1.
Refer to the image given below for a better understanding.

B-roll:
B-roll facilities one with the flexibility, when editing, to the video editing rules as it is an add-on picture that makes a previously incoherent scene seamless.
As shown in the image below, B-roll is used to insert which can make the transition easy to look on the eyes.
Bit rate:
Bit rate, also known as data rate, refers to the amount of data used for every second within the video. It is most commonly expressed in kilobits per second (kbps).
Close up:
Close-up refers to the shots that frame to subject tightly.
For instance, if it is a person, then the close-up covers solely his face.
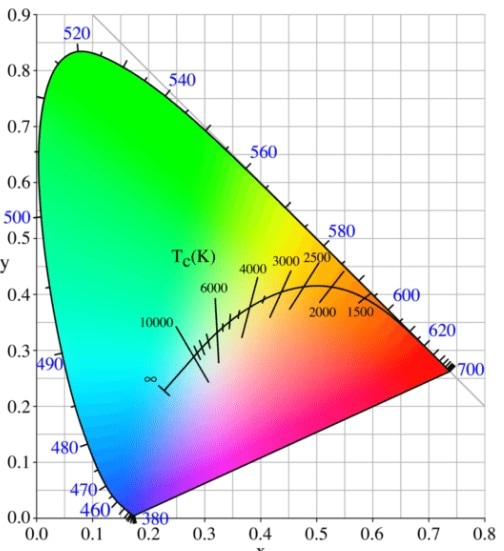
Color temperature:
Color temperature refers to the light visibility in a shot. Color temperature is expressed in Kelvin. The scale of color temperature ranges from cool to warm.
Composition:
Composition entails the process of combining multiple footages using video editing software.
Compression:
Compression is the process of minimizing the quantity of data utilized in a video file. It helps make in the process of uploading and downloading quite faster. This also leaves you with ample space for more of your publications.
Crop factor:
Crop factor refers to a number that expresses the ratio of the imaging area of a sensor to a full-frame sensor. It typically ranges from 1.3 to 2.0.
Cut-in
Cut-in refers to showing a specific part of a subject in order to emphasize a certain aspect or emotion. For instance, hand gestures may show nervousness, enthusiasm, agitation, etc.
Foley:
Often times the original sound of the scene captured in the video is not captured as naturally as they were supposed to sound like in reality. Hence, Foley is when you reproduce those sounds for that video.
Frame rate:
Frame rate refers to the video capturing by a shutter in a second or shutter cycling rate through opening and closing. Some of the common frame rates are 24, 25, 29.97, 30, etc. The frame rate is expressed in frames per second (fps).
High definition media interface:
HDMI is the connectors that digitally transfer audio and HD video to a television. This is helpful if you intend to work on a bigger screen or wish to share some of your productions.
Resolution:
Resolution refers to the horizontal and vertical pixels of your video. For instance 640×480 for SD and 1280×720 for HD. Sometimes resolution refers only to the number of pixels that paper vertically. For example 480p, 720p, and 1080p respectively.
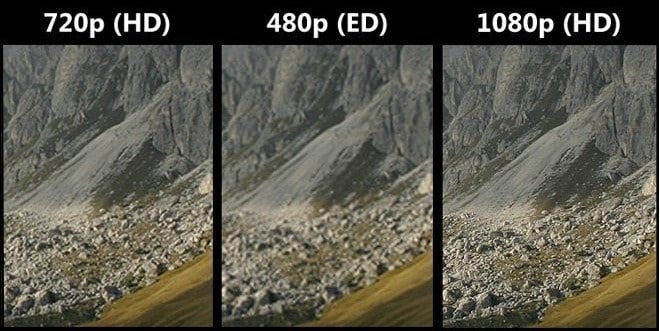
J-Cut:
J-cut refers to the editing technique in which the audio from a next scene is overlapped with the image from the previous scene, such that the audio segment of the next scene begins playing prior to its picture.
Jumpcut:
Jumpcut editing techniques refer to an abrupt transition between the two consecutive frames. The entity in the video containing jump cuts appears to jump along with the scene from one place to another. This looks disruptive to the audience.
L-Cut:
L-cut is exactly opposite to J-cut where the audio from the next scene overlays the image from the next scene to play the audio after an image has been displayed in the video.
Lower third:
As the name suggests, the lower third is derived from the rule of third which refers to the type of title, mostly used by vloggers, broadcasters, interviewers, and you tubers.
Memory bank:
You can understand the term by thinking of a memory box where we keep certain things as a memory of the events in someone’s life. Memory bank serves the same purpose through the use of video. It often uses natural sounds, document travel or merely store moments in routine life.
Press kit:
Press kit is used to provide information regarding your productions to the press for promotional purposes. Such information is often background including synopsis, crew, cast’s bios Q&A with the director, production stills and its reviews.
Shot list:
The shot list refers to the checklist related to the shots that a videographer plans to include in his/her content. This may help you save time and gear with efficient planning and handling. This gives a sense of direction to your production.
Storyboard:
A storyboard is a drawing to illustrate the scenes in the video. This gives a direct and organized way to visualize the needs for the shots or animation.
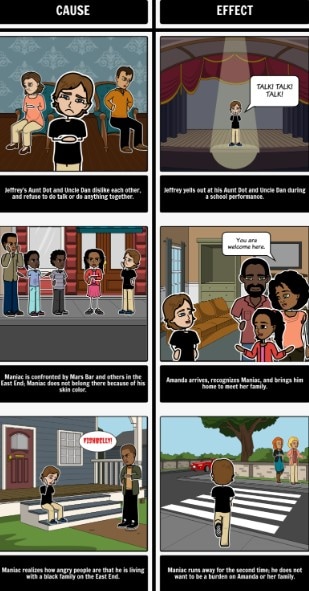
Sync:
Synchronization, aka sync, refers to the alignment of audio with video imaging.
Rule of thirds:
The rule of third is a grid that helps you to compose interesting and balanced shots to make your productions aesthetically pleasing. The grid is similar to a tic-tac-toe board since it segregates the picture into 9 segments. It helps bring points of interest to be aligned with the lines or intersection given in the grid.
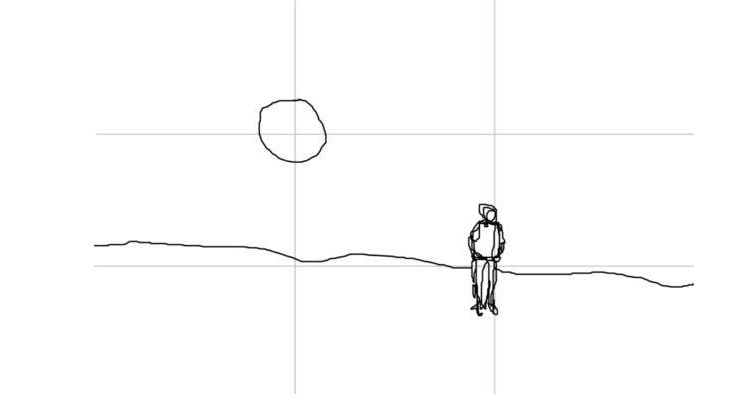
Three-point lighting:
This helps one to diminish the shadows for image balancing and provides an appealing contrast. These three lights are commonly known as fill, key, and backlight.

Tilts:
Tilts refer to the vertical transitions that your camera. This is the opposite of pans.

Pans:
Pans refer to the horizontal movements of your camera. This is exactly contrary to tilts.
White balance:
White balance refers to the process where the unrealistic color casts are removed in order to render a white object to be actually white in your photo, and not have other tints.
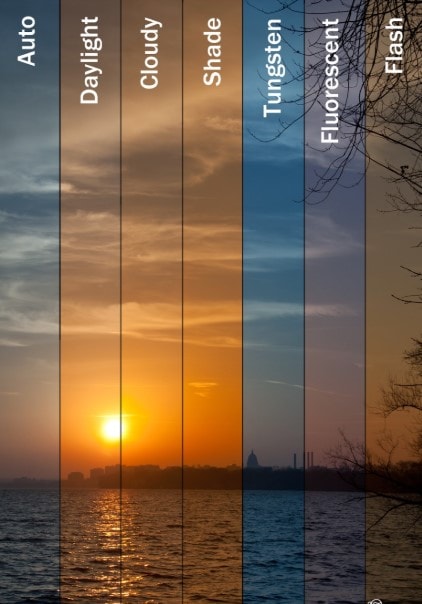
Wide-angle:
A wide-angel lens refers to a short focal length of a lens. This brings more of a subject rather than a subject being captured by a normal lens at equal distances.
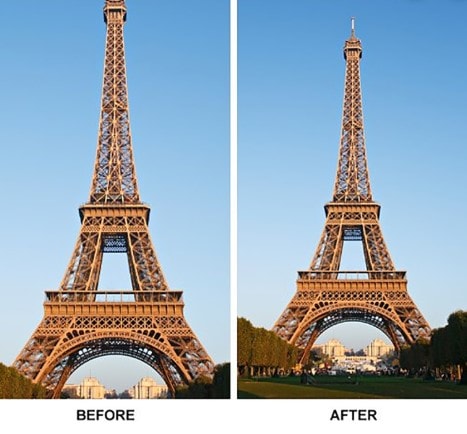
Non-linear editing:
NLEs is a non-destructive editing technique that allows one to access any frame in a video clip regardless of the sequence in the clip. It gives you the freedom to easily include effects, transitions, fades, etc. which cannot be achieved with linear editing
Pixel aspect ratio:
Pixels are several tiny squares that build up an image in a video. Whereas, aspect ratio refers to the ratio of width to height of a video. Hence, the pixel aspect ratio (PAR) is the ratio of width to height of the pixels.
Conclusion
Be it Instagram stories, YouTube product testimonials, or Facebook ads, using these easy-to-use video editing software will elevate your content into a professional and slick look.
So, I hope you are now ready to get started.
Lights, camera, action!
For Win 7 or later (64-bit)
Secure Download
For macOS 10.14 or later
Secure Download
Click here to get Filmora for PC by email
or Try Filmora App for mobile >>>
download filmora app for ios ](https://app.adjust.com/b0k9hf2%5F4bsu85t ) download filmora app for android ](https://app.adjust.com/b0k9hf2%5F4bsu85t )
Ollie Mattison
Ollie Mattison is a writer and a lover of all things video.
Follow @Ollie Mattison
Ollie Mattison
Mar 27, 2024• Proven solutions
If you are not a video-making expert, own a video studio, or have a video specialist to trim and shoot video features, then don’t worry!
We are here to take you on the tour of the easiest video editing software that would promise a professional-looking end-product despite being absolutely inexperienced!
In my opinion, an ideal video editing software should be easy for everyone to get started. It could be simple video editing software, but it at least contains all the basic features you want. My recommendation is Wondershare Filmora, which compromises usability and capability to the best. It not only comes with all common video editing tools at your fingertips but also features you may need to bring your videos to the next level.
- 15 Best Easy Video Editing Software
- Basic Features You Need in an Easy Video Editing Software
- Why Video Editing Matters Nowadays?
- Basic Video Editing Terms You Should Know
Watch Video to Take a Quick View of the 18 Best Video Editors
Filmora Video Editor is an expert in creating and editing videos with outstanding functions and features. The easy-to-use interface will help you much! It offers versions for Windows, Mac, Android and iOS! Worth to have a try!
Try Free Video Editor Try Free Video Editor Try Free Video Editor Learn More >
15 Best Easy Video Editing Software
Below are the brief detail of easy video editors for PC, giving you more editing scalability than mobile-based editing apps. So if you are seeking easy video editing software for YouTube or website then look no further!
1. Wondershare Filmora - Easy Video Editing Software, Unlimited Video Sharing
Compatibility: Windows, Mac, Android, iPhone and iPad.
Wondershare Filmora paves the way to share videos instantly with family and friends, whatever it’s on YouTube, computer, mobile devices, or TV, you’ll choose your way.
For Win 7 or later (64-bit)
Secure Download
For macOS 10.14 or later
Secure Download
You can directly upload the video to YouTube, as well as an optional message sending to Facebook and Twitter.
Preset profiles are included in output videos for playing on mobile devices like iPhone, iPad, iPod, PSP, etc. No further conversion required. A build-in DVD tool allows you to burn video to a high-quality DVD for watching on TV with your home DVD player.
Filmstock Stock Media Library ](https://filmstock.wondershare.com/creative-theme-tutorial?spm=rs.filmora%5Fweb&source%5Fchannel=seo%5Farticle )
Download the free trial version of Wondershare Filmora for your Mac/Windows version below, start to make your stunning home movies today!
2. Blender
Compatibility: Windows, Mac, and Linux.
This is free and open-source software, originally designed as a 3D animation suite but also has a use video editor. This editor lets you carry out basic actions like video cutting and video splicing. Hence, it is an easy video cutter and easy video joiner. It can also perform more advanced tasks such as video masking.
3. Lightworks
Compatibility: Windows, Mac, and Linux.
Lightworks is a free easy to use video editing software that comes with High precision video trimming, 720p video export for YouTube, Multicam support, and support of a large range of video formats. Its free version has ample features enough for most of the users. Although the paid pro version costs $25 a month.
4. Shotcut
Compatibility: Windows, Mac, and Linux.
Shotcut is a free, open-source video editing software, packed with ample features with wide range video formats support, timeline editing, 4K HD resolution support, and have several tutorials video.
Wondershare Filmora Video Editor
Filmora - No Watermark Video Editing Software
• Easily edit and export video files without watermark
• offers popular effects and filters for making your video professional
• Cross-platform supported - (Windows, Mac, iOS, Android)
Try Video Editor without Watermark Try Video Editor without Watermark Try Video Editor without Watermark Learn More >
5. VSDC
Compatibility: Windows
VSDC, an easy video editing software for windows, is a free video editing software, having an easy-to-learn powerful suite of features including audio editing and color correction. Although a paid version, pro, costs $19.99, having visual waveform, image stabilization and voice over support.
6. Machete Lite
Compatibility: Windows
Machete Lite is a free yet the simplest video editing software perfect for simple editing tasks. Only AVI and WMV files are supported in its free version. Its full version costs $19.95 having audio editing and more file type support, unlike the free version.
7. Avidemux
Compatibility: Windows, Mac, and Linux
Avoided is the simplest video editing software, perfect for beginners. It allows performing simple editing features like Encoding, simple cutting, and filtering with an easy-to-use interface.
8. Hitfilm Express
Compatibility: Windows and Mac
HitFilm Express is a free video editing software with features ranging from basic editing features like trimming, audio editing, and slicing to advance tools and features. Its free version supports over 180 special effects. There’s a built-in YouTube uploading.
Finding a Way to Edit Video for Free? Try This Out!
Filmora Video Editor brings you all the convenience of editing videos with handy functions. You can make your creative ideas into realize! More importantly, your edited video can export without a watermark!
Try It Free Try It Free Try It Free Learn More >
9. iMovie
Compatibility: Mac
If you are a beginner and searching for a good video editing software to get your hands clean on editing then iMovie editor is perfect for you. It is an easy video editing software for mac having an easy drag and drop interface. Features like Video trimming, split-screen, audio editing, pre-made transitions library, and 4K resolution support.
10. Openshot
Compatibility: Windows, Mac, and Linux
It is a free open source video editing software with an easy-to-use interface. Features like unlimited layers and tracks, time-mapping, real-time previews, trimming, snapping, clip resizing, curve-based keyframe animations etc. It offers more than enough features for free software.
11. Movie Maker
Compatibility: Windows
It is an easy video maker and editing software for beginners which can be downloaded from any third-party and use it to make and share high-quality movies.
12. Lumen5
Compatibility: Windows and Mac
It’s a perfect web-based video editing tool, best for Social Media promotion Campaigns with an easy drag-and-drop interface.
![]()
A cross-platform for making videos anywhere for all creators
Why your video editing isn’t good enough? How about some creative inspo?
- 100 Million+ Users
- 150+ Countries and Regions
- 4 Million+ Social Media Followers
- 5 Million+ Stock Media for Use
* Secure Download
13. Adobe Spark
Compatibility: Windows and Mac
Adobe Sparks is also a web-based easy video editor, similar to Lumen5. It offers an easy user interface but is a little restricted when it comes to offering a bank of images and footage to use.
14. Videopad
Compatibility: Windows
VideoPad is a simple video editing software for beginners, maybe not suitable for professional use. It has features like 3D Video Editing, Sound Effects and pre-made transitions Library, Reduce Camera Shakes and Multiple Resolutions export support.
15. Freemake
Compatibility: Windows
Freemake is a free video converter that is used to convert and alter videos that can modify and convert videos, embed videos to websites, and extract audio from video clips simply and fast. It supports above 500 video file formats and is compatible with multiple audio and image file formats for slideshows and video clip creation.
Basic Features You Need in an Easy Video Editing Software
A software having:
- Easy montage maker
- Easy video cutter
- Easy video joiner
- Compositing multiple elements together
- Color grading
- Motion tracking
- Stabilization
- Titles
- Background replacement
- Basic color correction
- Cross dissolves and fade-to-black transitions
- Audio crossfades
- Audio level adjustment using keyframes
- Auto synchronization of additional audio tracks
- Image position adjustment using keyframes
- Footage speed adjustments
- Basic color correction
- Footage bins for roughly organizing imported footage
Why Video Editing Matters Nowadays?
If videos aren’t a primary focus of your content marketing plan, the probability is it’s soon going to be certain! Every next production is turning into video-based content, be it content marketers or SEOs.
Around 50% of the content marketers are using Facebook and YouTube channels for the sake of video distribution since online activity spent on watching videos is 50%.
Moreover, by 2021, video is going to be projected to account for more than 80% out of all internet traffic.
Therefore, it has become a need to focus on video content if you are looking to grow the organic traffic of your publications.
Filmora Free Video Editor
Create AI-Generated Video with Filmora
Filmora Free video editor offers a ChatGPT plug-in and AI tools to enhance your creative vision. Make your idea into reality.
Try It Free Try It Free Try It Free Learn More >
Basic Video Editing Terms You Should Know
Below are some of the important yet basic terms that you should know related to videography in general and video editing in specific as well, whether you are a beginner or professional.
Aspect ratio:
The aspect ratio is the ratio of width and height of a video. Examples of the most used aspect ratios are: 4:3, 16:9, 1.85:1.
Refer to the image given below for a better understanding.
B-roll:
B-roll facilities one with the flexibility, when editing, to the video editing rules as it is an add-on picture that makes a previously incoherent scene seamless.
As shown in the image below, B-roll is used to insert which can make the transition easy to look on the eyes.
Bit rate:
Bit rate, also known as data rate, refers to the amount of data used for every second within the video. It is most commonly expressed in kilobits per second (kbps).
Close up:
Close-up refers to the shots that frame to subject tightly.
For instance, if it is a person, then the close-up covers solely his face.
Color temperature:
Color temperature refers to the light visibility in a shot. Color temperature is expressed in Kelvin. The scale of color temperature ranges from cool to warm.
Composition:
Composition entails the process of combining multiple footages using video editing software.
Compression:
Compression is the process of minimizing the quantity of data utilized in a video file. It helps make in the process of uploading and downloading quite faster. This also leaves you with ample space for more of your publications.
Crop factor:
Crop factor refers to a number that expresses the ratio of the imaging area of a sensor to a full-frame sensor. It typically ranges from 1.3 to 2.0.
Cut-in
Cut-in refers to showing a specific part of a subject in order to emphasize a certain aspect or emotion. For instance, hand gestures may show nervousness, enthusiasm, agitation, etc.
Foley:
Often times the original sound of the scene captured in the video is not captured as naturally as they were supposed to sound like in reality. Hence, Foley is when you reproduce those sounds for that video.
Frame rate:
Frame rate refers to the video capturing by a shutter in a second or shutter cycling rate through opening and closing. Some of the common frame rates are 24, 25, 29.97, 30, etc. The frame rate is expressed in frames per second (fps).
High definition media interface:
HDMI is the connectors that digitally transfer audio and HD video to a television. This is helpful if you intend to work on a bigger screen or wish to share some of your productions.
Resolution:
Resolution refers to the horizontal and vertical pixels of your video. For instance 640×480 for SD and 1280×720 for HD. Sometimes resolution refers only to the number of pixels that paper vertically. For example 480p, 720p, and 1080p respectively.
J-Cut:
J-cut refers to the editing technique in which the audio from a next scene is overlapped with the image from the previous scene, such that the audio segment of the next scene begins playing prior to its picture.
Jumpcut:
Jumpcut editing techniques refer to an abrupt transition between the two consecutive frames. The entity in the video containing jump cuts appears to jump along with the scene from one place to another. This looks disruptive to the audience.
L-Cut:
L-cut is exactly opposite to J-cut where the audio from the next scene overlays the image from the next scene to play the audio after an image has been displayed in the video.
Lower third:
As the name suggests, the lower third is derived from the rule of third which refers to the type of title, mostly used by vloggers, broadcasters, interviewers, and you tubers.
Memory bank:
You can understand the term by thinking of a memory box where we keep certain things as a memory of the events in someone’s life. Memory bank serves the same purpose through the use of video. It often uses natural sounds, document travel or merely store moments in routine life.
Press kit:
Press kit is used to provide information regarding your productions to the press for promotional purposes. Such information is often background including synopsis, crew, cast’s bios Q&A with the director, production stills and its reviews.
Shot list:
The shot list refers to the checklist related to the shots that a videographer plans to include in his/her content. This may help you save time and gear with efficient planning and handling. This gives a sense of direction to your production.
Storyboard:
A storyboard is a drawing to illustrate the scenes in the video. This gives a direct and organized way to visualize the needs for the shots or animation.
Sync:
Synchronization, aka sync, refers to the alignment of audio with video imaging.
Rule of thirds:
The rule of third is a grid that helps you to compose interesting and balanced shots to make your productions aesthetically pleasing. The grid is similar to a tic-tac-toe board since it segregates the picture into 9 segments. It helps bring points of interest to be aligned with the lines or intersection given in the grid.
Three-point lighting:
This helps one to diminish the shadows for image balancing and provides an appealing contrast. These three lights are commonly known as fill, key, and backlight.
Tilts:
Tilts refer to the vertical transitions that your camera. This is the opposite of pans.
Pans:
Pans refer to the horizontal movements of your camera. This is exactly contrary to tilts.
White balance:
White balance refers to the process where the unrealistic color casts are removed in order to render a white object to be actually white in your photo, and not have other tints.
Wide-angle:
A wide-angel lens refers to a short focal length of a lens. This brings more of a subject rather than a subject being captured by a normal lens at equal distances.
Non-linear editing:
NLEs is a non-destructive editing technique that allows one to access any frame in a video clip regardless of the sequence in the clip. It gives you the freedom to easily include effects, transitions, fades, etc. which cannot be achieved with linear editing
Pixel aspect ratio:
Pixels are several tiny squares that build up an image in a video. Whereas, aspect ratio refers to the ratio of width to height of a video. Hence, the pixel aspect ratio (PAR) is the ratio of width to height of the pixels.
Conclusion
Be it Instagram stories, YouTube product testimonials, or Facebook ads, using these easy-to-use video editing software will elevate your content into a professional and slick look.
So, I hope you are now ready to get started.
Lights, camera, action!
For Win 7 or later (64-bit)
Secure Download
For macOS 10.14 or later
Secure Download
Click here to get Filmora for PC by email
or Try Filmora App for mobile >>>
download filmora app for ios ](https://app.adjust.com/b0k9hf2%5F4bsu85t ) download filmora app for android ](https://app.adjust.com/b0k9hf2%5F4bsu85t )
Ollie Mattison
Ollie Mattison is a writer and a lover of all things video.
Follow @Ollie Mattison
Also read:
- Simplify Your Reaction Video Creation A Step-by-Step Guide with Filmora for 2024
- Updated Final Cut Pro Tutorial Adding Picture-in-Picture Overlays to Your Videos for 2024
- New In 2024, Make Animated Magic Happen Top Online Animation Tools Revealed
- Updated Expert Advice How to Choose the Perfect YouTube to MP3 Converter for 2024
- New The Ultimate Guide to Adobe Premiere Rush Alternatives (Updated 2023)
- Updated In 2024, Get Started with Videoleap on Your MacBook Today
- New WebM to MP3 Conversion Made Simple Top Tools for 2024
- New 2024 Approved 10 Best Video Editing Apps for Kids FREE & PAID
- New The Ultimate List of Video Editing Software for Mac
- In 2024, No Budget, No Problem Free Video Editing Software for Starters
- Updated Design and Send Top Video Invitation Apps for iOS & Android for 2024
- Updated From Confusion to Clarity The Only Facebook Video Aspect Ratio Guide You Need for 2024
- New 2024 Approved Cinematic Storytelling with Final Cut Pro X Tips and Tricks
- In 2024, Unlock Engagement The Ultimate Guide to Instagram Video Dimensions
- Updated In 2024, MP4 Video Tag Editor Reviews and Comparisons
- Updated Installing Videoleap on MacBook A Step-by-Step Guide for 2024
- Updated In 2024, Get the Best Picture Aspect Ratio Hacks for Amazon Prime Video
- Updated In 2024, The Ultimate Guide to Converting Files to M4R A Beginners Primer
- Updated 2024 Approved Elevate Your Storytelling Advanced Video Editing Techniques in Windows Movie Maker
- Updated In 2024, Android Essentials Must-Have Apps for Your Device
- New In 2024, Free Video Looper Tools for Endless Playback on Windows and Mac
- 2024 Approved Mavericks MP4 Video Editor Edit and Enhance Your Videos
- New In 2024, 10 Essential Apps for Creating Glitch Art Videos on iOS and Android
- New In 2024, Picture Perfect Finding the Right Aspect Ratio for Your Images
- New Expert-Approved Free Video Splitting Tools for 2024
- New If Youre a Looking for a Way to Quickly Convert a Video to VR, Youve Come to the Right Place because in This Article We Are Going to Take You Through 5 Best Video Converters for 2024
- New In 2024, Split, Merge, and Edit The Best Video Apps for iOS and Android
- Updated Trim and Edit Videos on Windows 10 The Best Free Options
- New 2024 Approved Unlocking Compressors Power in Final Cut Pro X
- New In 2024, One-Stop Video Editor Shop Best Solutions for Windows, Mac, Mobile, and Linux
- Updated In 2024, Elevate Your Video Editing Skills 6 Must-Know Adobe Premiere Tricks
- New Trim and Split Divx Videos with These Free Tools
- New Download Instagram Songs A Comprehensive Tutorial for 2024
- New 2024 Approved Final Cut Pro 2023 Reversing Video Clips Like a Pro
- New 2024 Approved Minitool Movie Maker In-Depth Review, Tutorial, and Top Alternatives
- Updated Best Online Lyrics Video Makers for 2024
- Speed Up or Slow Down Best Video Editing Software for 2024
- FRP Hijacker by Hagard Download and Bypass your Infinix Smart 8 FRP Locks
- Updated 2024 Approved How to Make an Adorable Video for Your Babys First Year
- In 2024, CatchEmAll Celebrate National Pokémon Day with Virtual Location On Motorola Edge 40 | Dr.fone
- How to identify missing or malfunctioning drivers with Windows Device Manager on Windows 10 & 7
- Updated What Are Differences Between 2D And 3D Animation
- Pokemon Go Error 12 Failed to Detect Location On Itel P55T? | Dr.fone
- In 2024, Want to Skip the Typing Hustle with a Convenient and Instant Conversion of Your Words Into Text? Stay Here to Learn About some Irresistible Software Solutions to Address the Concern
- Complete Guide For iPhone 14 Plus Lock Screen
- How to Rescue Lost Messages from Nokia 105 Classic
- Top 10 Best Spy Watches For your Samsung Galaxy A14 4G | Dr.fone
- 9 Solutions to Fix Samsung Galaxy S23+ System Crash Issue | Dr.fone
- Ways To Find Unlocking Codes For Huawei Nova Y91 Phones
- A Detailed VPNa Fake GPS Location Free Review On Nokia XR21 | Dr.fone
- 2 Ways to Transfer Text Messages from Samsung Galaxy S24 Ultra to iPhone 15/14/13/12/11/X/8/ | Dr.fone
- In 2024, How To Remove Phone Number From Your Apple ID on Your iPhone 8?
- How to Erase an Apple iPhone 11 without Apple ID?
- Top Picks Discover the Ultimate FLAC Conversion Tool for 2024
- Updated The Craziest 10 AI Editors Youve Seen for 2024
- Fix App Not Available in Your Country Play Store Problem on Honor Magic 6 | Dr.fone
- How to Spy on Text Messages from Computer & Apple iPhone SE (2022) | Dr.fone
- In 2024, 3 Effective Methods to Fake GPS location on Android For your OnePlus Open | Dr.fone
- Title: Updated Streamline Your Content How to Make Reaction Videos Quickly with Filmora for 2024
- Author: MdadeLe
- Created at : 2024-04-28 15:03:57
- Updated at : 2024-04-29 15:03:57
- Link: https://smart-video-editing.techidaily.com/updated-streamline-your-content-how-to-make-reaction-videos-quickly-with-filmora-for-2024/
- License: This work is licensed under CC BY-NC-SA 4.0.
