
:max_bytes(150000):strip_icc():format(webp)/001_the-best-kids-movies-on-disney-plus-june-2023-5112564-37245acf2e6840ba8319f0e13985e04a.jpg)
Updated Move Over WMM Discover the Best Free and Paid Video Editors for 2024
Move Over WMM: Discover the Best Free and Paid Video Editors
Windows Movie Maker has been a cornerstone tool for video editors for quite a while. There are a lot of amateurs who’ve made use of the free program and have done wonders with it. As it is discontinued, many Windows Movie Maker alternatives claim to offer ‘just the right video editing tool for you,’ few can live up to their promises—and most are very expensive.
We have ten other programs that can be used to create videos that include everything from Apple iMovie to other basic alternatives.
So whether you’re a beginner who wants to learn how to make a movie, a pro looking for an excellent alternative to Windows Movie Maker, or someone who wants to make a simple slide presentation or online video, you’re bound to find a video creation program here.
- Wondershare Filmora
- Avidemux Video Editor
- VirtualDub
- Sony Vegas Movie Studio
- WeVideo
- Lightworks
- ShotCut
- OpenShot
- Movavi Video Editor Plus
- VSDC Free Video Editor
- VideoPad Video Editor
- HitFilm
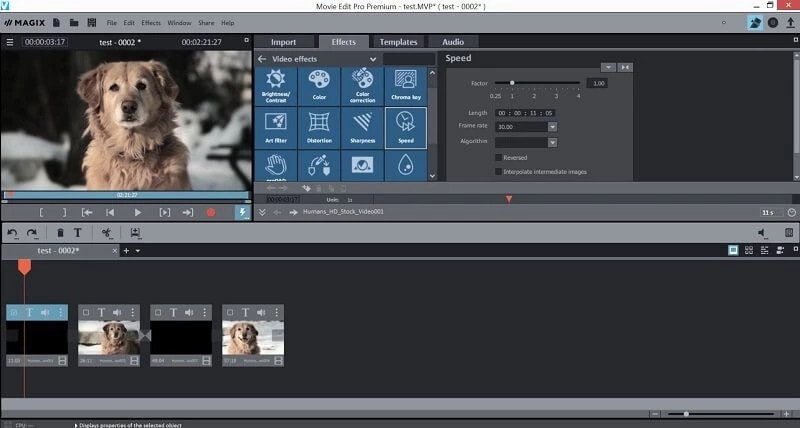
- Magix Movie Studio
- How To Edit a Video With a Windows Movie Maker Alternative
- Hot FAQs on Windows Movie Maker Alternatives
Part 1: Top 3 Picks for Windows Movie Maker Alternatives
The world’s best video editing software is about to change. We look at three of the most popular and valuable alternatives to Windows Movie Maker.
You will need to consider these alternatives to ensure they meet your expectations and needs.
1. Wondershare Filmora - Best Overall

Filmora is the best Windows Movie Maker Alternative designed according to your convenience.
Ratings: 4.4 Stars out 5
Starting from $49.99
2. Magix Movie Studio - Best for Collages
This alternative offers a variety of tools and plugins for anyone who wants to create professional-level videos in under a minute.
Download on Windows
Ratings: 4 stars out of 5
30-day free trials, then starts from $69.99 all the way to $129
3. Avidemux Video Editor - Best Open-Source Editor
An open-source editor that supports a wide range of formats is free! Avidemux has an interface similar to Windows Movie Maker, which makes it a perfect alternative.
Download on Windows
Ratings: 4.0 stars out of 5
Free Trial
Part 2: Ultimate Overview on 13 Best Alternatives to Windows Movie Maker
We live in visual culture, and we constantly see, capture, upload, and share videos on our smartphones, tablets, and laptops. So, it is only natural that more people seek ways to edit their videos. Windows Movie Maker was one of the most popular video editing apps. So it’s time to dig into the best Windows Movie Maker alternatives, which are arguably better and feature-rich.
| Software | OS | Media Resources | AI editing | Easy to Use | Free Trial |
|---|---|---|---|---|---|
| Wondershare Filmora | WindowsMacMobile | Yes | Yes | Yes | Yes |
| Avidemux | WindowsOS XLinuxBSD | Yes | No | Yes | Yes |
| Virtual Dub | Windows | No | No | Yes | Yes |
| Vegas Movie Studio | Windows | Yes | Yes | No | No |
| WeVideo | Online | Yes | No | Yes | Yes |
| Lightworks | LinuxOS X Windows | Yes | Yes | No | No |
| ShotCut | WindowsMacLinuxBSD | Yes | No | No | Yes |
| OpenShot | WindowsMacLinuxChrome OS | Yes | No | Yes | Yes |
| Movavi Plus | WindowsMac | Yes | No | Yes | Yes |
| VSDC | Windows | Yes | No | Yes | Yes |
| VideoPad | WindowsMaciPad/iPhone | Yes | No | Yes | Yes |
| HitFilm | WindowsMac | Yes | Yes | Yes | Yes |
| Magix Movie Studio | Windows | Yes | Yes | No | Yes |
Part 3: 13 Best Windows Movie Maker Alternatives for Windows
As we all know, Windows Movie Maker is the most used and trusted tool for creating videos in Windows. With its unique features and user-friendly interface, people often use this software to develop short and entertaining videos.
However, the fact is that Windows Movie Maker is not the current best video editing software for creating complex video projects. For this reason, we compiled a list of the 12 best alternatives to offer you a better option for Windows Movie Maker.
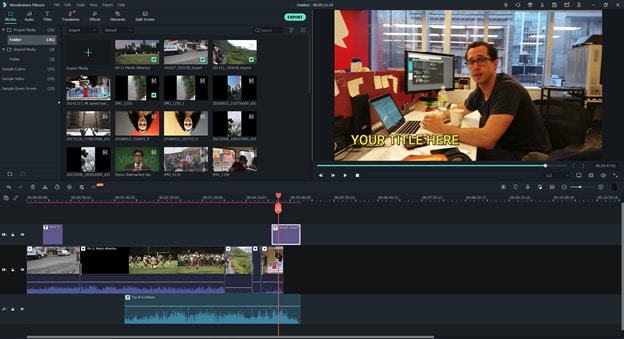
1. Wondershare Filmora
Filmora 11 is a powerful, easy-to-use video editor specially designed to streamline your workflow and save you hours weekly. It supports everything from Windows, Mac, and IOS to Android. The latest update to the flagship app includes several key enhancements that result in a much more efficient video creation workflow and one that’s easier to use than its rivals.
Key features
- Preset Templates
- Instant Mode
- Motion Tracking
- AI Editing Effects
- Auto Synchronization
- Plug-ins
Price
- Annual Plan: $49.99
- Perpetual Plan: $79.99
Pros
- Seamless interface for beginners
- Great customer support
- Plenty of effects and preset templates
- 4K video output options
Cons
- Rendering requires too much time
- The mobile app requires separate subscription
Supported OS: Windows , Mac , iOS , Android , iPad
G2 Ratings: 4.4 stars out of 5
Summary
Filmora’s intuitive interface allows experienced and brand-new users to create incredible videos with flawless special effects. Its high ratings and multiple supported formats make it quite popular among users.
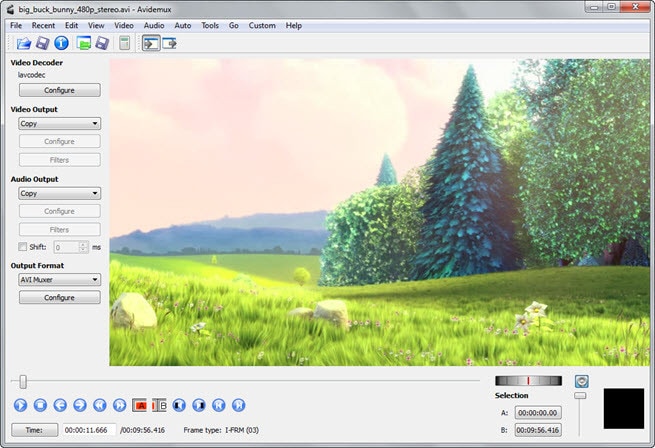
2. Avidemux Video Editor
If you are a beginner and want to use a free, open-source software program for basic video editing, then Avidemux is a good choice. The interface is not as fancy as it could be, but there are some presets that’ll save you a lot of time. Avidemux is a cross-platform video editor that allows you to create custom videos, but it doesn’t feature the ability to share the edited footage to social media directly,
Key features
- Video and Audio Filters
- Support Popular Formats
- Convert Video For Archiving or Publishing
Price: Free
Pros
- It can convert Video To A Smaller Size
- Easy cut, trim, split video
Cons
- Out-dated UI
- Lacks sharing option
Supported OS: Windows , OS X , Linux , BSD
Uptodown Ratings: 4.0 stars out of 5
Summary
An open-source video editor that supports most formats. Due to its obsolete UI and lack of sharing features, Avidemux has average ratings.
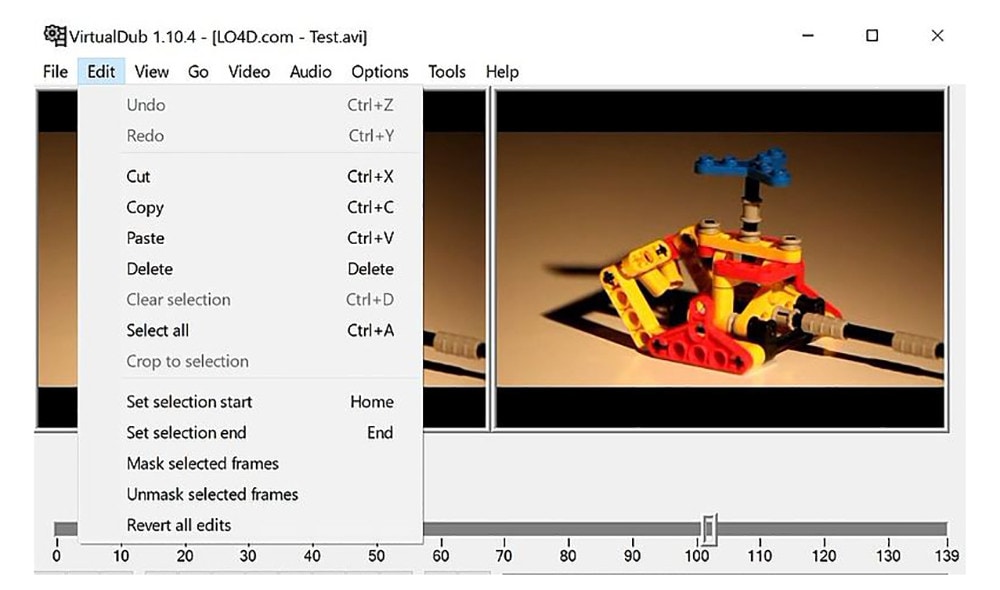
3. VirtualDub
This open-source software is user-friendly and allows users with little experience to navigate the software without much trouble. It supports 3rd party apps and also offers batch-processing, which means working on multiple videos simultaneously makes it possible.
Key features
- Integrated volume and histogram meter
- Optimized disk
- Noise reduction
- Fractional frame rates
Price: Free
Pros
- Clean interface, easy to use
- Keyboard and mouse shortcuts for faster operation
- Free to use
Cons
- Not suitable for 4K editing
- Lack learning material
- Obsolete Interface
Supported OS: Windows
Compare Camp Ratings: 4.0 stars out of 5
Summary
Virtual Dub supports multitasking, and its features are pretty helpful. However, it lacks 4k editing and a friendly interface. Overall Virtual Dub is a good choice.
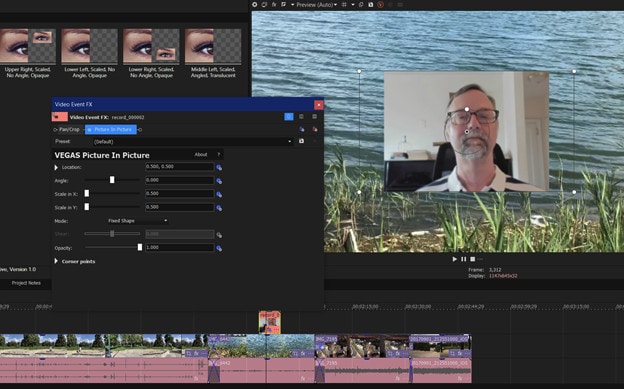
4. Sony Vegas Movie Studio
This video editing software makes it easy to create professional-looking videos in minimum time and effort. Vegas Movie Studio software is best for video editing professionals who have been doing it for some time and are looking for something a little more sophisticated than free alternatives. Not only does it has a high retail price, but its internal elements can be too complex for those just beginning.
Key features
- Color correction
- HDV and AVCHD-editing
- DV batch capture
- Wide variety of file formats and codecs
Price: Starting from $7.99 USD per month
Pros
- Customizable interface
- Multicam editing
- Lots of effects and transitions, with plug-in capability
- Good slow motion and warp flow transition tools
Cons
- Less intuitive interface than competitors
- Import from camcorder not ideal
- Some tools are complex
Supported OS: Windows
G2 Ratings: 4.4 out of 5
Summary
Vegas Movie Studio is the choice of professionals. It does all the work without taking up a lot of resources, and like most programs, there is a learning curve. It’s not always intuitive for beginners, but its professional and powerful features score decent in most reviews.
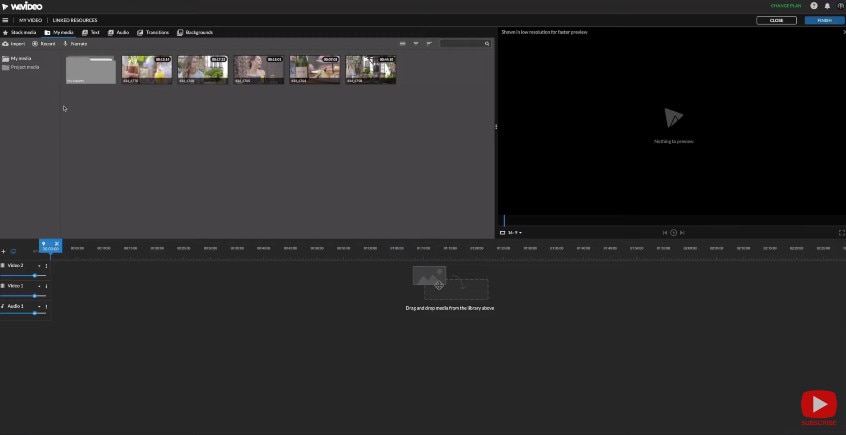
5. WeVideo
This cloud-based application is a simple-to-use video editing and sharing suite. WeVideo is a full-featured video editing application that uses JumpStart technology to create amazing videos. It’s an innovative app that offers a seamless editing experience as it supports multiple formats of video, images, audio, and graphics.
Key features
- WeVideo JumpStart
- Cloud storage
- Built-in graphics
- Customizable environment
- Advanced text editing
- Multi-track editing and storyboard
Price
- Free trial
- Power Plan: $9.99/month
- Unlimited Plan: $15.99/month
- Professional Plan: $39.99/month
- Business Plan: $73.99/month
Pros
- Constantly improving features
- Ease of use
- Storage is cloud-based
Cons
- Old fashion transition
- Leaves a watermark on free trial
Supported OS: Online
Trustpilot Ratings: 4 stars out of 5
Summary
WeVideo is a straightforward yet robust video editor. It offers a variety of features and supports multiple formats, plus its comprehensive pricing plan makes it useful for everyone.
6. Lightworks
Lightworks is the most powerful video editor in its class and an excellent tool for professionals who want to make amazing videos quickly. Lightworks is very fast and straightforward to use, and it has some great features you won’t find in any other video editor. It is available on all popular OS.

Key features
- Audio and Video Effect Plugin Support
- Cloud Connected
- Motion Graphics
- Advanced Metadata
- Proxy Workflows
- Apple ProRes decoding
Price
- Monthly Plan: $9.99/user
- Yearly Plan: $9.99/user
- Perpetual: $154.99
Pros
- High-resolution timeline rendering
- It has social media export templates
- Interfaces for multiple OS are consistent
- Instant autosave
Cons
- Commands are not always intuitive
- A bit pricey as compared to its competitors
Supported OS: Windows , Mac , Linux
Techradar Pro Ratings: 4 stars out of 5
Summary
Lightworks is not any other video editing tool available on the market of video editing tools. This video editing tool provides amateurs with the most sophisticated features in an optimized platform. Its scores are the highest on almost every review site.
7. ShotCut
Shotcut is a multiplatform video editor that lets you work with various formats for audio, video, image files, etc. This video editor makes it easy to mix and match the resolution and frame rates in a video file. All the changes you make in the editor can be undone and redone often. Shotcut is the best choice for video editing, without question.

Key features
- Webcam capture
- Audio scopes and filters
- Deinterlacing
- Eyedropper tool
- Video wipe transitions
- Keyframes for filter parameters
Price: Free
Pros
- Support for 4K resolutions
- Free
Cons
- Less intuitive than commercial apps
- Lacks built-in sharing to popular sites
Supported OS: Windows , Mac , Linux
GetApp Ratings: 4.5 out of 5 stars
Summary
Shotcut is an open-source video editor for creative professionals and is available on mac, Windows, and Linux. The free version of Shotcut has many excellent features, but it doesn’t have the slick interface or advanced techniques of the top paid editors.
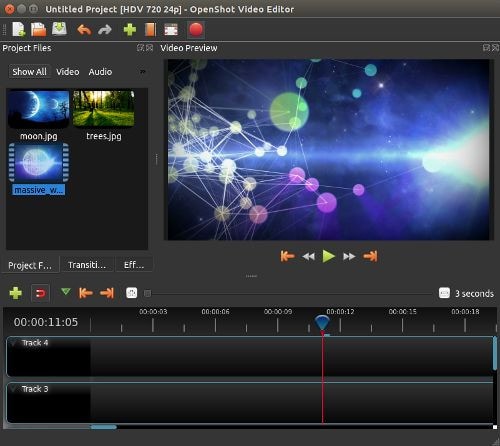
8. OpenShot
An award-winning open-source video editor that creates stunning videos. OpenShot is a fast, easy-to-use, and surprisingly powerful video editor. OpenShot Video Editor allows you to work with many different types of tracks so that your edits will seem natural. OpenShot Video Editor allows you to add your custom animations or titles. The options are endless, so it all depends on your time and interest. It is available in more than 70 languages, making it ideal for all types of users.
Key features
- 3D animations
- Animation and keyframes
- Multiple languages and formats
- Cross-platform
- Video-effects
Price: Free
Pros
- It is a non-linear editor with infinite tracks
- 100% free without watermark
- Frequent updates
Cons
- Obsolete interface
- Unstable performance
- Lacks some editing features
Supported OS: Window , Mac , Linux , Chrome OS
Getapp Ratings: 4.2 stars out of 5
Summary
Another open-source video-editor in the list is named OpenShot. It’s a multi-lingual and multi-supported app with unique features. Despite its unstable performance, OpenShot is still an ideal choice for many users.
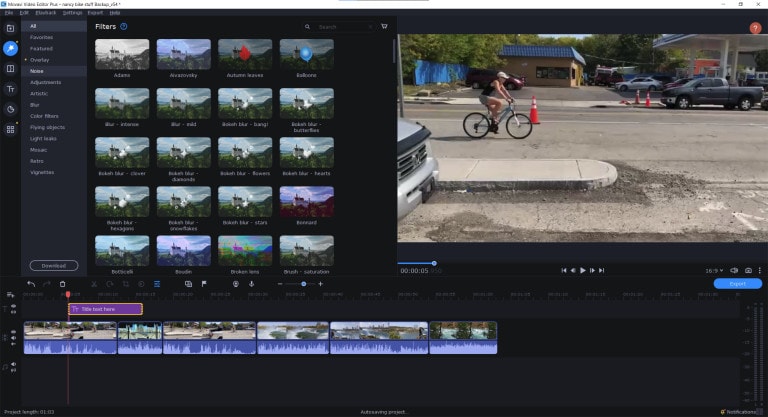
9. Movavi Video Editor Plus
Movavi Video Editor Plus is the perfect tool to bring your creative ideas to life. It has special effects, ready-made intros, and keyframe animation. Using chroma keying, you can change the background of your video clips to any color or pattern that suits your need. Movavi has now redesigned its user interface to make it easy to use.
Key features
- Effects and transitions
- Built-in media pack
- Fast processing of 4K videos
- Keyframe animation
- Automatic video creation
- Cutting, trimming, joining
Price
- Free version: 7 days
- Video Editor Plus 1 year /1 PC: $49.95
- Video Editor Plus Lifetime /1 PC: $69.95
- Video Suite Lifetime /1 PC: $89.95
Pros
- Easy-to-understand user interface
- Transitions with sound
- Motion tracking and picture-in-picture tools
- Chroma-key capability
- Quick movie-creation tool
Cons
- Lacks advanced trim modes
- Slow rendering
PCMag Ratings: 4.0 stars out of 5
Summary
If you want to edit your videos with a minimal learning curve, try Movavi. You get PiP, chroma-keying, titling, basic keying, and motion tracking. The program is simple to use but doesn’t have all the features and stands four stars.
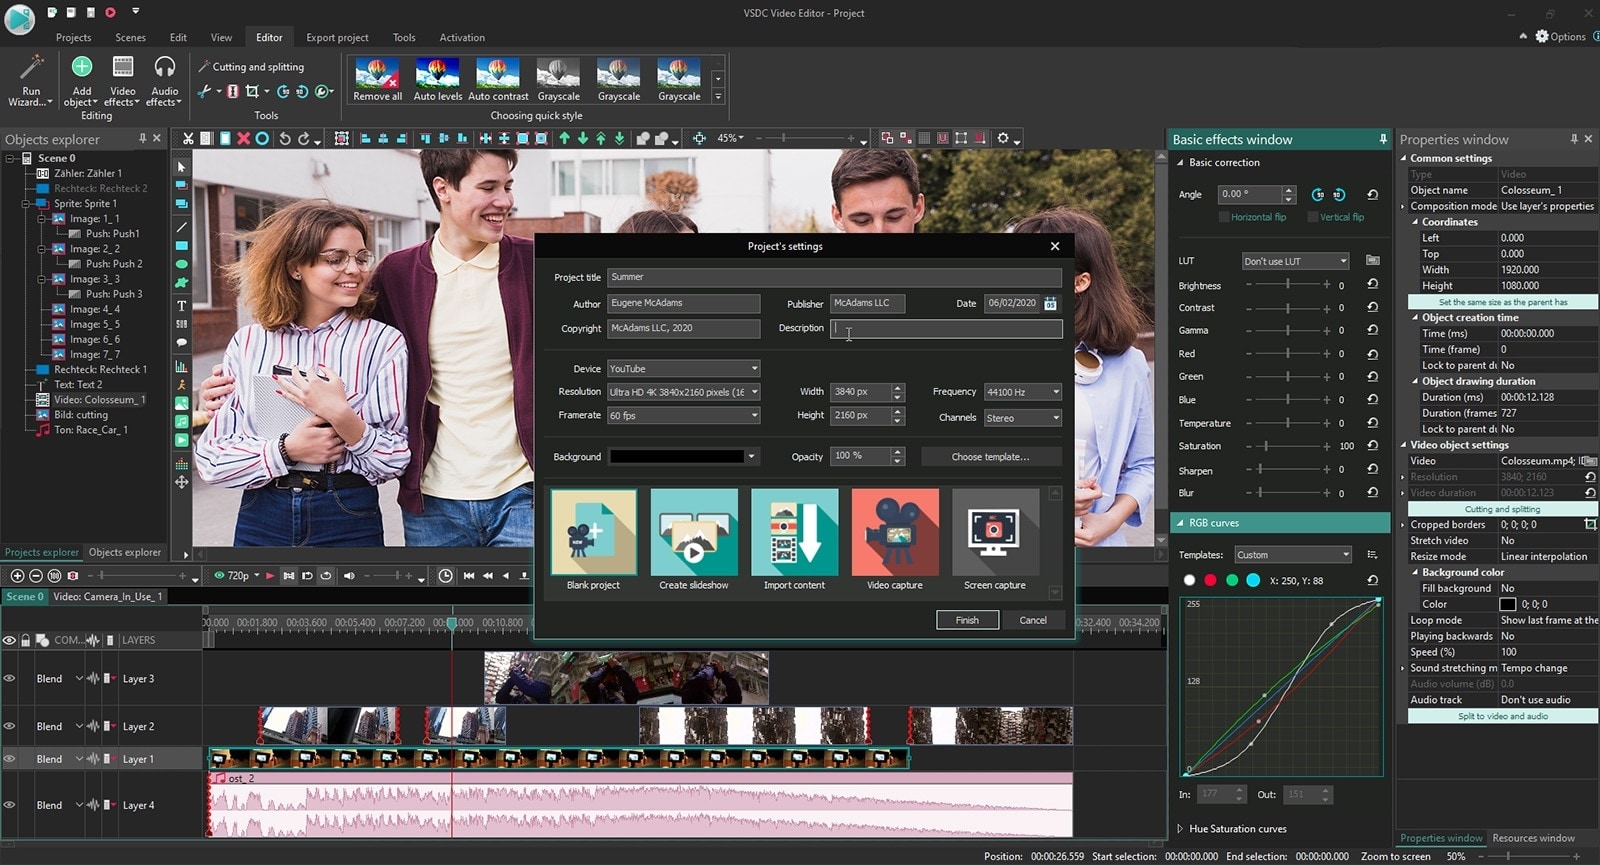
10. VSDC Free Video Editor
VSDC Free Video Editor is an online tool that lets you edit audio and video files to make your creations like movies, YouTube tutorial videos, and more. The audio and video files supported are extensive, and the software includes a codec manager. The Pro version isn’t necessary if you’re using the free edition of the software; it’s more than enough to get the job done.
Key features
- Dark theme
- Subpixel Accuracy
- Powerful Chroma Key tool
- Trendy video effects, filters, and transitions
- Color Blending And Filters
- Built-In DVD Burning Tool
Price: Free
Pros
- Non-linear
- Video effects library
- Video stabilization
- Masking
Cons
- Outdated interface
- Lack keyboard shortcuts
- Only available on Windows
Supported OS: Windows
Capterra Ratings: 4.5 stars out 5
Summary
VSDC is a non-linear editor with extensive format support. It includes all the essential features an editor requires but with an obsolete UI. It is also ideal for many who need a powerful yet free video editor.
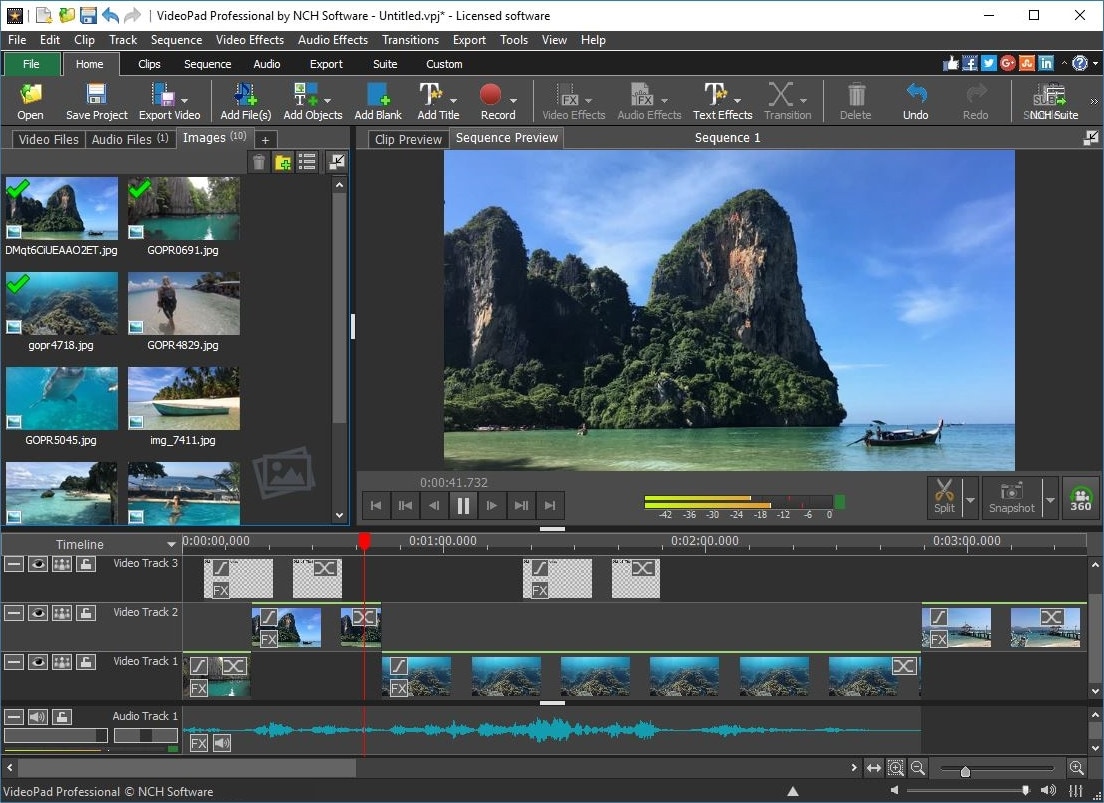
11. VideoPad Video Editor
VideoPad is a free video editor that can create stunning videos and perform basic editing tasks. A good video editor can help you to create videos for different social media platforms. You can make your videos look professional and polished with a few clicks and some simple editing skills. There’s nothing particularly exciting or advanced about this app; it’s simple enough for anyone new to video editing or even for seasoned editors. But the simple and easy-to-use interface makes the entire process very exciting.
Key features
- Text snippets
- Range of transitional effects
- Plug-ins Library
- Burn finished videos to Blu-Ray, DVD, etc.
- Color correction and light balance.
Price: Free
Pros
- Simple and clean interface
- Supports multiple file formats
- Includes video effects
- Lightweight on system resources
Cons
- Lack of advanced features
Supported OS: Windows , Mac , iPad/iPhone
Tom’s guide Ratings: 3.5 stars out of 5
Summary
Video pad is a free video editor designed for beginners that is lightweight and simple. VideoPad is also great for creating quick videos for social media purposes like Youtube and Facebook. The software has a high rating, as shown above, and it’s available on Windows.
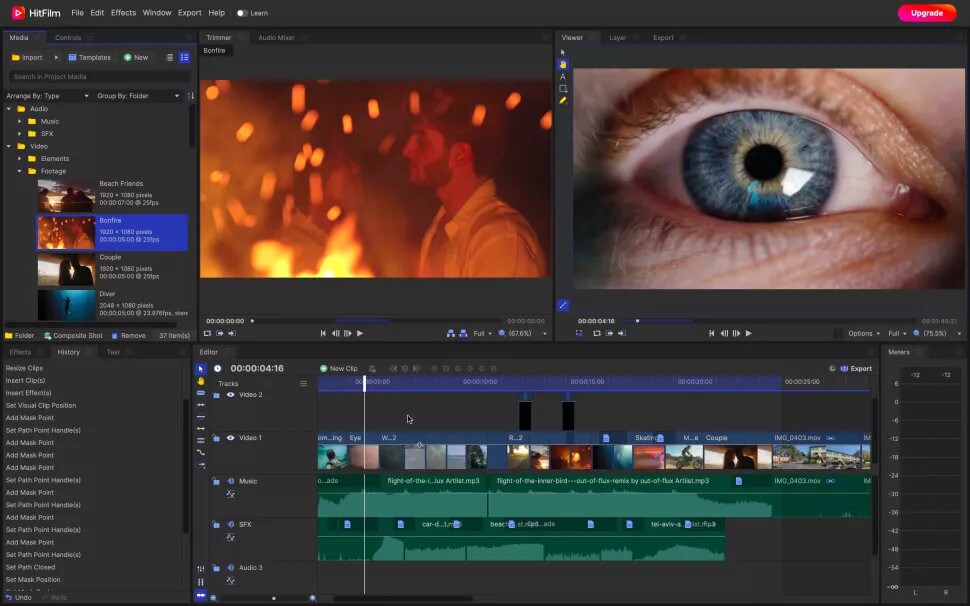
12. HitFilm
HitFilm is a helpful video editing software that makes editing easier for users. In addition to basic features, the program also provides advanced-level functions that make edited videos pop. Hitfilm Express Download has more than 400 features to help casual video editors save time. Features like: visual effects, cinematic elements, and compositing tools preset help unleash your creativity.
Key features
- Color Grading and correction
- Smart search
- Commentator recorder
- Lightning and lens flares
- 3D camera tracker
Price
- Free trial
- Creator: $7.50
- Pro: $12.50
- Enterprise: Custom pricing
Pros
- Intuitive interface
- It offers free tutorials and masterclasses
- Works on both Windows and Mac
Cons
- It requires heavy system requirements
TechRadar Ratings: 4.5 stars out of 5
Summary
HitFilm Express 15 is a powerful free video editing program that enables you to create high-quality videos in minutes with an intuitive interface. It offers advanced editing features such as advanced video trimming, 3D editing, and more.
13. Magix Movie Studio
Magix is the world’s leading professional audiovisual media software, with Sequoia being its industry-standard audio editing software. This movie editor is an enthusiast-level video editing software that competes with software from Adobe and CyberLink, and it even boasts support for 4K content and 360 degrees. There are many reasons to upgrade. This year’s update includes stabilization, 8K editing, motion tracking, and an in-app plug-in store.
Key features
- NewBlue effects
- Fly-in animation
- New filter view
- Stabilization
- Motion tracking
- 8k support
Price
- Movie Studio 2024: $69.99 (30-day free trial)
- Movie Studio 2024 Platinum: $99.99 (30-day free trial)
- Movie Studio 2024 Suite: $129.00 (30-day free trial)
Pros
- Lots of video effects
- Responsive editing interface
- Multicam
- Trailer-like movie templates
- Solid audio editing
Cons
- Slower project rendering than others
- Lacks import and organization tools
Supported OS: Windows
PCMag Ratings: 3 stars out of 5
Summary
Magix movie studio is a powerful all-around video editing tool with many features that professional users have come to expect. It’s also relatively simple to use. But usability and performance are poor compared to other software programs like Filmora .
Part 4: How To Edit a Video With a Windows Movie Maker Alternative
Windows Movie Maker was great for editing a video, but it’s no match for some of the best video editing software. We’re talking about software capable of creating a cinematic experience in seconds, all on your computer.
When you need to edit a video with simple, quick edits, like adding a special effect or changing the background, try Filmora . Filmora is an easy-to-use application that allows you to create a movie using simple tools that don’t require additional training. You can’t beat this option if you want to create a professional-quality video for your blog or website.
Let’s dive into a quick tutorial on editing videos in Filmora:
Free Download For Win 7 or later(64-bit)
Free Download For macOS 10.14 or later
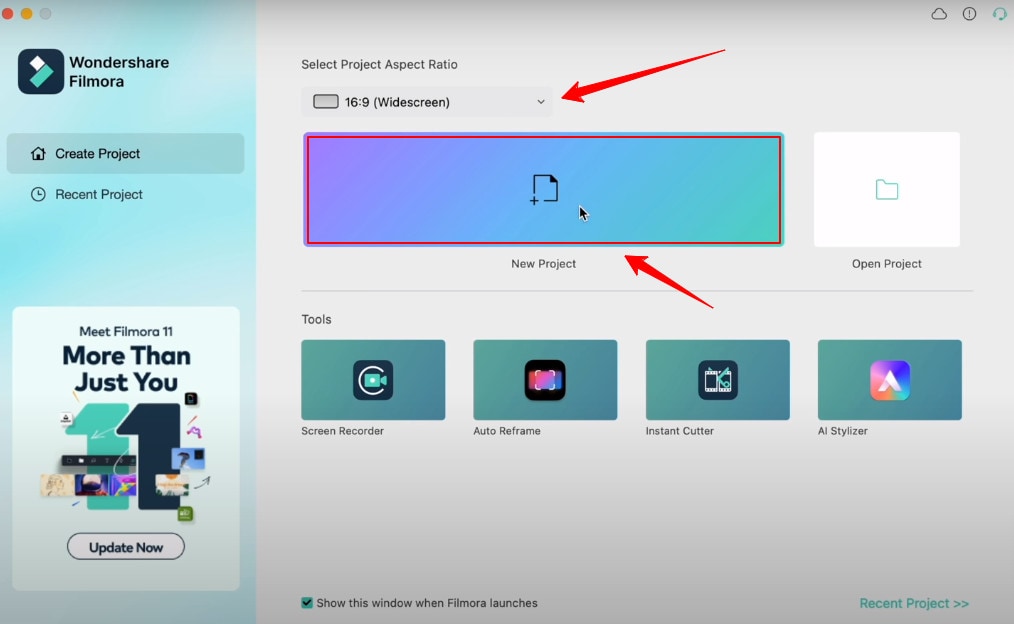
Step1 Open Wondershare Filmora on your PC or Mac
You can start a new project by clicking on ‘New Project’. And you can also change the ‘Aspect Ratio’ according to your project demand.
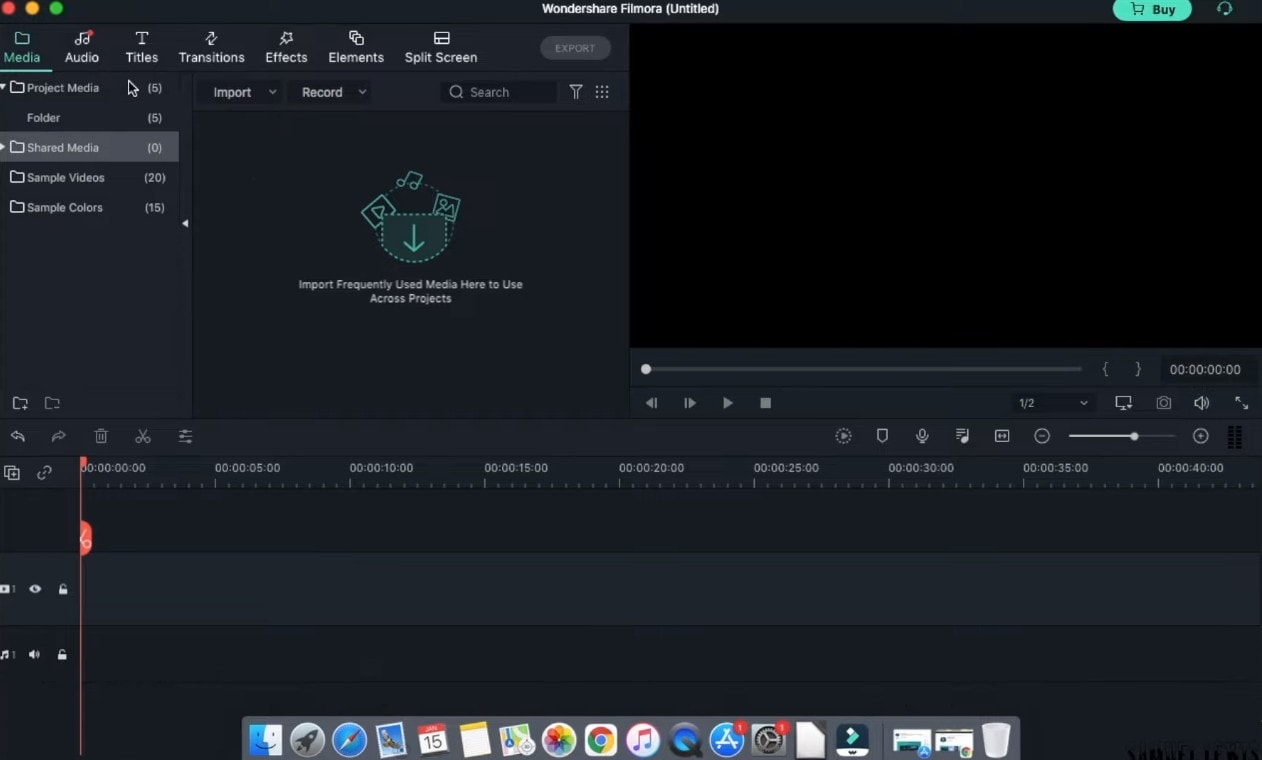
Step2 Import Videos
You can import your file by clicking the import tab on the upper-left side or clicking the import icon on the main window.
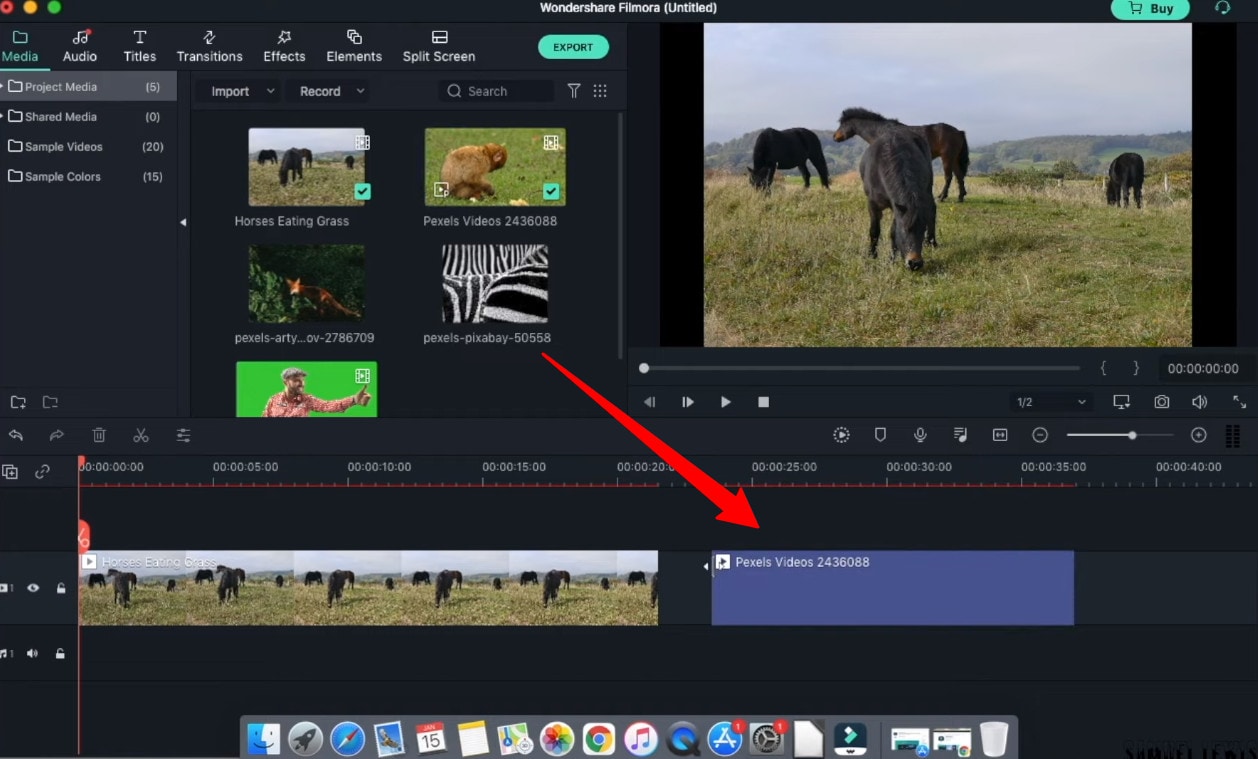
Step3 Drag and drop your footage to the timeline
After importing all the files, click and hold each individual video and drag and drop it to the timeline area according to your ideal sequence.
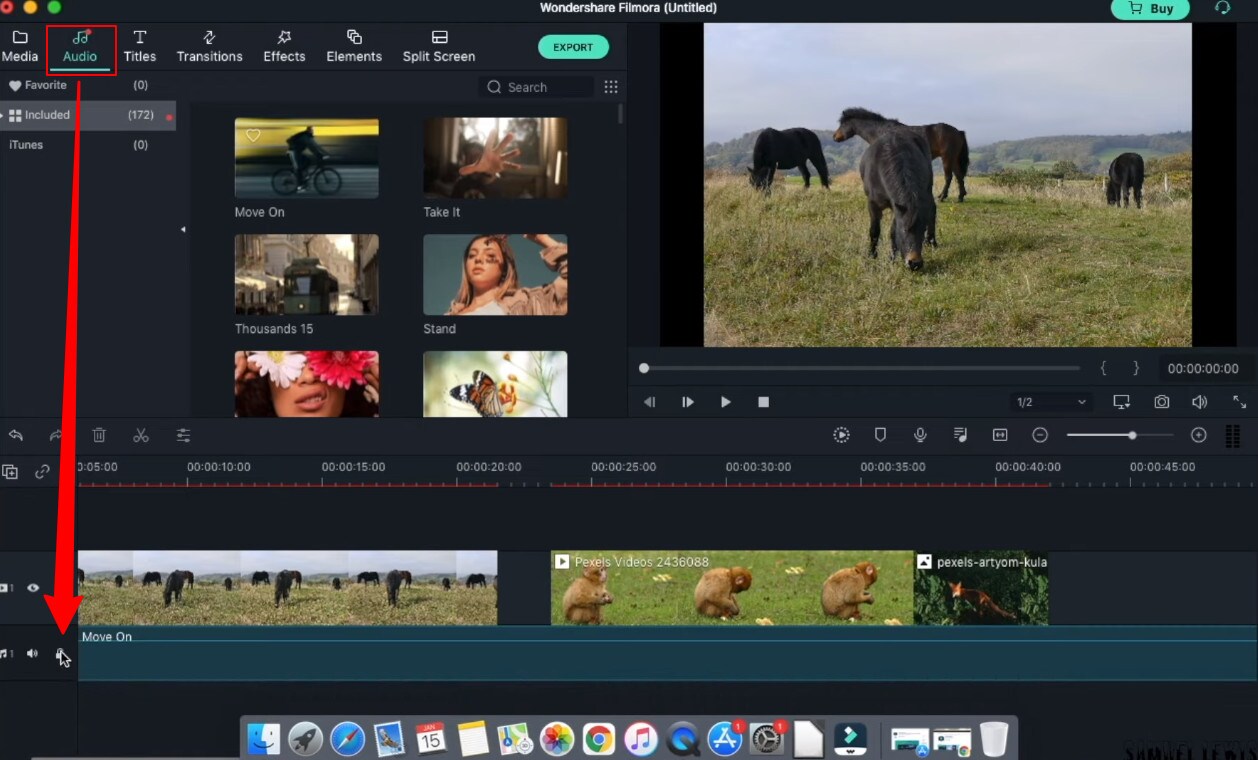
Step4 Add Audio
Go to the ‘Audio’ tab and select the audio file from the audio library. Once selected, drag and drop the audio file into the music timeline.
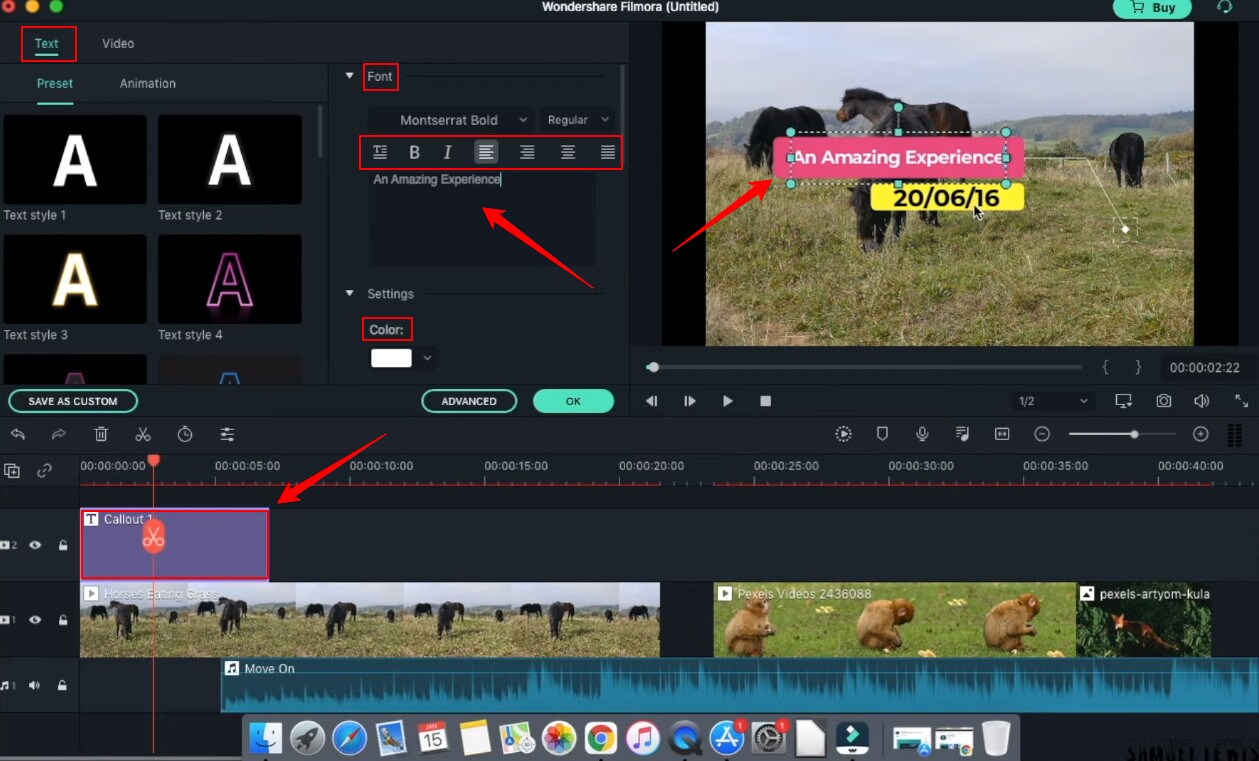
Step5 Add Titles
In your video intro, you can insert some title text. Go to the ‘Titles’ tab and select the one you like, and drag and drop it on top of the timeline. Double-click and edit the text and state your ideal statements. You can customize your text fonts and color too.
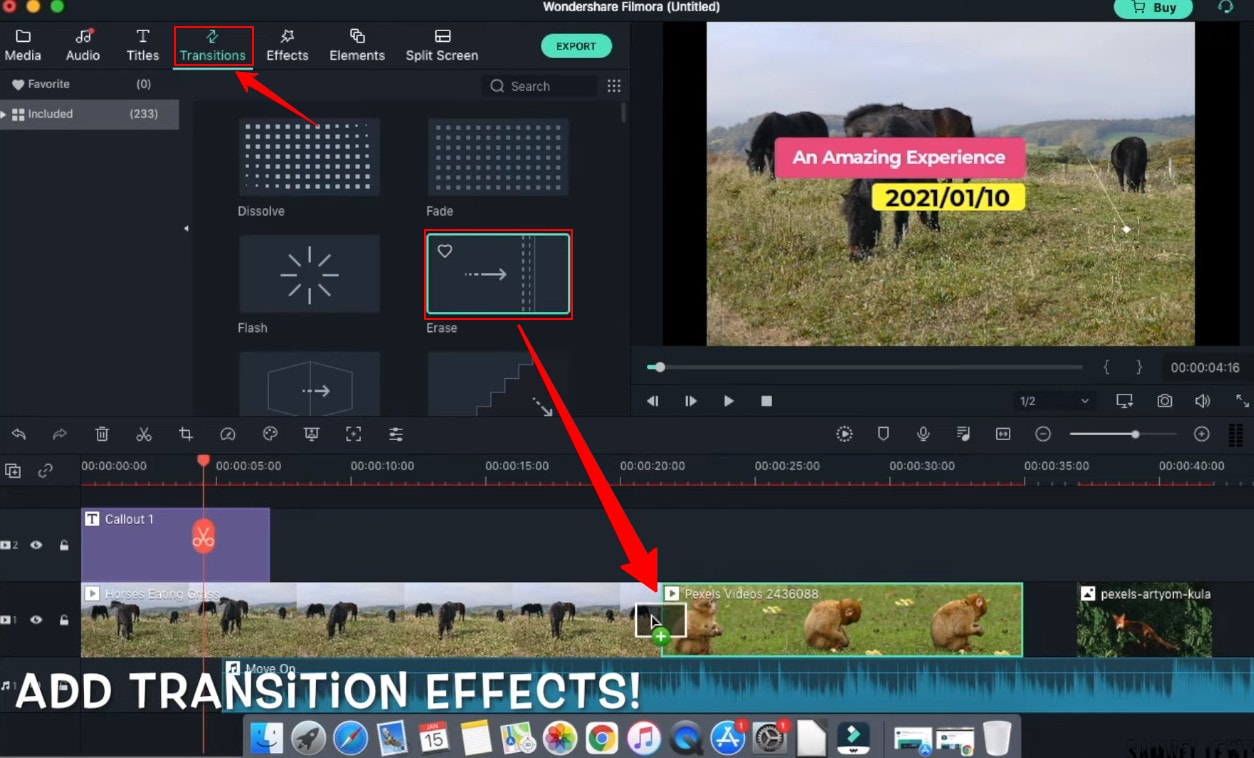
Step6 Add Transitions
You can add transition effects to ensure a smooth transition from one scene to another. The overall will get more professional look.
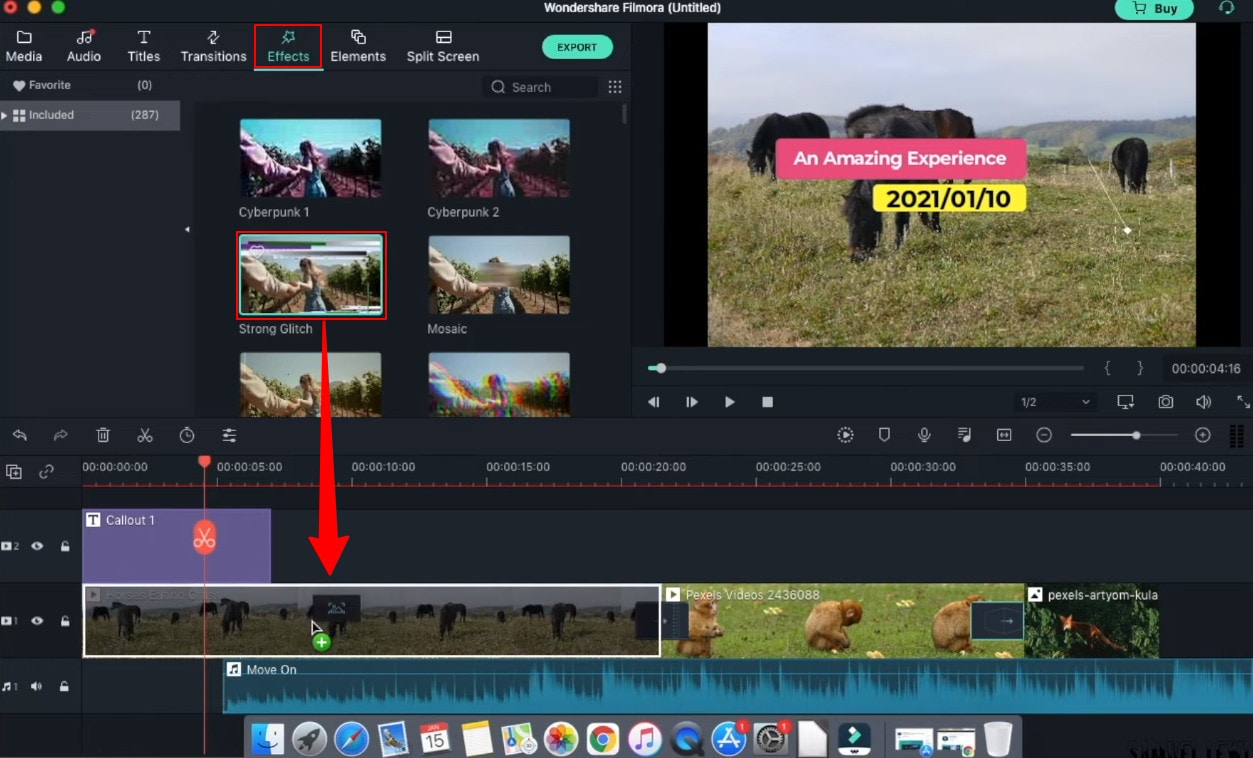
Step7 Add Effects
Next; you can get special effects to your video to make them more attractive and engaging to watch. Simple drag down the effect to your video and watch the effect take place in your selective scene.
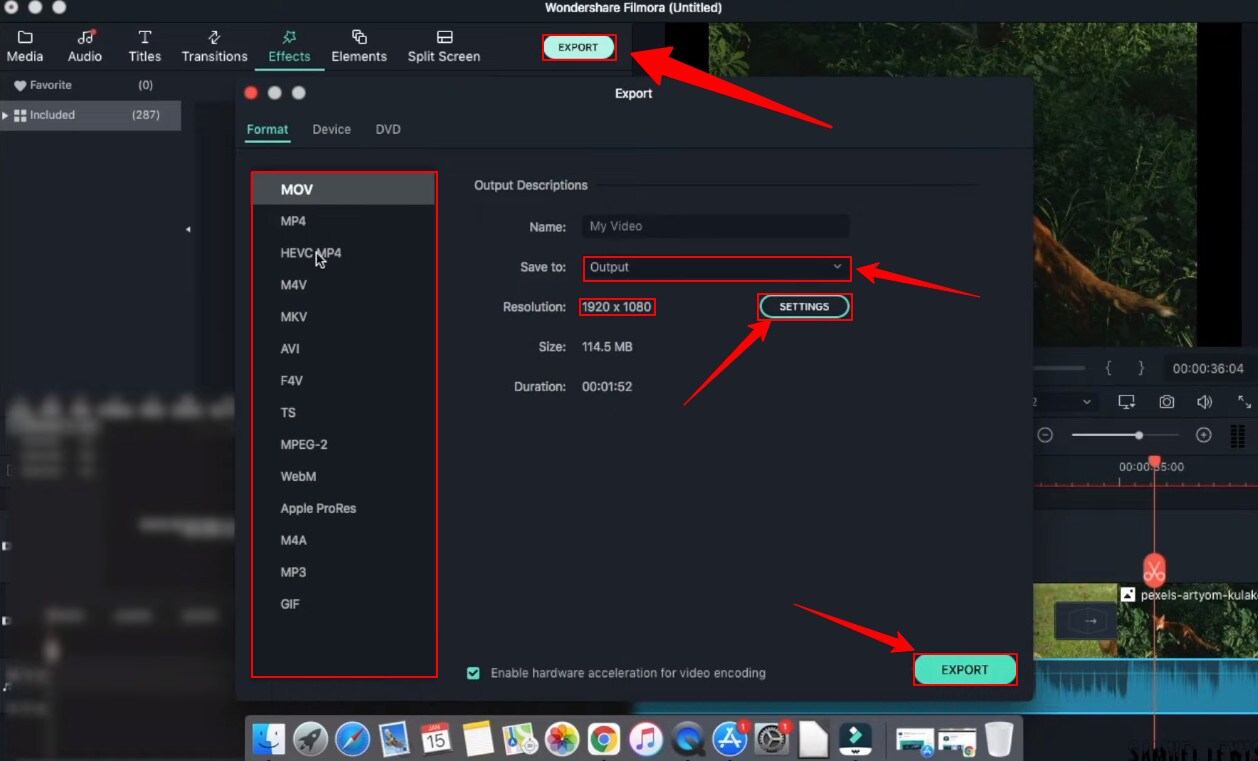
Step8 Export your work
Once all the changes have been made, hit ‘export’ from the top tab. A window will appear where you can change the settings, resolution, frame rate, bit rate, etc. Next, click the ‘export’ button down on that window, and then you can save the file in your drive.
Part 5: Hot FAQs on Windows Movie Maker Alternatives
1. Why is Windows Movie Maker discontinued?
Microsoft’s video editing program, Windows Movie Maker, did not become a big hit with the public because it failed to do well on the market. Microsoft couldn’t get the support they were looking for from the program’s users. As a result, Microsoft had to cease its support of the program.
2. Is there a free version of Windows Movie Maker?
Microsoft Windows Movie maker was always accessible and pre-installed every windows product. Microsoft has discontinued support for Movie Maker and warns about free downloads of Movie Maker provided by third parties that might contain malware, viruses, or other issues.
3. What are the best free Windows Movie Maker Alternatives for Mac?
After switching to a Mac, you’ll find that the Windows Movie Maker alternatives offer much more than just a simple video editor. They provide advanced features, easy transitions, and less technical know-how to create pro-quality results. You should try using these platforms on your Mac if you have a video to edit.
- Wondershare Filmora
- Movavi
- OpenShot
Final Words
Windows Movie Maker is an excellent Windows video editor application for Windows users. But in recent years, it has become outdated due to the continuous development of new technologies. There are many alternatives for Windows Movie Maker, and here we listed some of the best ones. Most of them are free and featured packs. Each program has its unique set of features and capabilities, and each one excels in different areas. Check them out and see what you think.
Free Download For Win 7 or later(64-bit)
Free Download For macOS 10.14 or later
Part 1: Top 3 Picks for Windows Movie Maker Alternatives
The world’s best video editing software is about to change. We look at three of the most popular and valuable alternatives to Windows Movie Maker.
You will need to consider these alternatives to ensure they meet your expectations and needs.
1. Wondershare Filmora - Best Overall
Filmora is the best Windows Movie Maker Alternative designed according to your convenience.
Ratings: 4.4 Stars out 5
Starting from $49.99
2. Magix Movie Studio - Best for Collages
This alternative offers a variety of tools and plugins for anyone who wants to create professional-level videos in under a minute.
Download on Windows
Ratings: 4 stars out of 5
30-day free trials, then starts from $69.99 all the way to $129
3. Avidemux Video Editor - Best Open-Source Editor
An open-source editor that supports a wide range of formats is free! Avidemux has an interface similar to Windows Movie Maker, which makes it a perfect alternative.
Download on Windows
Ratings: 4.0 stars out of 5
Free Trial
Part 2: Ultimate Overview on 13 Best Alternatives to Windows Movie Maker
We live in visual culture, and we constantly see, capture, upload, and share videos on our smartphones, tablets, and laptops. So, it is only natural that more people seek ways to edit their videos. Windows Movie Maker was one of the most popular video editing apps. So it’s time to dig into the best Windows Movie Maker alternatives, which are arguably better and feature-rich.
| Software | OS | Media Resources | AI editing | Easy to Use | Free Trial |
|---|---|---|---|---|---|
| Wondershare Filmora | WindowsMacMobile | Yes | Yes | Yes | Yes |
| Avidemux | WindowsOS XLinuxBSD | Yes | No | Yes | Yes |
| Virtual Dub | Windows | No | No | Yes | Yes |
| Vegas Movie Studio | Windows | Yes | Yes | No | No |
| WeVideo | Online | Yes | No | Yes | Yes |
| Lightworks | LinuxOS X Windows | Yes | Yes | No | No |
| ShotCut | WindowsMacLinuxBSD | Yes | No | No | Yes |
| OpenShot | WindowsMacLinuxChrome OS | Yes | No | Yes | Yes |
| Movavi Plus | WindowsMac | Yes | No | Yes | Yes |
| VSDC | Windows | Yes | No | Yes | Yes |
| VideoPad | WindowsMaciPad/iPhone | Yes | No | Yes | Yes |
| HitFilm | WindowsMac | Yes | Yes | Yes | Yes |
| Magix Movie Studio | Windows | Yes | Yes | No | Yes |
Part 3: 13 Best Windows Movie Maker Alternatives for Windows
As we all know, Windows Movie Maker is the most used and trusted tool for creating videos in Windows. With its unique features and user-friendly interface, people often use this software to develop short and entertaining videos.
However, the fact is that Windows Movie Maker is not the current best video editing software for creating complex video projects. For this reason, we compiled a list of the 12 best alternatives to offer you a better option for Windows Movie Maker.
1. Wondershare Filmora
Filmora 11 is a powerful, easy-to-use video editor specially designed to streamline your workflow and save you hours weekly. It supports everything from Windows, Mac, and IOS to Android. The latest update to the flagship app includes several key enhancements that result in a much more efficient video creation workflow and one that’s easier to use than its rivals.
Key features
- Preset Templates
- Instant Mode
- Motion Tracking
- AI Editing Effects
- Auto Synchronization
- Plug-ins
Price
- Annual Plan: $49.99
- Perpetual Plan: $79.99
Pros
- Seamless interface for beginners
- Great customer support
- Plenty of effects and preset templates
- 4K video output options
Cons
- Rendering requires too much time
- The mobile app requires separate subscription
Supported OS: Windows , Mac , iOS , Android , iPad
G2 Ratings: 4.4 stars out of 5
Summary
Filmora’s intuitive interface allows experienced and brand-new users to create incredible videos with flawless special effects. Its high ratings and multiple supported formats make it quite popular among users.
2. Avidemux Video Editor
If you are a beginner and want to use a free, open-source software program for basic video editing, then Avidemux is a good choice. The interface is not as fancy as it could be, but there are some presets that’ll save you a lot of time. Avidemux is a cross-platform video editor that allows you to create custom videos, but it doesn’t feature the ability to share the edited footage to social media directly,
Key features
- Video and Audio Filters
- Support Popular Formats
- Convert Video For Archiving or Publishing
Price: Free
Pros
- It can convert Video To A Smaller Size
- Easy cut, trim, split video
Cons
- Out-dated UI
- Lacks sharing option
Supported OS: Windows , OS X , Linux , BSD
Uptodown Ratings: 4.0 stars out of 5
Summary
An open-source video editor that supports most formats. Due to its obsolete UI and lack of sharing features, Avidemux has average ratings.
3. VirtualDub
This open-source software is user-friendly and allows users with little experience to navigate the software without much trouble. It supports 3rd party apps and also offers batch-processing, which means working on multiple videos simultaneously makes it possible.
Key features
- Integrated volume and histogram meter
- Optimized disk
- Noise reduction
- Fractional frame rates
Price: Free
Pros
- Clean interface, easy to use
- Keyboard and mouse shortcuts for faster operation
- Free to use
Cons
- Not suitable for 4K editing
- Lack learning material
- Obsolete Interface
Supported OS: Windows
Compare Camp Ratings: 4.0 stars out of 5
Summary
Virtual Dub supports multitasking, and its features are pretty helpful. However, it lacks 4k editing and a friendly interface. Overall Virtual Dub is a good choice.
4. Sony Vegas Movie Studio
This video editing software makes it easy to create professional-looking videos in minimum time and effort. Vegas Movie Studio software is best for video editing professionals who have been doing it for some time and are looking for something a little more sophisticated than free alternatives. Not only does it has a high retail price, but its internal elements can be too complex for those just beginning.
Key features
- Color correction
- HDV and AVCHD-editing
- DV batch capture
- Wide variety of file formats and codecs
Price: Starting from $7.99 USD per month
Pros
- Customizable interface
- Multicam editing
- Lots of effects and transitions, with plug-in capability
- Good slow motion and warp flow transition tools
Cons
- Less intuitive interface than competitors
- Import from camcorder not ideal
- Some tools are complex
Supported OS: Windows
G2 Ratings: 4.4 out of 5
Summary
Vegas Movie Studio is the choice of professionals. It does all the work without taking up a lot of resources, and like most programs, there is a learning curve. It’s not always intuitive for beginners, but its professional and powerful features score decent in most reviews.
5. WeVideo
This cloud-based application is a simple-to-use video editing and sharing suite. WeVideo is a full-featured video editing application that uses JumpStart technology to create amazing videos. It’s an innovative app that offers a seamless editing experience as it supports multiple formats of video, images, audio, and graphics.
Key features
- WeVideo JumpStart
- Cloud storage
- Built-in graphics
- Customizable environment
- Advanced text editing
- Multi-track editing and storyboard
Price
- Free trial
- Power Plan: $9.99/month
- Unlimited Plan: $15.99/month
- Professional Plan: $39.99/month
- Business Plan: $73.99/month
Pros
- Constantly improving features
- Ease of use
- Storage is cloud-based
Cons
- Old fashion transition
- Leaves a watermark on free trial
Supported OS: Online
Trustpilot Ratings: 4 stars out of 5
Summary
WeVideo is a straightforward yet robust video editor. It offers a variety of features and supports multiple formats, plus its comprehensive pricing plan makes it useful for everyone.
6. Lightworks
Lightworks is the most powerful video editor in its class and an excellent tool for professionals who want to make amazing videos quickly. Lightworks is very fast and straightforward to use, and it has some great features you won’t find in any other video editor. It is available on all popular OS.
Key features
- Audio and Video Effect Plugin Support
- Cloud Connected
- Motion Graphics
- Advanced Metadata
- Proxy Workflows
- Apple ProRes decoding
Price
- Monthly Plan: $9.99/user
- Yearly Plan: $9.99/user
- Perpetual: $154.99
Pros
- High-resolution timeline rendering
- It has social media export templates
- Interfaces for multiple OS are consistent
- Instant autosave
Cons
- Commands are not always intuitive
- A bit pricey as compared to its competitors
Supported OS: Windows , Mac , Linux
Techradar Pro Ratings: 4 stars out of 5
Summary
Lightworks is not any other video editing tool available on the market of video editing tools. This video editing tool provides amateurs with the most sophisticated features in an optimized platform. Its scores are the highest on almost every review site.
7. ShotCut
Shotcut is a multiplatform video editor that lets you work with various formats for audio, video, image files, etc. This video editor makes it easy to mix and match the resolution and frame rates in a video file. All the changes you make in the editor can be undone and redone often. Shotcut is the best choice for video editing, without question.
Key features
- Webcam capture
- Audio scopes and filters
- Deinterlacing
- Eyedropper tool
- Video wipe transitions
- Keyframes for filter parameters
Price: Free
Pros
- Support for 4K resolutions
- Free
Cons
- Less intuitive than commercial apps
- Lacks built-in sharing to popular sites
Supported OS: Windows , Mac , Linux
GetApp Ratings: 4.5 out of 5 stars
Summary
Shotcut is an open-source video editor for creative professionals and is available on mac, Windows, and Linux. The free version of Shotcut has many excellent features, but it doesn’t have the slick interface or advanced techniques of the top paid editors.
8. OpenShot
An award-winning open-source video editor that creates stunning videos. OpenShot is a fast, easy-to-use, and surprisingly powerful video editor. OpenShot Video Editor allows you to work with many different types of tracks so that your edits will seem natural. OpenShot Video Editor allows you to add your custom animations or titles. The options are endless, so it all depends on your time and interest. It is available in more than 70 languages, making it ideal for all types of users.
Key features
- 3D animations
- Animation and keyframes
- Multiple languages and formats
- Cross-platform
- Video-effects
Price: Free
Pros
- It is a non-linear editor with infinite tracks
- 100% free without watermark
- Frequent updates
Cons
- Obsolete interface
- Unstable performance
- Lacks some editing features
Supported OS: Window , Mac , Linux , Chrome OS
Getapp Ratings: 4.2 stars out of 5
Summary
Another open-source video-editor in the list is named OpenShot. It’s a multi-lingual and multi-supported app with unique features. Despite its unstable performance, OpenShot is still an ideal choice for many users.
9. Movavi Video Editor Plus
Movavi Video Editor Plus is the perfect tool to bring your creative ideas to life. It has special effects, ready-made intros, and keyframe animation. Using chroma keying, you can change the background of your video clips to any color or pattern that suits your need. Movavi has now redesigned its user interface to make it easy to use.
Key features
- Effects and transitions
- Built-in media pack
- Fast processing of 4K videos
- Keyframe animation
- Automatic video creation
- Cutting, trimming, joining
Price
- Free version: 7 days
- Video Editor Plus 1 year /1 PC: $49.95
- Video Editor Plus Lifetime /1 PC: $69.95
- Video Suite Lifetime /1 PC: $89.95
Pros
- Easy-to-understand user interface
- Transitions with sound
- Motion tracking and picture-in-picture tools
- Chroma-key capability
- Quick movie-creation tool
Cons
- Lacks advanced trim modes
- Slow rendering
PCMag Ratings: 4.0 stars out of 5
Summary
If you want to edit your videos with a minimal learning curve, try Movavi. You get PiP, chroma-keying, titling, basic keying, and motion tracking. The program is simple to use but doesn’t have all the features and stands four stars.
10. VSDC Free Video Editor
VSDC Free Video Editor is an online tool that lets you edit audio and video files to make your creations like movies, YouTube tutorial videos, and more. The audio and video files supported are extensive, and the software includes a codec manager. The Pro version isn’t necessary if you’re using the free edition of the software; it’s more than enough to get the job done.
Key features
- Dark theme
- Subpixel Accuracy
- Powerful Chroma Key tool
- Trendy video effects, filters, and transitions
- Color Blending And Filters
- Built-In DVD Burning Tool
Price: Free
Pros
- Non-linear
- Video effects library
- Video stabilization
- Masking
Cons
- Outdated interface
- Lack keyboard shortcuts
- Only available on Windows
Supported OS: Windows
Capterra Ratings: 4.5 stars out 5
Summary
VSDC is a non-linear editor with extensive format support. It includes all the essential features an editor requires but with an obsolete UI. It is also ideal for many who need a powerful yet free video editor.
11. VideoPad Video Editor
VideoPad is a free video editor that can create stunning videos and perform basic editing tasks. A good video editor can help you to create videos for different social media platforms. You can make your videos look professional and polished with a few clicks and some simple editing skills. There’s nothing particularly exciting or advanced about this app; it’s simple enough for anyone new to video editing or even for seasoned editors. But the simple and easy-to-use interface makes the entire process very exciting.
Key features
- Text snippets
- Range of transitional effects
- Plug-ins Library
- Burn finished videos to Blu-Ray, DVD, etc.
- Color correction and light balance.
Price: Free
Pros
- Simple and clean interface
- Supports multiple file formats
- Includes video effects
- Lightweight on system resources
Cons
- Lack of advanced features
Supported OS: Windows , Mac , iPad/iPhone
Tom’s guide Ratings: 3.5 stars out of 5
Summary
Video pad is a free video editor designed for beginners that is lightweight and simple. VideoPad is also great for creating quick videos for social media purposes like Youtube and Facebook. The software has a high rating, as shown above, and it’s available on Windows.
12. HitFilm
HitFilm is a helpful video editing software that makes editing easier for users. In addition to basic features, the program also provides advanced-level functions that make edited videos pop. Hitfilm Express Download has more than 400 features to help casual video editors save time. Features like: visual effects, cinematic elements, and compositing tools preset help unleash your creativity.
Key features
- Color Grading and correction
- Smart search
- Commentator recorder
- Lightning and lens flares
- 3D camera tracker
Price
- Free trial
- Creator: $7.50
- Pro: $12.50
- Enterprise: Custom pricing
Pros
- Intuitive interface
- It offers free tutorials and masterclasses
- Works on both Windows and Mac
Cons
- It requires heavy system requirements
TechRadar Ratings: 4.5 stars out of 5
Summary
HitFilm Express 15 is a powerful free video editing program that enables you to create high-quality videos in minutes with an intuitive interface. It offers advanced editing features such as advanced video trimming, 3D editing, and more.
13. Magix Movie Studio
Magix is the world’s leading professional audiovisual media software, with Sequoia being its industry-standard audio editing software. This movie editor is an enthusiast-level video editing software that competes with software from Adobe and CyberLink, and it even boasts support for 4K content and 360 degrees. There are many reasons to upgrade. This year’s update includes stabilization, 8K editing, motion tracking, and an in-app plug-in store.
Key features
- NewBlue effects
- Fly-in animation
- New filter view
- Stabilization
- Motion tracking
- 8k support
Price
- Movie Studio 2024: $69.99 (30-day free trial)
- Movie Studio 2024 Platinum: $99.99 (30-day free trial)
- Movie Studio 2024 Suite: $129.00 (30-day free trial)
Pros
- Lots of video effects
- Responsive editing interface
- Multicam
- Trailer-like movie templates
- Solid audio editing
Cons
- Slower project rendering than others
- Lacks import and organization tools
Supported OS: Windows
PCMag Ratings: 3 stars out of 5
Summary
Magix movie studio is a powerful all-around video editing tool with many features that professional users have come to expect. It’s also relatively simple to use. But usability and performance are poor compared to other software programs like Filmora .
Part 4: How To Edit a Video With a Windows Movie Maker Alternative
Windows Movie Maker was great for editing a video, but it’s no match for some of the best video editing software. We’re talking about software capable of creating a cinematic experience in seconds, all on your computer.
When you need to edit a video with simple, quick edits, like adding a special effect or changing the background, try Filmora . Filmora is an easy-to-use application that allows you to create a movie using simple tools that don’t require additional training. You can’t beat this option if you want to create a professional-quality video for your blog or website.
Let’s dive into a quick tutorial on editing videos in Filmora:
Free Download For Win 7 or later(64-bit)
Free Download For macOS 10.14 or later
Step1 Open Wondershare Filmora on your PC or Mac
You can start a new project by clicking on ‘New Project’. And you can also change the ‘Aspect Ratio’ according to your project demand.
Step2 Import Videos
You can import your file by clicking the import tab on the upper-left side or clicking the import icon on the main window.
Step3 Drag and drop your footage to the timeline
After importing all the files, click and hold each individual video and drag and drop it to the timeline area according to your ideal sequence.
Step4 Add Audio
Go to the ‘Audio’ tab and select the audio file from the audio library. Once selected, drag and drop the audio file into the music timeline.
Step5 Add Titles
In your video intro, you can insert some title text. Go to the ‘Titles’ tab and select the one you like, and drag and drop it on top of the timeline. Double-click and edit the text and state your ideal statements. You can customize your text fonts and color too.
Step6 Add Transitions
You can add transition effects to ensure a smooth transition from one scene to another. The overall will get more professional look.
Step7 Add Effects
Next; you can get special effects to your video to make them more attractive and engaging to watch. Simple drag down the effect to your video and watch the effect take place in your selective scene.
Step8 Export your work
Once all the changes have been made, hit ‘export’ from the top tab. A window will appear where you can change the settings, resolution, frame rate, bit rate, etc. Next, click the ‘export’ button down on that window, and then you can save the file in your drive.
Part 5: Hot FAQs on Windows Movie Maker Alternatives
1. Why is Windows Movie Maker discontinued?
Microsoft’s video editing program, Windows Movie Maker, did not become a big hit with the public because it failed to do well on the market. Microsoft couldn’t get the support they were looking for from the program’s users. As a result, Microsoft had to cease its support of the program.
2. Is there a free version of Windows Movie Maker?
Microsoft Windows Movie maker was always accessible and pre-installed every windows product. Microsoft has discontinued support for Movie Maker and warns about free downloads of Movie Maker provided by third parties that might contain malware, viruses, or other issues.
3. What are the best free Windows Movie Maker Alternatives for Mac?
After switching to a Mac, you’ll find that the Windows Movie Maker alternatives offer much more than just a simple video editor. They provide advanced features, easy transitions, and less technical know-how to create pro-quality results. You should try using these platforms on your Mac if you have a video to edit.
- Wondershare Filmora
- Movavi
- OpenShot
Final Words
Windows Movie Maker is an excellent Windows video editor application for Windows users. But in recent years, it has become outdated due to the continuous development of new technologies. There are many alternatives for Windows Movie Maker, and here we listed some of the best ones. Most of them are free and featured packs. Each program has its unique set of features and capabilities, and each one excels in different areas. Check them out and see what you think.
Free Download For Win 7 or later(64-bit)
Free Download For macOS 10.14 or later
The Art of Vertical Storytelling: Phone Aspect Ratio Best Practices
Best Practices for Creating Phone Aspect Ratio Vertical on Your Smartphone
An easy yet powerful editor
Numerous effects to choose from
Detailed tutorials provided by the official channel
When you’re taking a snapshot of someone or something and posting it to social media, you’ll need to decide if it’ll be a portrait or a landscape orientation. And that’s where the knowledge regarding the phone aspect ratio vertical comes in!

This post will dive into the rise of the phone aspect ratio vertical, including best practices on using phone ratio calculator and mobile vertical video size based on its final viewing platforms such as YouTube, Instagram, or broadcast.
In this article
01 [Why Vertical Videos Are in the Frame?](#Part 1)
02 [Different Aspect Ratios on Mobile Screens](#Part 2)
03 [Tips to Shoot a Vertical Video](#Part 3)
04 [Top 6 Practices for Creating Phone Aspect Ratio Vertical on Your Smartphone](#Part 4)
Part 1 Why Vertical Videos Are in the Frame?
Did you know that there are six aspect ratios in total for videos and photos that marketers and creators use? These aspect ratios are 9:16, 16:9, 1:1, 4:3, 3:2, 21:9. The first way to choose the right aspect ratio for your video is whether the video needs to be vertical or horizontal.
A video that’s portrait or vertical mode is taller than it is wide. The entire screen is devoted to vertical video capturing while gaining attention.
Smartphones are to be held vertically, and although you can view media always horizontally, it’s far simpler for watchers to consume media while keeping their mobile phones upright.
Vertical videos are available in different sizes, but the most standard instances come in the 9:16 aspect ratio. While the traditional format of watching videos on phones has been horizontal with an aspect ratio of 16:9, vertical videos are taller than more comprehensive, hence the reversed aspect ratio. And, this is the main reason you see vertical videos in the frame, and thus, they need to be fixed or rightly shot in terms of ideal phone aspect ratio vertical.
Part 2 Different Aspect Ratios on Mobile Screens
The aspect ratio also measures how tall or wide a display is. Still, it shouldn’t be mistaken for ‘display/screen size’ calculated by diagonally measuring throughout the screen.
The phone aspect ratio vertical is commonly written in proportions with the more petite figure on the right side and the more prominent figure on the left-hand side. It’s also sometimes called a decimal, the more prominent figure divided by, the more petite figure.
It means that a display aspect ratio of 16:9 can also be called an aspect ratio of 1.78, i.e., 16/9.
Types of Aspect ratio
● 16:9 Aspect Ratio
16:9 is one of the most common aspect ratios used on smartphones. Sometimes showcased as 1.78 or 4²:3², the aspect ratio has become typical for smartphones and other devices since 2010.
It generally means there will be 16 pixels in one direction for every 9 pixels in the other for a device with a 16:9 display.

Devices with a 16:9 aspect ratio are usually broad, and they became the standard aspect ratio for smartphones because most contents are also available in the exact format. So you would enjoy videos and gaming in full widescreen quality on a 16:9 aspect ratio device.
On the other hand, you’ll experience the “Letterboxing effect“ on devices that aren’t available in 16:9 aspect ratios and where black bars/bands appear at the bottom and the top of the content you are wandering.

● 18:9 Aspect ratio
This 18:9 aspect ratio was born out of the need to maximize the size of displays without increasing the dimensions of phone sizes.
The narrow design of 18:9 aspect ratio devices assisted for better one-hand grip, smooth multitasking, enhanced usability, and more screen real estate, etc. Yet, because contents are highly present in the 16:9 aspect ratio, there will be “black bands” at the top, bottom or to your display’s right or left.

The 18:9 aspect ratio allows for convenient usage of smartphones, provided we put the content-cropping and letterboxing aside.
● 19:9 Aspect ratio
19:9 is another smartphone aspect ratio that is becoming increasingly famous and used by top OEMs like Samsung, Huawei, ASUS, and Apple on their flagship devices.
The smartphones with a 19:9 aspect ratio are available with increased height and 19 pixels in single direction for every 9 pixels in the other. Similar to 18:9, devices with a 19:9 aspect ratio generally have pretty non-existent and slimmer bezels, but you’ll enjoy vast screen real estate with the latter.
Understanding iPhone Vertical Video Dimensions
Apple boasts a 16:9 screen for the versions of iPhone 5 onwards. Most Google/Android phones already had a 16:9 screen at that point. Thus, to export a vertical video, you would want it to be 9:16. (16:9 standing up!) and it’s the ideal size for iPhone vertical video dimensions.
The highest quality vertical video’s output is 720 Horizontal by 1280 vertical for 1080p (1080X1920).
The highest quality vertical video’s output is 576 horizontal by 1024 vertical for 720p (720X1280).
Vertical Phone Aspect Ratio for Video
Let’s now understand the mobile vertical video size! Vertical video is pretty higher than it is wide. Instead of being shown in a landscape orientation or widescreen format, the way video has traditionally intended for television and cinema and television, and the vertical video rotated by 90 degrees.

Hold your phone upright and record video in a 9:16 aspect ratio. Hence, the name vertical video is said to be!
It’s because if you horizontally hold your phone, the viewable screen area is 16:9 aspect ratio. The same standard is for most HDTV, video production, and cinema screen sizes.
Part 3 Tips to Shoot a Vertical Video
Besides using the photo ratio calculator, we’d like to enlist some tips on getting started with your phone aspect ratio vertical shooting.
1 – High production quality is not essential
Yes, the content is the king, and people or the end customers may not notice your video quality than the content. So, don’t be afraid when you start and move ahead with your DIY budget.
2 – Use the Ideal Dimensions
Whether it’s iPhone vertical video dimensions or other Android and Windows devices, you need to use the ideal dimensions already discussed above.
3 – Engage your audience better
You can incorporate little details within the video and engage your audience better. You can also add captions and burn them within the video.
4 – Optimize vertical videos
You can optimize vertical videos for viewing without sound. Try watching your videos without audio to see if they still make sense without that context. You likely won’t achieve the same excellent results made possible with good video marketing if they don’t.
5 – Capture Attention
Yes, you need to attract the audience and capture their attention within seconds. And, it’s the only or one of the best tricks t get your audience hooked for the long term. Don’t underestimate the significance of storytelling, and you can thus add them for creative looks.
Part 4 Top 6 Practices for Creating Phone Aspect Ratio Vertical on Your Smartphone
Are you looking to capture the video in the correct phone aspect ratio vertical? In this section, we will discuss a few helpful tips that will assist you in shooting a better vertical video in any condition you want to sort.
1 – Shoot in the desired or ideal aspect ratio
Any video bigger than the aspect ratio of 1:1 is vertical video.
It’s possible to create vertical videos two ways:
● By framing a camera in portrait mode.
● By rendering it vertically by scaling or cutting the video.
2 – Split the screen
You can use the tall height of the vertical frame to stack horizontal clips on top of each other creatively.
Clips can be related in appearance and content or appear to mend into one another. Various music videos have also used this technique.
You can also try merging various diagonal lines or clips for a unique look.
3 - Fill the vertical space
You can quickly fill vacant space in the frame automatically by getting closer to the subject.

When the camera is angled down and raised high, you automatically get a deep frame for filming long shots that fill space.
The above-the-head perspective provides an attractive and latest POV that serves the exact purpose.

4 - Try not to shake (or use a gimbal or a selfie stick)
While watching a video, jerking camera movements are almost always disturbing and distracting. This must be avoided quickly from side to side when creating vertical videos with minimized space on sides.
While a normal 360-degree or pan rotation is outstanding (and even crucial), cameras cannot manage the data amount they must process once they begin to move too quickly.
Slow down when in doubt!

5 - Remember to resize as per the platform
You don’t essentially have to shoot everything at eye level or arm’s length when you shoot videos vertically.
Changing your angles and shot length will assist make your videos more interactive, and you can create something compelling out of them within the video frame.
Screen recordings are usually horizontal, but they will be vertically viewed when you upload them to Instagram. They also make sure the edges did not get cut off while uploading them and the writing is still legible.
6 - Add graphics, fun text, GIFs, or stickers
Use text that complements visuals. Make sure your text isn’t highlighting your subject. Any graphics elements, such as stickers or emojis, should follow this exact approach.
Line them up where they’ll improve your video and scale them up as required.
Pro Tip: Use Wondershare Filmora Video Editor to get your desired phone aspect ratio vertical

Wondershare Filmora - Best Video Editor for Mac/Windows
5,481,435 people have downloaded it.
Build unique custom animations without breaking a sweat.
Focus on creating epic stories and leave the details to Filmora’s auto features.
Start a creative adventure with drag & drop effects and endless possibilities.
Filmora simplifies advanced features to save you time and effort.
Filmora cuts out repetition so you can move on to your next creative breakthrough.
Filmora provides various functions to resize your video, which means you can change video bitrate or directly crop your video when exporting. Despite resizing a video, you can also zoom your video to highlight the best section of your video. Here are certain features or functions of Filmora to resize a video. Download it now and have a try!
● Resize the video size and aspect ratio of video;
● Crop/trim/cut video to highlight an object within the video;
● Add multiple video effects
● Export the edited video portion to a mobile device, DVD, or YouTube;
● Supported OS: Mac OS X (above 10.10) and Windows (Windows 10 included).
Resize Video by Cropping
Step 1: Upload the video to the program
Firstly, upload your media via the “Import” tab or drag and drop it from the Windows File Explorer tab to the User’s Album.
Thereafter, drag videos from the User’s Album to the Timeline.

Step 2: Crop the video
You can aim at a specific part of the video by cropping and resizing your video display dimensions. Hit the added video on Timeline, a “Crop, and Zoom” button to cut the video. It will appear in the options menu.
Hit it to bring up the editing panel and crop videos.

Hit the Crop tab. Just hover the mouse to move and resize the marquee to decide how to crop the original video.
You have five options while video cropping at the bottom to assist you: Custom, 16:9, 4:3, 1:1, and 9:16 aspect radio.
Select Aspect Ratio of Project
After you launch Filmora, you can select the project aspect ratio. There are options among 16:9 (widescreen), 4:3 (standard), 9:16 (portrait), 1:1 (Instagram). Select the one you desire and begin by clicking the New Project.

Key Takeaways from This Episode
● Understanding phone aspect ratio vertical on both the Windows and iPhone.
● Different types of mobile vertical video sizes.
● Best six practices to shoot the video in the proper phone aspect ratio vertical.
When you’re taking a snapshot of someone or something and posting it to social media, you’ll need to decide if it’ll be a portrait or a landscape orientation. And that’s where the knowledge regarding the phone aspect ratio vertical comes in!
This post will dive into the rise of the phone aspect ratio vertical, including best practices on using phone ratio calculator and mobile vertical video size based on its final viewing platforms such as YouTube, Instagram, or broadcast.
In this article
01 [Why Vertical Videos Are in the Frame?](#Part 1)
02 [Different Aspect Ratios on Mobile Screens](#Part 2)
03 [Tips to Shoot a Vertical Video](#Part 3)
04 [Top 6 Practices for Creating Phone Aspect Ratio Vertical on Your Smartphone](#Part 4)
Part 1 Why Vertical Videos Are in the Frame?
Did you know that there are six aspect ratios in total for videos and photos that marketers and creators use? These aspect ratios are 9:16, 16:9, 1:1, 4:3, 3:2, 21:9. The first way to choose the right aspect ratio for your video is whether the video needs to be vertical or horizontal.
A video that’s portrait or vertical mode is taller than it is wide. The entire screen is devoted to vertical video capturing while gaining attention.
Smartphones are to be held vertically, and although you can view media always horizontally, it’s far simpler for watchers to consume media while keeping their mobile phones upright.
Vertical videos are available in different sizes, but the most standard instances come in the 9:16 aspect ratio. While the traditional format of watching videos on phones has been horizontal with an aspect ratio of 16:9, vertical videos are taller than more comprehensive, hence the reversed aspect ratio. And, this is the main reason you see vertical videos in the frame, and thus, they need to be fixed or rightly shot in terms of ideal phone aspect ratio vertical.
Part 2 Different Aspect Ratios on Mobile Screens
The aspect ratio also measures how tall or wide a display is. Still, it shouldn’t be mistaken for ‘display/screen size’ calculated by diagonally measuring throughout the screen.
The phone aspect ratio vertical is commonly written in proportions with the more petite figure on the right side and the more prominent figure on the left-hand side. It’s also sometimes called a decimal, the more prominent figure divided by, the more petite figure.
It means that a display aspect ratio of 16:9 can also be called an aspect ratio of 1.78, i.e., 16/9.
Types of Aspect ratio
● 16:9 Aspect Ratio
16:9 is one of the most common aspect ratios used on smartphones. Sometimes showcased as 1.78 or 4²:3², the aspect ratio has become typical for smartphones and other devices since 2010.
It generally means there will be 16 pixels in one direction for every 9 pixels in the other for a device with a 16:9 display.
Devices with a 16:9 aspect ratio are usually broad, and they became the standard aspect ratio for smartphones because most contents are also available in the exact format. So you would enjoy videos and gaming in full widescreen quality on a 16:9 aspect ratio device.
On the other hand, you’ll experience the “Letterboxing effect“ on devices that aren’t available in 16:9 aspect ratios and where black bars/bands appear at the bottom and the top of the content you are wandering.
● 18:9 Aspect ratio
This 18:9 aspect ratio was born out of the need to maximize the size of displays without increasing the dimensions of phone sizes.
The narrow design of 18:9 aspect ratio devices assisted for better one-hand grip, smooth multitasking, enhanced usability, and more screen real estate, etc. Yet, because contents are highly present in the 16:9 aspect ratio, there will be “black bands” at the top, bottom or to your display’s right or left.
The 18:9 aspect ratio allows for convenient usage of smartphones, provided we put the content-cropping and letterboxing aside.
● 19:9 Aspect ratio
19:9 is another smartphone aspect ratio that is becoming increasingly famous and used by top OEMs like Samsung, Huawei, ASUS, and Apple on their flagship devices.
The smartphones with a 19:9 aspect ratio are available with increased height and 19 pixels in single direction for every 9 pixels in the other. Similar to 18:9, devices with a 19:9 aspect ratio generally have pretty non-existent and slimmer bezels, but you’ll enjoy vast screen real estate with the latter.
Understanding iPhone Vertical Video Dimensions
Apple boasts a 16:9 screen for the versions of iPhone 5 onwards. Most Google/Android phones already had a 16:9 screen at that point. Thus, to export a vertical video, you would want it to be 9:16. (16:9 standing up!) and it’s the ideal size for iPhone vertical video dimensions.
The highest quality vertical video’s output is 720 Horizontal by 1280 vertical for 1080p (1080X1920).
The highest quality vertical video’s output is 576 horizontal by 1024 vertical for 720p (720X1280).
Vertical Phone Aspect Ratio for Video
Let’s now understand the mobile vertical video size! Vertical video is pretty higher than it is wide. Instead of being shown in a landscape orientation or widescreen format, the way video has traditionally intended for television and cinema and television, and the vertical video rotated by 90 degrees.
Hold your phone upright and record video in a 9:16 aspect ratio. Hence, the name vertical video is said to be!
It’s because if you horizontally hold your phone, the viewable screen area is 16:9 aspect ratio. The same standard is for most HDTV, video production, and cinema screen sizes.
Part 3 Tips to Shoot a Vertical Video
Besides using the photo ratio calculator, we’d like to enlist some tips on getting started with your phone aspect ratio vertical shooting.
1 – High production quality is not essential
Yes, the content is the king, and people or the end customers may not notice your video quality than the content. So, don’t be afraid when you start and move ahead with your DIY budget.
2 – Use the Ideal Dimensions
Whether it’s iPhone vertical video dimensions or other Android and Windows devices, you need to use the ideal dimensions already discussed above.
3 – Engage your audience better
You can incorporate little details within the video and engage your audience better. You can also add captions and burn them within the video.
4 – Optimize vertical videos
You can optimize vertical videos for viewing without sound. Try watching your videos without audio to see if they still make sense without that context. You likely won’t achieve the same excellent results made possible with good video marketing if they don’t.
5 – Capture Attention
Yes, you need to attract the audience and capture their attention within seconds. And, it’s the only or one of the best tricks t get your audience hooked for the long term. Don’t underestimate the significance of storytelling, and you can thus add them for creative looks.
Part 4 Top 6 Practices for Creating Phone Aspect Ratio Vertical on Your Smartphone
Are you looking to capture the video in the correct phone aspect ratio vertical? In this section, we will discuss a few helpful tips that will assist you in shooting a better vertical video in any condition you want to sort.
1 – Shoot in the desired or ideal aspect ratio
Any video bigger than the aspect ratio of 1:1 is vertical video.
It’s possible to create vertical videos two ways:
● By framing a camera in portrait mode.
● By rendering it vertically by scaling or cutting the video.
2 – Split the screen
You can use the tall height of the vertical frame to stack horizontal clips on top of each other creatively.
Clips can be related in appearance and content or appear to mend into one another. Various music videos have also used this technique.
You can also try merging various diagonal lines or clips for a unique look.
3 - Fill the vertical space
You can quickly fill vacant space in the frame automatically by getting closer to the subject.
When the camera is angled down and raised high, you automatically get a deep frame for filming long shots that fill space.
The above-the-head perspective provides an attractive and latest POV that serves the exact purpose.
4 - Try not to shake (or use a gimbal or a selfie stick)
While watching a video, jerking camera movements are almost always disturbing and distracting. This must be avoided quickly from side to side when creating vertical videos with minimized space on sides.
While a normal 360-degree or pan rotation is outstanding (and even crucial), cameras cannot manage the data amount they must process once they begin to move too quickly.
Slow down when in doubt!
5 - Remember to resize as per the platform
You don’t essentially have to shoot everything at eye level or arm’s length when you shoot videos vertically.
Changing your angles and shot length will assist make your videos more interactive, and you can create something compelling out of them within the video frame.
Screen recordings are usually horizontal, but they will be vertically viewed when you upload them to Instagram. They also make sure the edges did not get cut off while uploading them and the writing is still legible.
6 - Add graphics, fun text, GIFs, or stickers
Use text that complements visuals. Make sure your text isn’t highlighting your subject. Any graphics elements, such as stickers or emojis, should follow this exact approach.
Line them up where they’ll improve your video and scale them up as required.
Pro Tip: Use Wondershare Filmora Video Editor to get your desired phone aspect ratio vertical
Wondershare Filmora - Best Video Editor for Mac/Windows
5,481,435 people have downloaded it.
Build unique custom animations without breaking a sweat.
Focus on creating epic stories and leave the details to Filmora’s auto features.
Start a creative adventure with drag & drop effects and endless possibilities.
Filmora simplifies advanced features to save you time and effort.
Filmora cuts out repetition so you can move on to your next creative breakthrough.
Filmora provides various functions to resize your video, which means you can change video bitrate or directly crop your video when exporting. Despite resizing a video, you can also zoom your video to highlight the best section of your video. Here are certain features or functions of Filmora to resize a video. Download it now and have a try!
● Resize the video size and aspect ratio of video;
● Crop/trim/cut video to highlight an object within the video;
● Add multiple video effects
● Export the edited video portion to a mobile device, DVD, or YouTube;
● Supported OS: Mac OS X (above 10.10) and Windows (Windows 10 included).
Resize Video by Cropping
Step 1: Upload the video to the program
Firstly, upload your media via the “Import” tab or drag and drop it from the Windows File Explorer tab to the User’s Album.
Thereafter, drag videos from the User’s Album to the Timeline.
Step 2: Crop the video
You can aim at a specific part of the video by cropping and resizing your video display dimensions. Hit the added video on Timeline, a “Crop, and Zoom” button to cut the video. It will appear in the options menu.
Hit it to bring up the editing panel and crop videos.
Hit the Crop tab. Just hover the mouse to move and resize the marquee to decide how to crop the original video.
You have five options while video cropping at the bottom to assist you: Custom, 16:9, 4:3, 1:1, and 9:16 aspect radio.
Select Aspect Ratio of Project
After you launch Filmora, you can select the project aspect ratio. There are options among 16:9 (widescreen), 4:3 (standard), 9:16 (portrait), 1:1 (Instagram). Select the one you desire and begin by clicking the New Project.
Key Takeaways from This Episode
● Understanding phone aspect ratio vertical on both the Windows and iPhone.
● Different types of mobile vertical video sizes.
● Best six practices to shoot the video in the proper phone aspect ratio vertical.
The Ultimate Guide to Video Editing on Your Phone: IPhone and Android Apps
Today, editing videos and photos on the go has become easier than ever. With the wide range of mobile video editing apps available both in App Store and Google Play, it is now possible to create high-quality films right at your fingertips. Whether you are an amateur or a professional filmmaker, there are ample applications out there that will help you get creative with your videos. In this article, we discuss the top mobile video editing apps for both iPhone and Android users.
Top 10 Best Mobile Video Editors for iPhone and Android in 2022
There are several video editing apps available for both Android and iOS. Make sure to check them out from the below section.
1. Wondershare Filmora
Wondershare Filmora is an easy-to-use video editor for creating amazing videos with just a few taps. Designed for users of all skill levels, it allows individuals to add creative touches quickly and easily like titles, transitions, and effects to personalize their movies. It features fun templates so that even those without any video editing experience can make cool videos that look like professionals created them.
Filmora also has tons of essential tools for adjusting your video clips or combining multiple images into one movie file. It enables users to crop, cut or trim their clips while adding SFX, special filters such as reverse motion or time lapse and blending multiple audio recordings together. Whether you are a novice in the world of videography, or an experienced designer wanting to share powerful stories on-the-go – Wondershare Filmora has all the tools needed to create beautiful memories that will last a lifetime.
Key Features:
- Get access to a wide range of templates for quicker video creation
- Compatible with various languages such as Spanish, Japanese, and French
- Templates for social media networks such as YouTube and Instagram are available as presets
- Can add music or sound effects from your computer or the app’s library
- Available for both iOS and Android
- Price: Free, Weekly plan - $1.99, Monthly plan - $6.99, Annual plan - $32.99
2. InShot
InShot is a creative and powerful video editing app that has been available on mobile and tablet devices since the early 2000s. It offers advanced features like transitions, filters, music, and text options, as well as more basic functions like trimming, cutting and rotating videos. What makes InShot stand out from other similar apps is it’s easy to use interface which makes it ideal for users of all experience levels, from beginners to advanced editors.
Another great feature about InShot is support for multiple file formats including MP4s, JPGs and even GIFs. This means you can easily share the results of your work in the form that best suits the platform or project you are sharing it with. Furthermore, editing doesn’t require any compression or another type of coding which makes producing a quality video quick and simple.
Key Features:
- Video Trimming and Merging: You can quickly adjust the length of your videos by cutting or merging parts of it.
- Music Library: Choose from hundreds of preloaded royalty-free music and sound effects to enhance your creations.
- Text and Stickers: Make your videos unique with stylish text formats and stickers available in the InShot library.
- Filters and Effects: Experiment with advanced color filters and lens flare effects to give your projects a professional touch from home!
- Speed Control: Slow down or speed up any part of your video for awesome presentation effects!
- Export Options: Once you’ve finished your project, hit the export button for quick results and an impressive final product with 720p HD quality!
- Available for both Android and iOS
- Price: Free, Monthly plan - $3.99, Annual plan - $14.99, Lifetime access - $34.99
3. CapCut
Thanks to its ShortCut feature, this well-designed free video editing app makes producing shareable videos a breeze. CapCut allows you to select clips and photographs, and the software will automatically add background music and effects.
Trimming and resizing clips, inserting text, and modifying sharpness and brightness are all possible with CapCut’s full editing suite, which includes various tools. Furthermore, all of the features of ShortCut, including templates and imported sounds, are carried over to this version. You even get effects, filters, frames, and stickers similar to those seen on TikTok.
Set the resolution and frame rate before exporting your movie. CapCut then estimates the file size. CapCut supports 4K and 60 fps.
Key Features:
- Create unique video content with animation effects
- CapCut allows users to edit their videos in multiple viewports for efficient multitasking.
- Providing intuitive controls that use visual cues so even beginners can navigate the app easily.
- The Mixer mode lets you create polished audio tracks with various sound options all at the same time!
- The text tool within CapCut makes adding captions and subtitles easier than ever before.
- CapCut lets you share your masterpiece directly onto popular social media channels like Facebook and Instagram
- Price: Free
Find out the details about how to edit videos on CapCut.
4. Apple iMovie
Apple’s iMovie is one of the best free video editing tools for iOS . It is pre-installed on all Apple devices and is entirely free to use and download. iMovie doesn’t give you much room to edit, but it has enough functionality to turn your basic recording into a masterpiece.
An iMovie template is a great way to add your company logo and credits to your videos. Furthermore, you can add different themes, filters, and a few sound effects and music to your movies to make them more interesting. It supports 4K video and, as one might expect, connects seamlessly with the rest of the Apple ecosystem. Examples include the ability to stream editing clips from your iCloud storage to an Apple TV.
Key Features:
- The green screen technology to make it look like your cast is on location anywhere in the world
- Adjust the depth of field or add/remove focus points in Cinematic Mode-recorded video clips
- The app also allows you to adjust playback speed and adjust pitch as needed for unique sound effects or slow motion videos
- Create stunning visuals by applying various filters such as Sepia or Solarize and overlay cinematic titles onto your clips
- Available for iOS user
- Price: Free
5. Adobe Premiere Rush
Adobe Premiere Rush is a portable or mobile version of Adobe Premiere Pro, one of the most powerful and effective editing tools on the market today. It’s a cross-platform video editor for iOS and Android with a built-in camera for making pro-quality videos on mobile devices.
It is equipped with multi-track timeline editing and cloud sync capabilities that appeal to professional film creators. Motion graphics and auto-ducking effects are included in addition to the standard editing features. In contrast to other services, it restricts free exporting, rendering, and sharing to a maximum of three videos. Adobe Premiere Rush is a cross-platform app. If you left a document unfinished on macOS, you could continue editing on an iOS device. Color correction, animations, and voice-overs are just a few of the UI’s features.
Key Features:
- Add in a lot of stickers and overlays
- Auto-ducking and other audio tools are available
- Crop, trim and flip the videos
- Sharing to Instagram, Facebook, and TikTok in one click with preset aspect ratios is possible
- Available for both iOS and Android
- Price: Free, Monthly plan - $4.99, Annual plan - $29.99
Find out more details about how to use Adobe Premiere Rush.
6. KineMaster
KineMaster is another powerful Android video editor with a slew of useful tools and is easy to use. It has an innovative editing interface that offers a circular media panel on the right side of the screen. Aside from the camera, you’ll be able to import material from other sources and record a voice-over in the panel.
You’ll have opacity, color filters, keyframes, and chroma keys at your disposal when editing. Various effects like Gaussian Blur are pre-installed in KineMaster, but you can always visit the KineMaster marketplace for more similar effects. Although KineMaster supports 4K, only paid users can export videos in that resolution. Free users can export videos with a KineMaster watermark.
Key Features:
- Library of a wide range of transition, animation, and effects
- Add audio, photos, effects, stickers, and text to your videos
- Customize effects with speed control, reversing, and blending modes
- Post videos directly to YouTube, Instagram, and Facebook
- Available for both iOS and Android
- Price: Free, Monthly plan - $4.99, Annual plan - $39.99
7. LamaFusion
Lumafusion is a fantastic software for iPhone and iPad users that brings a desktop-style editing user interface for Apple users through a mobile device. In addition to having a comprehensive history, it offers an excellent preview ability. In addition to text overlays and substantial transitions, Lamafusion is a great app that can do much more. It is a tool that both amateurs and pros will admire.
It allows you to position your clip, experiment with animations and motions, apply visual effects and audio, change filters, and more. If you want to get into video editing and marketing, now is the greatest time to do so because the demand for videos is increasing, and Lamafusion is certainly here to help you.
Key Features:
- Interface that is uncluttered and can be easily customized
- LUTs are available for adjusting the colors and tones of a photograph.
- Adjustable image stabilizer
- Up to six layers of video and audio are supported
- Supports a wide range of video formats
- Available for iOS users only
- Price: Annual plan - $29.99
8. Splice
It is yet another most sought-after mobile video editing app out there, with a clean design and all the features you’ll ever need. Overlays (be it, with or without transparency), chroma keys, masks, and speed changes are all simple to implement. The app also supports HDR video output. Well-designed and full of basic video editing tools, this app is an excellent addition to the app store.
As soon as you load video clips into the editor, you’ll be able to customize and resize them, apply transitions and filters, and use the royalty-free music collection to these. In the end, you may either save the file to your device or post it directly on social media once you’ve finished your creation.
Key Features:
- Modify the contrast, brightness, and saturation of the shots
- Speed ramping and speed control is possible
- Cut, crop, and trim your video files
- Combine videos and photos to create spectacular visuals
- Trim and mix your audio or use the built-in voice recorder
- Available for both Android and iOS
- Price: Free, Weekly plan - $2.99, Monthly plan - $9.99, Annual plan - $49.99
9. Apple Clips
Apple Clips is a fantastic iPhone video editing software for anyone who wants to capture video quickly, tweak it with filters and emoji, and then share it with the rest of the world via social media. It is possible to add holographic selfie effects, live subtitles, and other useful features to your videos.
If you want to edit and share your video with the world in a short amount of time, then Clips is the way to go. Users of Instagram will be familiar with the effects available on Apple Clips. This includes brightness and contrast sliders, which are both disabled by default.
One other fantastic feature of Apple Clips is Live Titles, which automatically inserts captions that are in tune with your voice while you’re talking. After you’re done, go back and update the Live Titles to ensure they’re right.
Isn’t that great?
Key Features:
- Simple and easy to use for beginners
- All the features built into it function properly
- Pre-loaded in all iOS devices
- Available only for iOS
- Price: Free
10. Funimate
The mobile video editing apps like Funimate claim to be the best of the best in this regard. Some TikTok users utilize it to enhance their 60-second videos with additional editing features. The UI looks and feels like any other mobile video editor. It has a timeline below the video and a panel of editing choices at the bottom of the screen.
It has over a hundred effects, stickers, and emojis. If you want something more versatile, you can design your effects using your phone’s photos. In addition to the standard merge, crop, and trim tools, Funimate includes an auto-looping feature that allows you to loop a video from the end to the beginning of the clip automatically. Funimate is perfect for amateurs who want to make short videos as one of the finest free video editing tools.
Key Features:
- Ideal for the TikTok video creators and enthusiasts
- Simple and effective to use
- Add text, graphics, and video elements to the intro and outro
- Emoji and sticker addition
- Available for both iOS and Android
- Price: Free, Weekly plan - $2.99
Conclusion
It is estimated that the ten video editing apps that we have listed above constitute a combined user base of over a million people. With their functionality and ease of use, these apps have been able to meet the needs of their respective consumers. However, keep in mind that not all apps are suitable for your needs.
You may need only one app from the list above or require many apps for different projects. Review the previous section, evaluate the app’s features, and select the best app for your task.
This list should help you find the best video editor app for mobile. Contact our experts or leave a comment below if you have any problems finding the best.
Design Your Dream Face: Free Online Tools
While signing up for a social media account, you may not want to use your real photograph as your profile picture, but at the same time, you might not find it ethical to use someone else’s image either. This is where a face generation portal comes into play. You can easily create a virtual face that looks almost like you and sometimes even better with a face generator.
Similarly, run a business where you want to publish your clients’ reviews without showing their real photos as they might not like the idea. You can use a good face generator online tool to create a virtual face that resembles their look and post it along with their feedback.
Considering the above scenarios and many others that may come up over time, the following list some of the best free online face generators to create fake faces.
Watch Video! Best Free Online Face Generators
Best Free Online Face Generators to Get Virtual Faces in 2022
1. Generated Photos: Faces
Website: https://generated.photos/faces
This online portal enables you to create virtual faces by specifying the physical attributes of a character, such as gender, age, hair color, eye color, and much more. You can be as creative as you want to generate a face that appears somewhat like you with the available options. Once a look is generated, you can download and use it as needed.
The steps that are given below explain how you can use Generated Photos’ Faces section to create and download a virtual face:
- Launch your favorite web browser and go to the URL given above, and then you will see all free AI-generated photos on this website.

- Use the filters given in the left pane to define your character’s physical attributes and click Apply from the bottom to get the results. You can customize the face from its head post, gender, age, hair, eye, and emotion aspects.
- Click your preferred character from the AI-generated faces, and then click Download from the page that opens next. Choose your preferred method to sign up, and then sign in to download the virtual face to your PC.
2. Generated Photos: Anonymizer
Website: https://generated.photos/anonymizer
Anonymizer is another section from the Generated Photos portal that allows you to upload your image. Then it uses AI technology to generate similar virtual faces that you can download and use wherever needed.
However, sometimes the pictures that the website creates may not resemble your face as closely as you expect them to be, but that’s OK. Isn’t it? The main idea is to keep your privacy intact, and that’s what Generated Photos: Anonymizer does.
You can learn how to use this section by following the instructions given below:
- Use the URL given above to get to the Anonymizer’s web page and then click Upload photo;
- Select and upload your photo from your PC to the portal and wait while Anonymizer uses AI to generate similar faces.
- Click the photo that you want to use, and when the next page opens up, click Sign up or sign in to download the photo and use it wherever needed

3. Generated Photos Face Generator
Website: https://generated.photos/face-generator
This online face generator from Generated Photos allows you to create a unique realt-time face from scratch in one click. And if you don’t like the face generated, you can change the parameters such as gender, skin tone, hair, eye and head pose.
Generated Photos Face Generator tool is a good choice for people who don’t want to upload any photos online, and need to customize the face at maximum.
Below is a brief tutorial about how to generate a face with it step by step:
- Go to the website give above and then click the Generate faces
- Select the parameters accordingly based on your needs. You can generate the same face young or old with different emotions.

You can then download the generated photo by signing up or logging in, but you need to pay to remove the watermark.
4. Massless
Website: https://massless.io/tool/face-maker-ai
Massless allows you to use its tools to sketch a portrait, and then it uses AI technology to generate a virtual face out of your drawing. However, because you can’t always be precise while sketching with the mouse, it would be good to have access to a digital drawing pad to create the faces with a pen. With Massless, you can explore your creativity to the full and draw beautiful faces to use them as your avatar.
You can follow the procedure given below to use Massless to draw virtual faces:
- Open a web browser, and visit the URL given above. Click any icons from the toolbox at the top (E.g., Nose).
- Draw a shape on its corresponding face area on the left (E.g., Nose), and wait while the portal automatically updates the photo on the right.
- Repeat the process to sketch other parts of the face, and click the More icon (with three vertical dots) from the top-right corner.
- Click Download images from the page that opens next to download the photo to your PC and use it wherever needed.

5. This Person Does Not Exist
Website: https://thispersondoesnotexist.com/
This free online virtual face generator is probably the easiest and quickest. As you go to the website, it displays a random realistic image of a person that may not exist. If you don’t like the idea, you can change it with merely a single mouse click. Because the portal doesn’t have any Download button at the time of this writing, you must rely on the web browser’s default downloading process to get the image to your PC.
You can follow the instructions that are given below to switch between the images and download the one you like:
- Use your preferred web browser (Google Chrome here) to visit the URL provided above, and then notice the random image that appears on the page;
- Click Another from the box that appears at the bottom-right corner to change the image, repeat this process until you find a good photo for your avatar, and then right-click anywhere on the image.
- Click Save image from the context menu to save the photo. And then go to the default download folder to access the downloaded image, and use the picture wherever needed.
Note: Different browsers may have this feature with other names

6. BoredHumans
Website: https://boredhumans.com/faces.php
This web portal is identical to the previous one as it generates random virtual faces with merely one mouse click. Even this website doesn’t have any Download button to help you download the image. Therefore, you must use the browser’s built-in feature to obtain the photo you want to save to your PC.
You can learn how to use BoredHumans to generate virtual faces and download them to your computer by following the steps given below:
- Open a web browser (Google Chrome here) and visit the URL provided above, and then click Generate Another Fake Human if you don’t like the one that appears;
- Keep clicking the button until you find a face that can be used as your avatar. Alternatively, you can click the Generate A Human button to create a less realistic image of a random person.

- Right-click the image and click Save image to download the photo to your PC; and then get to the default download location to access the photo and use it wherever needed.
7. faceMaker
Website: https://facemaker.uvrg.org/
faceMaker allows you to generate virtual faces out of the fine details that you specify during the creation process. These details are adjusted using the sliders that affect the corresponding physical attributes of the avatars. For example, you can modify the lips, eye color, hair, face roundness, mouse depth, jaw shape, etc. using their respective sliders.
You can follow the steps that are given below to learn how to create a virtual face using faceMaker, and save it to your PC to use it as an avatar:
- Use your preferred web browser to visit the URL given above and click Start from the main page.
- Fill out the questionnaire by choosing your preferred options and agreeing to the term and conditions.
- Click Start and then click Continue on the next page. Use the sliders on the left and right panels to customize the face as needed, and once done, you can use any screen capturing tool to take a snapshot and remove the sliders by cropping the image, thus having only the virtual face.

- Save the cropped photo on your PC, and then back on the webpage, click Finished from the bottom-right corner.

- On the next page, choose the radio buttons according to your choice. Once done, click Yes, submit now from the bottom to submit the customized virtual face to the portal.

Conclusion
With all the cybercrime reports circulating everywhere nowadays, it is important to stay cautious about what you post on any social media website. To add an extra layer of security, you can avoid using your real photograph as a profile picture, and go with the fake faces instead. You can generate these virtual faces using any of the free online face generator websites, some of which even allow you to define the shape of a face quite minutely. Because the generated faces are not of any real human, they can be used as your avatar without any risk.
Wondershare Filmora
Get started easily with Filmora’s powerful performance, intuitive interface, and countless effects!
Try It Free Try It Free Try It Free Learn More about Video Editing

Best Free Online Face Generators to Get Virtual Faces in 2022
1. Generated Photos: Faces
Website: https://generated.photos/faces
This online portal enables you to create virtual faces by specifying the physical attributes of a character, such as gender, age, hair color, eye color, and much more. You can be as creative as you want to generate a face that appears somewhat like you with the available options. Once a look is generated, you can download and use it as needed.
The steps that are given below explain how you can use Generated Photos’ Faces section to create and download a virtual face:
- Launch your favorite web browser and go to the URL given above, and then you will see all free AI-generated photos on this website.
- Use the filters given in the left pane to define your character’s physical attributes and click Apply from the bottom to get the results. You can customize the face from its head post, gender, age, hair, eye, and emotion aspects.
- Click your preferred character from the AI-generated faces, and then click Download from the page that opens next. Choose your preferred method to sign up, and then sign in to download the virtual face to your PC.
2. Generated Photos: Anonymizer
Website: https://generated.photos/anonymizer
Anonymizer is another section from the Generated Photos portal that allows you to upload your image. Then it uses AI technology to generate similar virtual faces that you can download and use wherever needed.
However, sometimes the pictures that the website creates may not resemble your face as closely as you expect them to be, but that’s OK. Isn’t it? The main idea is to keep your privacy intact, and that’s what Generated Photos: Anonymizer does.
You can learn how to use this section by following the instructions given below:
- Use the URL given above to get to the Anonymizer’s web page and then click Upload photo;
- Select and upload your photo from your PC to the portal and wait while Anonymizer uses AI to generate similar faces.
- Click the photo that you want to use, and when the next page opens up, click Sign up or sign in to download the photo and use it wherever needed
3. Generated Photos Face Generator
Website: https://generated.photos/face-generator
This online face generator from Generated Photos allows you to create a unique realt-time face from scratch in one click. And if you don’t like the face generated, you can change the parameters such as gender, skin tone, hair, eye and head pose.
Generated Photos Face Generator tool is a good choice for people who don’t want to upload any photos online, and need to customize the face at maximum.
Below is a brief tutorial about how to generate a face with it step by step:
- Go to the website give above and then click the Generate faces
- Select the parameters accordingly based on your needs. You can generate the same face young or old with different emotions.
You can then download the generated photo by signing up or logging in, but you need to pay to remove the watermark.
4. Massless
Website: https://massless.io/tool/face-maker-ai
Massless allows you to use its tools to sketch a portrait, and then it uses AI technology to generate a virtual face out of your drawing. However, because you can’t always be precise while sketching with the mouse, it would be good to have access to a digital drawing pad to create the faces with a pen. With Massless, you can explore your creativity to the full and draw beautiful faces to use them as your avatar.
You can follow the procedure given below to use Massless to draw virtual faces:
- Open a web browser, and visit the URL given above. Click any icons from the toolbox at the top (E.g., Nose).
- Draw a shape on its corresponding face area on the left (E.g., Nose), and wait while the portal automatically updates the photo on the right.
- Repeat the process to sketch other parts of the face, and click the More icon (with three vertical dots) from the top-right corner.
- Click Download images from the page that opens next to download the photo to your PC and use it wherever needed.
5. This Person Does Not Exist
Website: https://thispersondoesnotexist.com/
This free online virtual face generator is probably the easiest and quickest. As you go to the website, it displays a random realistic image of a person that may not exist. If you don’t like the idea, you can change it with merely a single mouse click. Because the portal doesn’t have any Download button at the time of this writing, you must rely on the web browser’s default downloading process to get the image to your PC.
You can follow the instructions that are given below to switch between the images and download the one you like:
- Use your preferred web browser (Google Chrome here) to visit the URL provided above, and then notice the random image that appears on the page;
- Click Another from the box that appears at the bottom-right corner to change the image, repeat this process until you find a good photo for your avatar, and then right-click anywhere on the image.
- Click Save image from the context menu to save the photo. And then go to the default download folder to access the downloaded image, and use the picture wherever needed.
Note: Different browsers may have this feature with other names
6. BoredHumans
Website: https://boredhumans.com/faces.php
This web portal is identical to the previous one as it generates random virtual faces with merely one mouse click. Even this website doesn’t have any Download button to help you download the image. Therefore, you must use the browser’s built-in feature to obtain the photo you want to save to your PC.
You can learn how to use BoredHumans to generate virtual faces and download them to your computer by following the steps given below:
- Open a web browser (Google Chrome here) and visit the URL provided above, and then click Generate Another Fake Human if you don’t like the one that appears;
- Keep clicking the button until you find a face that can be used as your avatar. Alternatively, you can click the Generate A Human button to create a less realistic image of a random person.
- Right-click the image and click Save image to download the photo to your PC; and then get to the default download location to access the photo and use it wherever needed.
7. faceMaker
Website: https://facemaker.uvrg.org/
faceMaker allows you to generate virtual faces out of the fine details that you specify during the creation process. These details are adjusted using the sliders that affect the corresponding physical attributes of the avatars. For example, you can modify the lips, eye color, hair, face roundness, mouse depth, jaw shape, etc. using their respective sliders.
You can follow the steps that are given below to learn how to create a virtual face using faceMaker, and save it to your PC to use it as an avatar:
- Use your preferred web browser to visit the URL given above and click Start from the main page.
- Fill out the questionnaire by choosing your preferred options and agreeing to the term and conditions.
- Click Start and then click Continue on the next page. Use the sliders on the left and right panels to customize the face as needed, and once done, you can use any screen capturing tool to take a snapshot and remove the sliders by cropping the image, thus having only the virtual face.
- Save the cropped photo on your PC, and then back on the webpage, click Finished from the bottom-right corner.
- On the next page, choose the radio buttons according to your choice. Once done, click Yes, submit now from the bottom to submit the customized virtual face to the portal.
Conclusion
With all the cybercrime reports circulating everywhere nowadays, it is important to stay cautious about what you post on any social media website. To add an extra layer of security, you can avoid using your real photograph as a profile picture, and go with the fake faces instead. You can generate these virtual faces using any of the free online face generator websites, some of which even allow you to define the shape of a face quite minutely. Because the generated faces are not of any real human, they can be used as your avatar without any risk.
Wondershare Filmora
Get started easily with Filmora’s powerful performance, intuitive interface, and countless effects!
Try It Free Try It Free Try It Free Learn More about Video Editing
Also read:
- Updated 2024 Approved The Ultimate Guide to Online Image Aspect Ratio Changers
- New 2024 Approved Online Video Blurring A Free and Simple Solution
- Updated 2024 Approved Make Your Instagram Feed Pop with Stop Motion Animation
- New The Great Debate Sony Vegas Pro vs Adobe Premiere Pro for Professional Video Editing for 2024
- New 2024 Approved Best Free and Open-Source Video Editing Software
- New The Art of Slow Motion A Kapwing Tutorial for Creating Breathtaking Videos for 2024
- Updated 2024 Approved Apple Video Editing Essentials Top Software Choices
- Updated Click-Worthy Thumbnails A Step-by-Step Guide to YouTube Success for 2024
- New In 2024, Top-Rated Image Resizing Tools for Web and Social Media
- Updated In 2024, Video to Live Photo Conversion Top-Rated Apps and Guides
- Updated Unleash Your Creativity 6 Innovative Adobe Premiere Pro Techniques for 2024
- New In 2024, Learn, Create, and Grow 90 Days of Free Final Cut Pro Access
- New 2024 Approved Photo to Cartoon Converter Free Online Tool
- 2024 Approved The Ultimate List of Public Domain Image Sources
- Updated In 2024, How to Create a Movie in Minutes A Quick Start Guide
- 2024 Approved Twitter Video Size Matters How to Find the Perfect Ratio
- Updated In 2024, Bringing Your Vision to Life Top 7 Animation Drawing Software Tools
- Updated In 2024, WMM Not Your Thing? Try These 13 Video Editing Solutions
- Updated In 2024, What Is the Best Intro Maker for Gaming? In This Article, I Will Share Top 10 of the Best Gaming Intro Makers for Windows and Mac Users, Including Both Free and Paid Gaming Intros. Keep Reading
- Updated Pixel Calculator Demystified A Simple Ratio Guide for 2024
- Updated 2024 Approved The Art of Time Manipulation in Final Cut Pro X
- Updated The Art of Video Resizing Tips for Perfect Proportions
- New 2024 Approved Premiere-Free Zone 10 Linux Video Editing Software You Need
- Unleash Your Creativity Top 5 iPhone Video Editing Apps You Need for 2024
- Updated Create Engaging WhatsApp Status Videos with These Top Makers for 2024
- Updated 2024 Approved Get Steady The Best Free Video Stabilization Software Ultimate Guide
- New 2024 Approved The Best Free Online Movie Making Platforms
- Updated In 2024, Free 2D Animation Software Is Great to Create Hand Drawing Animation. Now Check the 10 Best 2D Animation Software that Best for Beginners/Pros
- New 2024 Approved AIFF Converter Buying Guide Make the Right Decision
- New Unlock Your Creativity How to Edit MP4 Videos on Mac and Windows Computers for 2024
- New In 2024, Cloud Animation Studio Stop Motion Software Features, Tutorials, and Alternatives
- 2024 Approved OS X Mavericks MP4 Editor Trim, Cut, and Enhance Your Videos
- Updated Kapwing Online Editor Trim and Refine Your Videos in Minutes for 2024
- In 2024, Top 10 Free Animated Logo Creators for Stunning Brand Identities
- New 2024 Approved Linux Users Rejoice Best Adobe Premiere Alternatives Revealed
- New Top-Rated Gaming Intro Software Free and Paid Options for PC and Mac for 2024
- New 2024 Approved S Most Popular Video Resume Builders Templates and Tools Inside
- New In 2024, Phone Filmmaking Essentials Optimizing for Vertical Aspect Ratio
- Updated In 2024, Get Retro with These Awesome VHS Effect Apps for iPhone and Android
- Updated Best of the Best 9 Free Video Compression Tools for Windows 10 for 2024
- New In 2024, Fade In, Fade Out Two Essential Audio Techniques in FCP
- New Unlock Vertical Video Potential Top Editing Apps for iOS and Android
- New In 2024, Free and Easy AVI Video Editing Software Options
- Updated 2024 Approved Unleash the Power of Reverse How to Edit TikTok Videos Like a Pro
- New In 2024, The Ultimate Mac Video Editor MKVtoolnix Features
- In 2024, Online Video Blurring The Top Free Tools and Techniques
- Updated In 2024, Ditch the Limits Installing Linux on Your Chromebook (Updated 2023)
- New In 2024, Unlimited Fake Faces Top Free Online Generators Reviewed
- New 2024 Approved No Strings Attached Top 10 Free Online Video Editors with No Watermark
- Updated Premiere Pro Transitions List of 10 Best Transition Plugins for 2024
- How to Watch Hulu Outside US On Vivo Y17s | Dr.fone
- Reset pattern lock Tutorial for Magic 5 Lite
- How to Fix Pokemon Go Route Not Working On Motorola Edge 2023? | Dr.fone
- Play Store Not Working On Nokia C300? 8 Solutions Inside | Dr.fone
- Fix Unfortunately Settings Has Stopped on Lava Blaze 2 Quickly | Dr.fone
- What To Do When Realme GT Neo 5 SE Has Black Screen of Death? | Dr.fone
- In 2024, How to Screen Mirroring Realme Narzo 60x 5G? | Dr.fone
- How To Recover Apple iPhone XS Max Data From iCloud? | Dr.fone
- How to Change Netflix Location to Get More Country Version On Oppo F23 5G | Dr.fone
- How to Unlock Xiaomi Redmi Note 12R Bootloader Easily
- How to Unlock Nubia Z50S Pro Phone without Any Data Loss
- How to Factory Reset iPad or Apple iPhone 13 Pro Max without iCloud Password or Apple ID?
- In 2024, The Ultimate Guide to Get the Rare Candy on Pokemon Go Fire Red On Vivo X100 | Dr.fone
- Top 12 Prominent Xiaomi Redmi Note 12 Pro 5G Fingerprint Not Working Solutions
- In 2024, How to Bypass Google FRP Lock on Tecno Spark 10 4G Devices
- What Is the Best Filmora Slideshow Templates? Experts Choice for 2024
- 10 Free Location Spoofers to Fake GPS Location on your Realme Narzo 60x 5G | Dr.fone
- In 2024, 3 Ways to Unlock iPhone SE (2022) without Passcode or Face ID | Dr.fone
- How to Remove or Mute Audio in Video with Android Phones?
- How To Restore Missing Photos Files from Nubia Red Magic 9 Pro+.
- The way to recover deleted pictures on Vivo S17e without backup.
- 10 Easy-to-Use FRP Bypass Tools for Unlocking Google Accounts On Samsung Galaxy S23
- Easy steps to recover deleted photos from Infinix Note 30 Pro.
- How To Restore Missing Photos Files from Motorola Razr 40.
- In 2024, 6 Ways To Transfer Contacts From Nokia C12 Pro to iPhone | Dr.fone
- How To Transfer Data From Apple iPhone 11 Pro To Other iPhone 14 Pro devices? | Dr.fone
- New 2024 Approved Demystifying AI Game Generators | Wondershare Virbo Glossary
- In 2024, How to Detect and Remove Spyware on Xiaomi Redmi 12? | Dr.fone
- How to Find iSpoofer Pro Activation Key On Nubia Z50S Pro? | Dr.fone
- In 2024, How To Stream Anything From Nokia G22 to Apple TV | Dr.fone
- Wondering the Best Alternative to Hola On Samsung Galaxy A05s? Here Is the Answer | Dr.fone
- Life360 Circle Everything You Need to Know On Itel P55T | Dr.fone
- How to Fix Life360 Shows Wrong Location On Samsung Galaxy M34? | Dr.fone
- Complete guide for recovering music files on Lava Yuva 3
- In 2024, Trouble with iPhone 15 Pro Swipe-Up? Try These 11 Solutions | Dr.fone
- In 2024, Learn How To Lock Stolen Your Apple iPhone 14 Pro Properly
- In 2024, How to Come up With the Best Pokemon Team On Apple iPhone 12 Pro? | Dr.fone
- Forgot Pattern Lock? Heres How You Can Unlock Poco X5 Pro Pattern Lock Screen
- How to Fix Android App Not Installed Error on Honor 80 Pro Straight Screen Edition Quickly? | Dr.fone
- How to Transfer Photos From Realme C33 2023 to Samsung Galaxy S21 Ultra | Dr.fone
- A Detailed Guide on Faking Your Location in Mozilla Firefox On Apple iPhone 12 Pro | Dr.fone
- Best Android Data Recovery - Retrieve Lost Pictures from Motorola Razr 40 Ultra.
- In 2024, How To Check if Your Nokia G310 Is Unlocked
- In 2024, How does the stardust trade cost In pokemon go On Itel P55? | Dr.fone
- In 2024, Tips and Tricks for Apple ID Locked Issue From iPhone 8 Plus
- New In 2024, From Zero to Hero Fixing FCPX Plugin Problems in Minutes
- The Best 8 VPN Hardware Devices Reviewed On Oppo Reno 11F 5G | Dr.fone
- Title: Updated Move Over WMM Discover the Best Free and Paid Video Editors for 2024
- Author: MdadeLe
- Created at : 2024-04-28 15:03:54
- Updated at : 2024-04-29 15:03:54
- Link: https://smart-video-editing.techidaily.com/updated-move-over-wmm-discover-the-best-free-and-paid-video-editors-for-2024/
- License: This work is licensed under CC BY-NC-SA 4.0.
