
:max_bytes(150000):strip_icc():format(webp)/windows11contextmenu-f4d6ebb14db4444d851b4338aa553e21.png)
Updated 2024 Approved Design Your Dream Invite Top 10 Free Online Video Makers
Design Your Dream Invite: Top 10 Free Online Video Makers
Searching for the best free online video invitation maker can be challenging because there are numerous options to pick from. And each online video invitation maker has a different purpose from the next one. Some online video invitation makers are excellent choices for weddings while others are best fitted for naming ceremonies, birthdays, graduations, etc.
If you want to make an invitation video online for any of your events that your recipients will find impressive, then you should know the right one to use. In this article, you are going to learn about the best free online video invitation makers to use for any of your events.
Best Invitation Video Makers Online Free
Here are the ten best free online video invitation makers to use in 2024, you will find the best one fits your needs perfectly.
1. Animaker
Animaker is one of the best free video invitation makers online. You can use it to create, share and edit content. It is perfect for making wedding, baby shower, and birthday video invitations. Animaker runs on a powerful HTML5 engine that ensures a seamless user experience. It has over 100 million-plus stock assets. It also has an extensive template library that you can use to make your invitations. Using these awesome video templates, you can personalize them and add your photos and event info.
Animaker allows you to edit videos and export in 4k quality. You can also subtitle to your videos , add an overlay to videos with a single click, watermark your video content and so much more. It also has numerous royalty-free music tracks and sound effects that you can add to your videos without the fear of copyright.
2. FlexClip

This is another invitation video maker online for free that you can use to make good invitation videos. You should go for FlexClip if you are a beginner because it has an easy-to-use user interface. If you want to do a wedding, online webinar, or graduation invitation video, FlexClip is your best bet. It has a free extensive video template that you can add to your storyboard to make excellent video invitations for your events.
One of its distinctive features is that you can export your video invitation without a watermark online . FlexClip has amazing images and footage that allows you to decorate your invitation nicely. You can resize, trim and add voice-over to your invitation.
3. Promo

Promo is one of the best free online invitation video makers. If you want to do an office event, baby shower, wedding party, or retirement celebration and you need a good online invitation video maker, Promo is a perfect choice. Promo allows you to either upload your video or choose out of its numerous rich invitation templates. It’s also user-friendly and very easy to use.
Promo has over 110 million photo and video libraries. You can customize the template you choose with your texts, brand, and images with a few clicks. It also has a vast collection of royalty-free music you can add to your content. Another great feature is the ability to filter these pieces of music by mood, genre, and tempo to find the perfect one for your invitation. Promo will create your video invitations in minutes.
4. Biteable

Biteable is another great online video invitation maker that will help you to create the perfect invitation video for your events. It is the perfect invitation maker for birthdays, work functions, and weddings. With Biteable, you will turn ordinary videos into sensational video invitations. You can get inspiration from the tons of video templates in Biteable. It has a library of over 80,000 animated graphics and Shutterstock clips and over 1.8 million video clips and images to pick from.
Biteable allows you to add logos and your brand colors to your content. You can customize your invite with photos, texts, animations, etc. You can also export your video invites to your emails.
5. InVideo

Like its name, InVideo is an online video invitation maker that allows you to create and edit video invites with awesome templates. Whether it is a birthday party, wedding celebration, work party, or a sales event, you can use InVideo to make stunning, attention-grabbing invites that will wow your guests. InVideo allows you to pick a theme and then pick a template that matches your theme.
You can also add fonts to your content. In addition, it has an automated voice-over and power transitions. You can also add smart frames to beautify your invite. With Invideo, you can confidently say goodbye to boring video invites.
6. Veed.io
If you want to create dynamic videos that work perfectly as digital invites, Veed is what you are looking for. Veed is a perfect choice if you want video invites for your baby shower, company event, birthday, and wedding. It has powerful yet simple tools that give optimal results in a few minutes. Veed also has an extensive library of rich customizable templates you can pick from.
You can also drag and drop your video into the video editor. In addition, you can add power transitions and camera effects that allow you to make insanely clear video invites. Veed also enables you to split your videos into various clips and add different filters to each clip. Other features include background music, stickers, personalized texts, etc.
7. Renderforest

This is another great free online video invitation maker you can use to create eye-catching invites within a few minutes. You can also use Renderforest to create stunning invites for weddings, graduation ceremonies, birthday parties, etc. It has numerous professionally designed and outstanding templates you can edit to fit your needs. It has drag-and-drop where you can upload video and images directly to your storyboard.
It has numerous video editing features that include, adjusting colors, muting of projects, uploading of voiceovers, changing the duration, choosing the best background music that fits your theme, etc. If you want an easy-to-use video invitation maker with a track record of stunning video invites and satisfied customers, Renderforest is a perfect fit.
8. Typito
Typito is one of the best online video invitation makers. Typito is best used for weddings, webinars, conferences, birthdays, and engagements. It has numerous templates you can choose from and edit to fit your needs. You can also create your invitation from scratch by uploading your videos and images using drag-and-drop, text templates, and motion graphics.
Typito allows you to personalize each video invitation to fit your chosen theme. It has numerous background music that has been made to fit every theme you choose. In addition, you can change colors, filters, animations, photos, and texts. If you want user-friendly software to make video invitations with a few clicks, go for Typito.
9. VideoCreek

VideoCreek is very easy to use. If you want a DIY online video invitation maker that will give you the needed tools to create awesome custom invitations that will delight your guest, VideoCreek fits perfectly. VideoCreek is a great choice for farewells, anniversaries, bachelor parties, and birthdays. It has a vast library that contains thousands of free invitation templates that you edit to your preference.
You can add graphics, music, texts, and images to your content. You can also customize your invitation by adding animations, favorite stickers, effects, emoji, etc. Making stunning video invitations without stress is possible with VideoCreek.
10. Design Wizard

Design Wizard is another free online video invitation maker that makes creating video invitations fun. It is perfect for birthdays, housewarmings, bridal showers, and retirement parties. It has more than enough customizable templates with over twenty categories that you can choose from and edit to fit your video invite idea. It also has an entire library of TV and quality videos. Design Wizard’s drag and drop templates make online video editing easy for beginners and novices. You can also add texts to your video invitation.
Other notable features include an online video trimmer , adding a logo to the video, adding images to videos, etc. Design Wizard can get you hooked with its friendly user interface, and you will love the experience.
Bonus: Best Video Invitation Makers for Windows and Mac – Wondershare Filmora
Filmora is one of the best video invitation makers because of its music library, title templates, and plentiful effects.
For users who are running Wondershare Filmora V10.5 and later version, you can search birthday, wedding, baby shower in the effects search bar to navigate to the related effects easily.
For Win 7 or later (64-bit)
For macOS 10.12 or later
Final Thoughts
When selecting the software to use for editing video invitations, you must know the one that will fit your events. With this article, Choosing the best online video invitation maker to use has been made easy for you. You now know the right free online video invitation maker to use for any of your events. Now, you can create stunning, eye-catching video invitations that will wow your guests and make them look forward to your event.
Animaker is one of the best free video invitation makers online. You can use it to create, share and edit content. It is perfect for making wedding, baby shower, and birthday video invitations. Animaker runs on a powerful HTML5 engine that ensures a seamless user experience. It has over 100 million-plus stock assets. It also has an extensive template library that you can use to make your invitations. Using these awesome video templates, you can personalize them and add your photos and event info.
Animaker allows you to edit videos and export in 4k quality. You can also subtitle to your videos , add an overlay to videos with a single click, watermark your video content and so much more. It also has numerous royalty-free music tracks and sound effects that you can add to your videos without the fear of copyright.
2. FlexClip
This is another invitation video maker online for free that you can use to make good invitation videos. You should go for FlexClip if you are a beginner because it has an easy-to-use user interface. If you want to do a wedding, online webinar, or graduation invitation video, FlexClip is your best bet. It has a free extensive video template that you can add to your storyboard to make excellent video invitations for your events.
One of its distinctive features is that you can export your video invitation without a watermark online . FlexClip has amazing images and footage that allows you to decorate your invitation nicely. You can resize, trim and add voice-over to your invitation.
3. Promo
Promo is one of the best free online invitation video makers. If you want to do an office event, baby shower, wedding party, or retirement celebration and you need a good online invitation video maker, Promo is a perfect choice. Promo allows you to either upload your video or choose out of its numerous rich invitation templates. It’s also user-friendly and very easy to use.
Promo has over 110 million photo and video libraries. You can customize the template you choose with your texts, brand, and images with a few clicks. It also has a vast collection of royalty-free music you can add to your content. Another great feature is the ability to filter these pieces of music by mood, genre, and tempo to find the perfect one for your invitation. Promo will create your video invitations in minutes.
4. Biteable
Biteable is another great online video invitation maker that will help you to create the perfect invitation video for your events. It is the perfect invitation maker for birthdays, work functions, and weddings. With Biteable, you will turn ordinary videos into sensational video invitations. You can get inspiration from the tons of video templates in Biteable. It has a library of over 80,000 animated graphics and Shutterstock clips and over 1.8 million video clips and images to pick from.
Biteable allows you to add logos and your brand colors to your content. You can customize your invite with photos, texts, animations, etc. You can also export your video invites to your emails.
5. InVideo
Like its name, InVideo is an online video invitation maker that allows you to create and edit video invites with awesome templates. Whether it is a birthday party, wedding celebration, work party, or a sales event, you can use InVideo to make stunning, attention-grabbing invites that will wow your guests. InVideo allows you to pick a theme and then pick a template that matches your theme.
You can also add fonts to your content. In addition, it has an automated voice-over and power transitions. You can also add smart frames to beautify your invite. With Invideo, you can confidently say goodbye to boring video invites.
6. Veed.io
If you want to create dynamic videos that work perfectly as digital invites, Veed is what you are looking for. Veed is a perfect choice if you want video invites for your baby shower, company event, birthday, and wedding. It has powerful yet simple tools that give optimal results in a few minutes. Veed also has an extensive library of rich customizable templates you can pick from.
You can also drag and drop your video into the video editor. In addition, you can add power transitions and camera effects that allow you to make insanely clear video invites. Veed also enables you to split your videos into various clips and add different filters to each clip. Other features include background music, stickers, personalized texts, etc.
7. Renderforest
This is another great free online video invitation maker you can use to create eye-catching invites within a few minutes. You can also use Renderforest to create stunning invites for weddings, graduation ceremonies, birthday parties, etc. It has numerous professionally designed and outstanding templates you can edit to fit your needs. It has drag-and-drop where you can upload video and images directly to your storyboard.
It has numerous video editing features that include, adjusting colors, muting of projects, uploading of voiceovers, changing the duration, choosing the best background music that fits your theme, etc. If you want an easy-to-use video invitation maker with a track record of stunning video invites and satisfied customers, Renderforest is a perfect fit.
8. Typito
Typito is one of the best online video invitation makers. Typito is best used for weddings, webinars, conferences, birthdays, and engagements. It has numerous templates you can choose from and edit to fit your needs. You can also create your invitation from scratch by uploading your videos and images using drag-and-drop, text templates, and motion graphics.
Typito allows you to personalize each video invitation to fit your chosen theme. It has numerous background music that has been made to fit every theme you choose. In addition, you can change colors, filters, animations, photos, and texts. If you want user-friendly software to make video invitations with a few clicks, go for Typito.
9. VideoCreek
VideoCreek is very easy to use. If you want a DIY online video invitation maker that will give you the needed tools to create awesome custom invitations that will delight your guest, VideoCreek fits perfectly. VideoCreek is a great choice for farewells, anniversaries, bachelor parties, and birthdays. It has a vast library that contains thousands of free invitation templates that you edit to your preference.
You can add graphics, music, texts, and images to your content. You can also customize your invitation by adding animations, favorite stickers, effects, emoji, etc. Making stunning video invitations without stress is possible with VideoCreek.
10. Design Wizard
Design Wizard is another free online video invitation maker that makes creating video invitations fun. It is perfect for birthdays, housewarmings, bridal showers, and retirement parties. It has more than enough customizable templates with over twenty categories that you can choose from and edit to fit your video invite idea. It also has an entire library of TV and quality videos. Design Wizard’s drag and drop templates make online video editing easy for beginners and novices. You can also add texts to your video invitation.
Other notable features include an online video trimmer , adding a logo to the video, adding images to videos, etc. Design Wizard can get you hooked with its friendly user interface, and you will love the experience.
Bonus: Best Video Invitation Makers for Windows and Mac – Wondershare Filmora
Filmora is one of the best video invitation makers because of its music library, title templates, and plentiful effects.
For users who are running Wondershare Filmora V10.5 and later version, you can search birthday, wedding, baby shower in the effects search bar to navigate to the related effects easily.
For Win 7 or later (64-bit)
For macOS 10.12 or later
Final Thoughts
When selecting the software to use for editing video invitations, you must know the one that will fit your events. With this article, Choosing the best online video invitation maker to use has been made easy for you. You now know the right free online video invitation maker to use for any of your events. Now, you can create stunning, eye-catching video invitations that will wow your guests and make them look forward to your event.
Best Vegas Pro Replacements for Mac Users : Free and Paid Options
For creating high-grade dynamic videos, simply shooting or recording a clip is not enough. Finding the best Sony Ve gas alternatives for Mac is essential since the software mainly targets Windows users.
Thanks to developers, there are many free and paid options to start your video editing journey on a Mac. Let’s first have a look at alternative software you could consider.
- Lightworks
- Wondershare Filmora
- Adobe Premiere Pro
- HitFilm Express
- Kdenlive
- OpenShot
- Blender
- Jahshaka
- Final Cut Pro
- Cyberlink PowerDirector 365
- What are the limitations when using Sony Vegas (Vegas Pro) on Mac?
- Hot FAQs about Vegas Pro Alternatives
Part 1: Sony Vegas Pro Alternatives & Competitors Overview
Here is a list of the top 10 tools we found after research. For an easier understanding, the following are the essential points of difference between alternative video editing software types for Sony Vegas Pro in a tabular form.
| Software | Supported OS | Price | Editor’s Verdict |
|---|---|---|---|
| Lightworks | Windows, Mac, Linux | Create-$9.99/month, Pro-$23.99/month | Medium-Difficult |
| Wondershare Filmora | Windows, Mac | Annual-$49.99, Perpetual-$79.99 | Easy |
| Adobe Premiere Pro | Windows, Mac | $20.99/month | Easy-Medium |
| HitFilm Express | Windows, Mac | Free | Easy |
| Kdenlive | Windows, Mac, Linux | Free | Medium-Difficult |
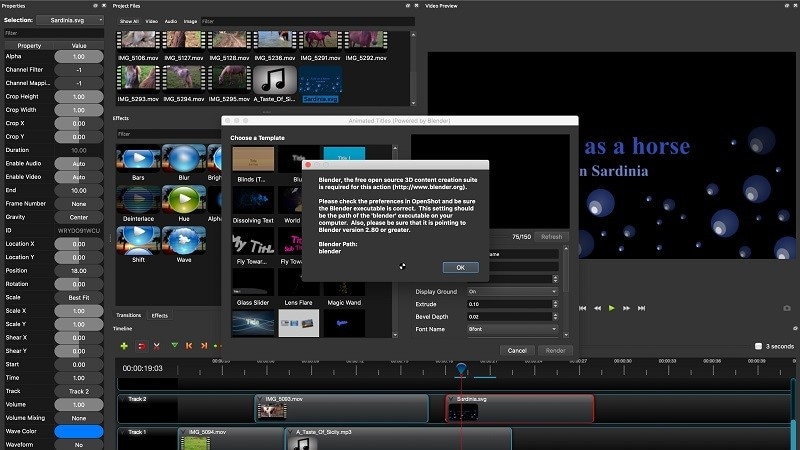
| OpenShot | Windows, Mac, Linux, OsX | Free | Medium-Difficult |
| Blender | Windows, Mac, Linux | Free | Easy |
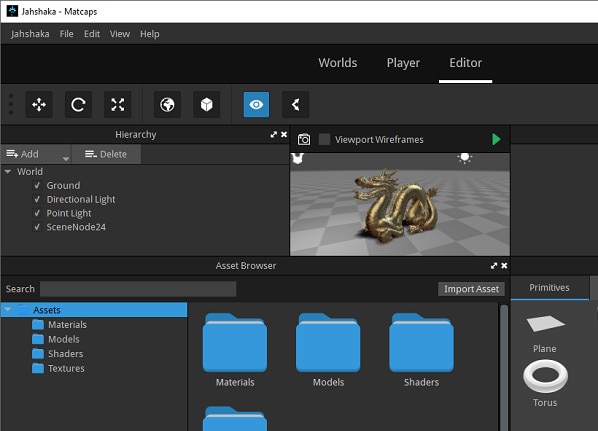
| Jahshaka | Windows, Linux, OsX | Free | Easy-Medium |
| Final Cut Pro | Mac | Lifetime-$299.99 | Easy-Medium |
| Cyberlink PowerDirector 365 | Windows, Mac | Lifetime-$52.50 | Easy-Medium |
Part 2: Top 10 Sony Vegas (Vegas Pro) Alternatives & Competitors
Now that you know the primary differences between the Sony Vegas Pro alternatives. Are you find anything you like? Let’s move on to more details for your further consideration.
1. Lightworks
With Lightworks, using the independent timeline codec, format, and resolution alteration in videos is extremely simple. In addition, you can use the multi-cam editing feature for real-time, high-quality editing work. Moreover, drag and drop elements into videos for optimized video editing work, including pre-existing Storyboard points.
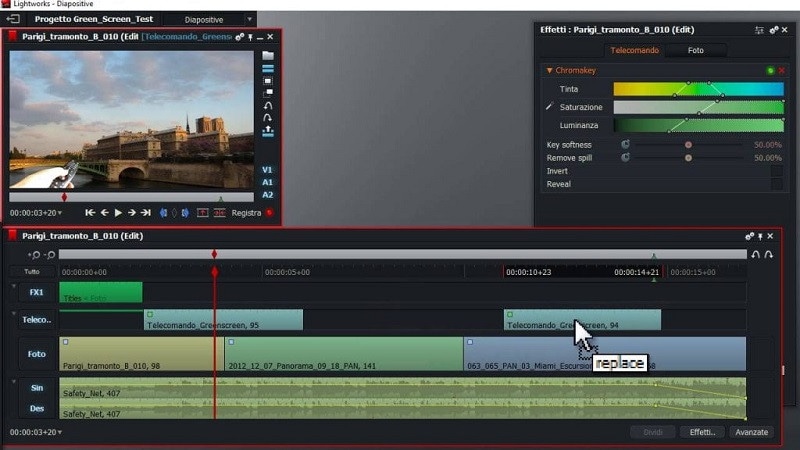
Main Features:
- Industry-grade features like QC, transcoding, and automated transfer are available.
- Edit files at different FPS limits and use three-point editing for recording/source files.
- Insert files and overwrite on a new project, replace, backfill, and fit to fill your video clips.
- Attach Storyboard tiles and match-frame clips/sub-clips easily.
Pros
- Flexible functionality and speedy transfers
- Edit files with professional movie-like quality
- Auto Sync feature for automatic timeline re-syncing is available
Cons
- Direct X is only available on the Windows version
- TotalFX plugin is not available for free- you have to upgrade to use them
OS Compatibility: Windows , Mac , Linux
Best For: Editing experts creating visually animated and professional-looking short videos can work with Lightworks.
What users say:
For professional-level video editing work, Lightworks brings a lot of resources and elements to users. According to reviews , people who have tried it have experienced better video editing functionality with these resources.
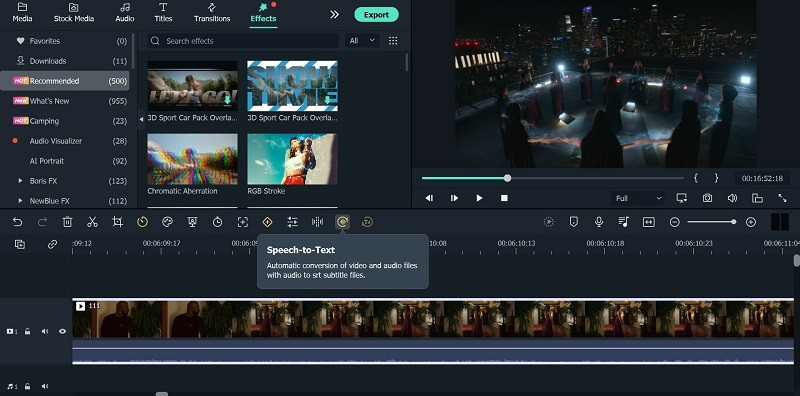
2. Wondershare Filmora
The top Vegas Pro alternative that both Windows and Mac users can opt for is Filmora. The software has advanced AI-incorporated editing functions for automated editing work, including preset effects from FX plugins. Besides that, you can easily add pre-set transitions, audio clips, text, images, and more.
Beginners find it simple to navigate through its interface and can opt for the Instant Mode function for automatic video edits .
Free Download For Win 7 or later(64-bit)
Free Download For macOS 10.14 or later

For a better idea of how this works, you should check out this tutorial video: https://filmora.wondershare.com/get-creative/make-a-video-quickly.html
Main Features:
- Instant Mode is available for automatic video/audio project editing out of 6 shorter clips.
- Support Advanced editing tools like Chroma Key and AI Portrait.
- Record voiceover, apply speech-to-text/text-to-speech functions, and more audio editing features.
- OpenFX plugins like BorisFX and NewBlue FX for a better list of pre-set effects.
Pros
- Simple to use and navigate on the editor timeline, especially with drag-and-drop support
- Output your editing files in different video/audio formats
- Quickly share the file on Vimeo or YouTube, besides downloading it on the local hard drive
Cons
- Free trial users cannot bring their Instant Mode-created videos into the editor timeline
- 4K support only with selected MKV, MOV, M4V (for Mac), and MP4 codecs
OS Compatibility: Windows , Mac
G2 Rating: 4.4 out of 5
Best For: All types of users like educators, students, homeowners, businesses, and video editors for comprehensive video editing tools and uses.
What users say:
Filmora is extremely simple to use, with advanced features available for top-level video editing work. Users mention in reviews how they have benefitted from the simple functionality and dynamic AI-based features available here for video editing.
3. Adobe Premiere Pro
If you are looking for high-quality programs like Sony Vegas, Adobe Premiere Pro is a reliable choice. This editing software allows you to easily create, delete, and move big video projects. Moreover, you can work on multiple files simultaneously and use shortcuts for faster editing work.
Preset filters and editing features are also available here, especially if they choose the Adobe Creative Cloud option.
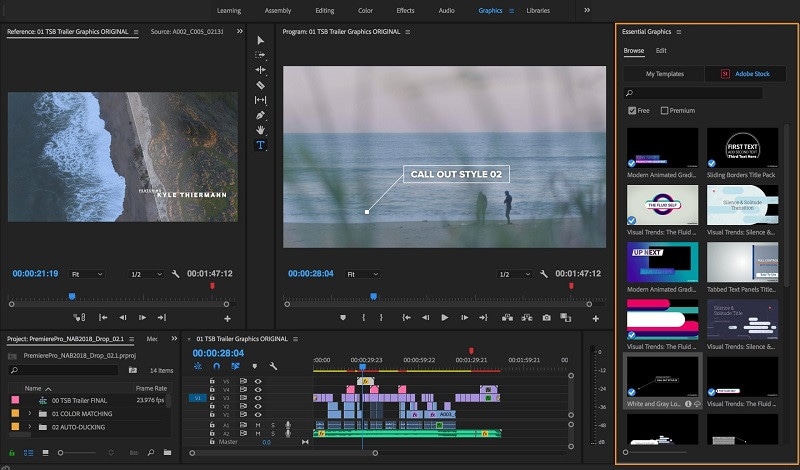
Main Features:
- Multiple pre-set transitions and effects are available for quick thematic changes.
- Add graphics, titles, and captions.
- Color grading and correction tools are available.
- It is possible to add keyframing and animation elements.
Pros
- Opting for group plans for video editing practice and learning using Adobe Premiere Pro is possible
- Aligns audio with videos instantly during editing
- Utilize Quick Export functionality for video files in some taps
Cons
- Windows High Contrast Mode is supported but to a limited extent, like with menus and title bars
- HDR workflows can only be handled on the Windows version with DisplayHDR 400 support
OS Compatibility: Windows , Mac
G2 Rating: 4.5 out of 5
Best For: Professional editors and trainers can use the various plans under Adobe Premiere Pro for video/audio editing.
What users say:
Advertisers and videographers enjoy high-grade video editing features and like the simple effects and interface quality. The motion graphics support in Adobe Premiere Pro is high-grade as well.
4. HitFilm Express
A capable Sony Vegas free alternative that you should check out is HitFilm Express. With this, you can expect many prepared designs for quick video edits. Additionally, you can manually customize the video files you are working on with high-grade personalization features available in the timeline.

Main Features:
- Pre-set customizable designs are available.
- Built-in sound effects and soundtracks are usable for free.
- Cache renders in timelines are optimized.
- The New Grade Clips feature allows users to apply varying effects to many video clips.
Pros
- Stable process of switching between timelines with an active orbit tool
- Easy to switch between 2D/3D timelines while using the text tool
- Simple to use for an unlimited period
Cons
- Does not work on older versions than Windows 10 and macOS 10.14
- Users cannot integrate this with Vegas Pro like before
OS Compatibility: Windows , Mac
TechRadar Rating: 4.5 out of 5
Best For: This software is a high-quality video editor for custom video editing work, fit for beginners and professionals alike.
What users say:
HitFilm Express is easy to use and efficient in the market for professional-level editing. The tutorial is available here for quick learning about the steps, and expandable features are well-admired by users.
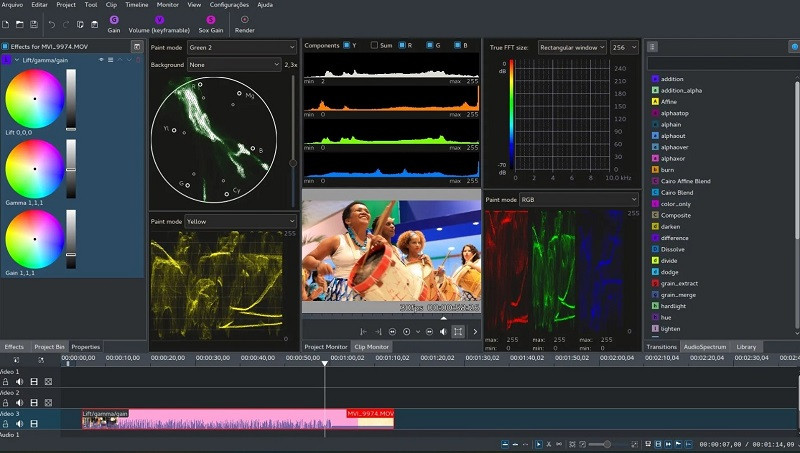
5. Kdenlive
A high-quality Sony Vegas open-source variety that you should seriously consider is Kdenlive. The video editor comes with MLT framework support and holds many tools for optimizing video editing.
To simplify, you can arrange and adjust various video/audio tracks and mute or lock specific ones as needed. Add everything from filters, texts, and transitions using this editor for high-grade video projects.
Main Features:
- Get an automatic backup of your video project while you are editing it.
- Use proxy editing to create low-resolution source clip copies and render them later on computers.
- Multiple video/audio scopes are available for monitoring projects like vectorscope, waveform, and RDB Parade.
- Many transition and effect choices to use.
Pros
- Flexibility with themes to add with multiple options
- Pre-render specific timeline parts for preview
- Effects are simple to use with keyframing quality
Cons
- Complex for completely non-technical users to adapt to
- Only supports 64-bit versions in regards to Windows-based compatibility
Trustpilot Rating: 3.7 out of 5
Best For: High-level editing experts who need strong video editing and monitoring features in an open-source platform.
What users say:
Kdenlive, as an open-source video editing software, assures quick and straightforward usability with projects. Per reviews , users like the ability to make simple video edits without bugs in this editor and quickly export finished projects.
6. OpenShot
OpenShot is a high-quality cross-platform video editor that you can use on different devices for quick but dynamic video project edits. Use keyframing ability here to adjust the animated elements you add to the file.
Moreover, cut the videos with simple steps and add many audio tracks/background videos/watermarks in layers. Also, get several video effects to optimize the video look easily.
Main Features:
- Adjust video speed in reverse motion, fast forward, and slow motion.
- Render effects and 3D animated elements into the video project.
- Get title templates and edit them as needed.
- Visualize the background audio beats with waveform support.
Pros
- Very user-friendly interface with a simple navigation guarantee
- Supports more than 70 languages that you can translate as well using LaunchPad
- Drag-and-drop functionality is supported for adding images, audio, and videos into the OpenShot editor timeline
Cons
- Some bug issues can occur
- Slightly complex learning curve
OS Compatibility: Windows , Linux , OsX
G2 Rating: 4.4 out of 5
Best For: Professional-level video editing experts can opt for this cross-platform free software for high-quality video creations.
What users say:
The OpenShot software is suitable for high-quality video editing across different devices and operating systems. Users like the lack of automated watermarks on all videos, its simple dashboard, and its multi-track editing ability, all available for free.
7. Blender
Blender is free video editing software like Sony Vegas that users can use for video editing, but it is also effective for game development with animations. Indeed, you can create and render dynamic-looking scenes with features like Cycles.
Furthermore, the software has a rich modelling toolset with solutions like curves and sculpting tools.

Main Features:
- Completely customization-friendly UI, shortcuts, and window layout here.
- Customization and scripting are possible to do with this software due to the Python API support.
- Supports access and integration of many pipeline tools for projects.
- Comes with advanced simulation-based features available in MantaFlow and Bullet libraries.
Pros
- Basic and advanced tools for quick video edits
- Strong composition and masking ability with object-based motion tracking benefits
- Easily create short animations with Blender
Cons
- Data under the standalone games created here fall under GPL conditions
- Strict licensing rules are applicable here
OS Compatibility: Windows , Mac , Linux
G2 Rating: 4.5 out of 5
Best For: Game developers and videographers for companies can use this open-source platform for creation and editing.
What users say:
Blender is a capable software for animation-based editing, with high-quality game-based features and interactive elements that make editing simple. As per reviews , users like the simple animation-based tools and fast rendering it offers.
8. Jahshaka
Users of Jahshaka can experience an inclusive, collaborative environment for metaverse-level editing work. This free editing software, like Sony Vegas, focuses mainly on VR-based editing functions and comes with powerful tools for project management and content creation.
Take the help of other team members to collaborate on dynamic virtual world building, editing, and publishing.
Main Features:
- Compatible player for different desktop and mobile devices.
- Create diversified worlds and scenes with one comprehensive platform.
- Immersive software 3D video development.
- Access to pre-built content and libraries of scenes and assets
Pros
- Easily share and distribute your virtual projects
- Deliver final projects offline and online
- An interactive multi-user engine is available
Cons
- Usable for a niche audience and does not include standard video editing tools
- Jahshaka V2 legacy support is no longer active
OS Compatibility: Windows , Linux , OsX
SourceForge Rating: 4.4 out of 5
Best For: Professional video editors who want a collaborative experience in VR-based development and publishing.
What users say:
Jahshaka is a suitable program for optimized VR-based editing with many preset features and themes to choose from. Most users enjoy the new features and worlds and can work with them efficiently.
9. Final Cut Pro
One of the top Sony Vegas alternatives Mac users can safely turn to is Final Cut Pro, which has powerful modern video editing features. With this software, you will access Cinematic Mode, which you can use to create stylish and thematic video scenes.
Similarly, the Object Tracker features utilize ML technology to automatically detect objects and faces in moving videos. It can align effects and titles accurately with the graphical elements in videos.

Main Features:
- Object Tracker feature for using color correction and adding texts into moving videos.
- Accelerated functional for motion tracking with Apple Neural Engine.
- Add high-quality effects and titles into videos with Cinematic Mode support.
- Preset audio tracks and royalty-free sound effects are available for editing.
Pros
- Handle color grading for optimized scene quality
- Adjust the field depth and focus depth in clips
- Share projects across iOS and macOS platforms
Cons
- Not valid for Windows users
- Relatively high cost to avail the paid version with all advanced features
OS Compatibility: Mac
TrustRadius Rating: 4.8 out of 5
Best For: Professional video editors, students, and filmmakers who want to create cinematic-quality video projects.
What users say:
Final Cut Pro is an efficient Mac-based video editing tool with easy sharing and editing capabilities, rich effects/transitions options, and fast rendering ability. Customers enjoy the intuitive non-linear editor, easy accessibility to social media platforms for file exporting, and live scrubbing, as noted in one review .
10. Cyberlink PowerDirector 365
Another Sony Vegas mac alternative for Windows you should give a try is PowerDirector 365 from Cyberlink. This software removes or compiles video clips and uses masking features like image/custom masks.
Preset special effects, blending modes, and sound effects are available here for quick editing. Additionally, the AI-powered Motion Tracking traces objects in clips and adds graphics, animations, and text quickly in line with it.

Main Features:
- You can create and remove videos with masking features.
- Drag and drop the pre-set effects and texts into videos.
- Adjust video clips with tools for border, gradation, and shadowing.
- Multiple animations, callouts, graphics, and stickers to add to videos.
Pros
- Use green screen functionality for quick background removal or editing
- Automatic audio mastering and mixing functionality are available
- Keyframing benefits for customized animations like scaling and positioning
Cons
- Dolby Digital-centric audio codec is not available for users
- Users can try features like Room Echo Removal and NVIDIA A/V Denoise only on Windows 11
OS Compatibility: Windows
TechRadar Rating: 4.5 out of 5
Best For: Professional videographers and regular users who want a Windows-based video editing software for standard video clip editing.
What users say:
Cyberlink PowerDirector is a powerful video editor with standard editing functions many users have tried and benefited from. According to customers , the program has high-quality video and audio editing benefits for presentations, with additional effects/splitting/cropping features.
Part 3: What are the limitations when using Sony Vegas (Vegas Pro) on Mac?
Yes, with the given Sony Vegas alternatives, Mac and Windows users can benefit heavily. But why is it important to try for a replacement when Sony Vegas Pro is relatively efficient software?
To know the answer, you should take the time to understand its limitations, which do exist.
It only works for Windows users
The Sony Vegas Pro software is not available for Mac or other operating systems besides Windows. In addition, it’ll be really complex and time-consuming, even if you opt for virtual machine software or handle dual booting techniques to configure the software on your Mac or Linux.
You need to invest in other hardware
Sony Vegas Pro does do not work within one comprehensive platform like other capable video editing software types, like Wondershare Filmora . You have to acquire a powerful PC and tools to operate it separately. The software works very slowly on older devices.
Not incredibly unique
The functions of Sony Vegas Pro match somewhat with other options in the market. So, users would not expect much value in purchasing this software’s plans that they want to upgrade from their previous system, but on the other hand, the available features are mostly standard-level in functionality as well.
Hot FAQs about Vegas Pro Alternatives
After knowing these details, many users still have specific common queries about opting for a Sony Vegas Pro alternatively. So these are some common FAQs about this- answered.
1. Can Sony Vegas be used on a Mac?
No, it is impossible to directly use Sony Vegas on macOS devices since it does not support it. Instead, you have to separately use a dual boot strategy or virtual machine software to activate the video editor on Mac devices, but the process for that is complex.
2. Is Wondershare Filmora or Vegas Pro better?
Wondershare Filmora and Vegas Pro are top-level options in video and audio editing projects with professional-level editing accuracy. However, Filmora has a cohesive ecosystem with rich AI and standard functions and comes with Mac/Windows support. So, in that sense, Filmora is comparatively a better choice.
Final Words
In place of Sony Vegas Pro, any of these options would also give you a great user experience. Out of them, Filmora is one that we will recommend due to its multi-faceted benefits and features for Mac and Windows users. Ultimately, make your decision based on your particular needs.
Free Download For Win 7 or later(64-bit)
Free Download For macOS 10.14 or later
Part 1: Sony Vegas Pro Alternatives & Competitors Overview
Here is a list of the top 10 tools we found after research. For an easier understanding, the following are the essential points of difference between alternative video editing software types for Sony Vegas Pro in a tabular form.
| Software | Supported OS | Price | Editor’s Verdict |
|---|---|---|---|
| Lightworks | Windows, Mac, Linux | Create-$9.99/month, Pro-$23.99/month | Medium-Difficult |
| Wondershare Filmora | Windows, Mac | Annual-$49.99, Perpetual-$79.99 | Easy |
| Adobe Premiere Pro | Windows, Mac | $20.99/month | Easy-Medium |
| HitFilm Express | Windows, Mac | Free | Easy |
| Kdenlive | Windows, Mac, Linux | Free | Medium-Difficult |
| OpenShot | Windows, Mac, Linux, OsX | Free | Medium-Difficult |
| Blender | Windows, Mac, Linux | Free | Easy |
| Jahshaka | Windows, Linux, OsX | Free | Easy-Medium |
| Final Cut Pro | Mac | Lifetime-$299.99 | Easy-Medium |
| Cyberlink PowerDirector 365 | Windows, Mac | Lifetime-$52.50 | Easy-Medium |
Part 2: Top 10 Sony Vegas (Vegas Pro) Alternatives & Competitors
Now that you know the primary differences between the Sony Vegas Pro alternatives. Are you find anything you like? Let’s move on to more details for your further consideration.
1. Lightworks
With Lightworks, using the independent timeline codec, format, and resolution alteration in videos is extremely simple. In addition, you can use the multi-cam editing feature for real-time, high-quality editing work. Moreover, drag and drop elements into videos for optimized video editing work, including pre-existing Storyboard points.
Main Features:
- Industry-grade features like QC, transcoding, and automated transfer are available.
- Edit files at different FPS limits and use three-point editing for recording/source files.
- Insert files and overwrite on a new project, replace, backfill, and fit to fill your video clips.
- Attach Storyboard tiles and match-frame clips/sub-clips easily.
Pros
- Flexible functionality and speedy transfers
- Edit files with professional movie-like quality
- Auto Sync feature for automatic timeline re-syncing is available
Cons
- Direct X is only available on the Windows version
- TotalFX plugin is not available for free- you have to upgrade to use them
OS Compatibility: Windows , Mac , Linux
Best For: Editing experts creating visually animated and professional-looking short videos can work with Lightworks.
What users say:
For professional-level video editing work, Lightworks brings a lot of resources and elements to users. According to reviews , people who have tried it have experienced better video editing functionality with these resources.
2. Wondershare Filmora
The top Vegas Pro alternative that both Windows and Mac users can opt for is Filmora. The software has advanced AI-incorporated editing functions for automated editing work, including preset effects from FX plugins. Besides that, you can easily add pre-set transitions, audio clips, text, images, and more.
Beginners find it simple to navigate through its interface and can opt for the Instant Mode function for automatic video edits .
Free Download For Win 7 or later(64-bit)
Free Download For macOS 10.14 or later
For a better idea of how this works, you should check out this tutorial video: https://filmora.wondershare.com/get-creative/make-a-video-quickly.html
Main Features:
- Instant Mode is available for automatic video/audio project editing out of 6 shorter clips.
- Support Advanced editing tools like Chroma Key and AI Portrait.
- Record voiceover, apply speech-to-text/text-to-speech functions, and more audio editing features.
- OpenFX plugins like BorisFX and NewBlue FX for a better list of pre-set effects.
Pros
- Simple to use and navigate on the editor timeline, especially with drag-and-drop support
- Output your editing files in different video/audio formats
- Quickly share the file on Vimeo or YouTube, besides downloading it on the local hard drive
Cons
- Free trial users cannot bring their Instant Mode-created videos into the editor timeline
- 4K support only with selected MKV, MOV, M4V (for Mac), and MP4 codecs
OS Compatibility: Windows , Mac
G2 Rating: 4.4 out of 5
Best For: All types of users like educators, students, homeowners, businesses, and video editors for comprehensive video editing tools and uses.
What users say:
Filmora is extremely simple to use, with advanced features available for top-level video editing work. Users mention in reviews how they have benefitted from the simple functionality and dynamic AI-based features available here for video editing.
3. Adobe Premiere Pro
If you are looking for high-quality programs like Sony Vegas, Adobe Premiere Pro is a reliable choice. This editing software allows you to easily create, delete, and move big video projects. Moreover, you can work on multiple files simultaneously and use shortcuts for faster editing work.
Preset filters and editing features are also available here, especially if they choose the Adobe Creative Cloud option.
Main Features:
- Multiple pre-set transitions and effects are available for quick thematic changes.
- Add graphics, titles, and captions.
- Color grading and correction tools are available.
- It is possible to add keyframing and animation elements.
Pros
- Opting for group plans for video editing practice and learning using Adobe Premiere Pro is possible
- Aligns audio with videos instantly during editing
- Utilize Quick Export functionality for video files in some taps
Cons
- Windows High Contrast Mode is supported but to a limited extent, like with menus and title bars
- HDR workflows can only be handled on the Windows version with DisplayHDR 400 support
OS Compatibility: Windows , Mac
G2 Rating: 4.5 out of 5
Best For: Professional editors and trainers can use the various plans under Adobe Premiere Pro for video/audio editing.
What users say:
Advertisers and videographers enjoy high-grade video editing features and like the simple effects and interface quality. The motion graphics support in Adobe Premiere Pro is high-grade as well.
4. HitFilm Express
A capable Sony Vegas free alternative that you should check out is HitFilm Express. With this, you can expect many prepared designs for quick video edits. Additionally, you can manually customize the video files you are working on with high-grade personalization features available in the timeline.
Main Features:
- Pre-set customizable designs are available.
- Built-in sound effects and soundtracks are usable for free.
- Cache renders in timelines are optimized.
- The New Grade Clips feature allows users to apply varying effects to many video clips.
Pros
- Stable process of switching between timelines with an active orbit tool
- Easy to switch between 2D/3D timelines while using the text tool
- Simple to use for an unlimited period
Cons
- Does not work on older versions than Windows 10 and macOS 10.14
- Users cannot integrate this with Vegas Pro like before
OS Compatibility: Windows , Mac
TechRadar Rating: 4.5 out of 5
Best For: This software is a high-quality video editor for custom video editing work, fit for beginners and professionals alike.
What users say:
HitFilm Express is easy to use and efficient in the market for professional-level editing. The tutorial is available here for quick learning about the steps, and expandable features are well-admired by users.
5. Kdenlive
A high-quality Sony Vegas open-source variety that you should seriously consider is Kdenlive. The video editor comes with MLT framework support and holds many tools for optimizing video editing.
To simplify, you can arrange and adjust various video/audio tracks and mute or lock specific ones as needed. Add everything from filters, texts, and transitions using this editor for high-grade video projects.
Main Features:
- Get an automatic backup of your video project while you are editing it.
- Use proxy editing to create low-resolution source clip copies and render them later on computers.
- Multiple video/audio scopes are available for monitoring projects like vectorscope, waveform, and RDB Parade.
- Many transition and effect choices to use.
Pros
- Flexibility with themes to add with multiple options
- Pre-render specific timeline parts for preview
- Effects are simple to use with keyframing quality
Cons
- Complex for completely non-technical users to adapt to
- Only supports 64-bit versions in regards to Windows-based compatibility
Trustpilot Rating: 3.7 out of 5
Best For: High-level editing experts who need strong video editing and monitoring features in an open-source platform.
What users say:
Kdenlive, as an open-source video editing software, assures quick and straightforward usability with projects. Per reviews , users like the ability to make simple video edits without bugs in this editor and quickly export finished projects.
6. OpenShot
OpenShot is a high-quality cross-platform video editor that you can use on different devices for quick but dynamic video project edits. Use keyframing ability here to adjust the animated elements you add to the file.
Moreover, cut the videos with simple steps and add many audio tracks/background videos/watermarks in layers. Also, get several video effects to optimize the video look easily.
Main Features:
- Adjust video speed in reverse motion, fast forward, and slow motion.
- Render effects and 3D animated elements into the video project.
- Get title templates and edit them as needed.
- Visualize the background audio beats with waveform support.
Pros
- Very user-friendly interface with a simple navigation guarantee
- Supports more than 70 languages that you can translate as well using LaunchPad
- Drag-and-drop functionality is supported for adding images, audio, and videos into the OpenShot editor timeline
Cons
- Some bug issues can occur
- Slightly complex learning curve
OS Compatibility: Windows , Linux , OsX
G2 Rating: 4.4 out of 5
Best For: Professional-level video editing experts can opt for this cross-platform free software for high-quality video creations.
What users say:
The OpenShot software is suitable for high-quality video editing across different devices and operating systems. Users like the lack of automated watermarks on all videos, its simple dashboard, and its multi-track editing ability, all available for free.
7. Blender
Blender is free video editing software like Sony Vegas that users can use for video editing, but it is also effective for game development with animations. Indeed, you can create and render dynamic-looking scenes with features like Cycles.
Furthermore, the software has a rich modelling toolset with solutions like curves and sculpting tools.
Main Features:
- Completely customization-friendly UI, shortcuts, and window layout here.
- Customization and scripting are possible to do with this software due to the Python API support.
- Supports access and integration of many pipeline tools for projects.
- Comes with advanced simulation-based features available in MantaFlow and Bullet libraries.
Pros
- Basic and advanced tools for quick video edits
- Strong composition and masking ability with object-based motion tracking benefits
- Easily create short animations with Blender
Cons
- Data under the standalone games created here fall under GPL conditions
- Strict licensing rules are applicable here
OS Compatibility: Windows , Mac , Linux
G2 Rating: 4.5 out of 5
Best For: Game developers and videographers for companies can use this open-source platform for creation and editing.
What users say:
Blender is a capable software for animation-based editing, with high-quality game-based features and interactive elements that make editing simple. As per reviews , users like the simple animation-based tools and fast rendering it offers.
8. Jahshaka
Users of Jahshaka can experience an inclusive, collaborative environment for metaverse-level editing work. This free editing software, like Sony Vegas, focuses mainly on VR-based editing functions and comes with powerful tools for project management and content creation.
Take the help of other team members to collaborate on dynamic virtual world building, editing, and publishing.
Main Features:
- Compatible player for different desktop and mobile devices.
- Create diversified worlds and scenes with one comprehensive platform.
- Immersive software 3D video development.
- Access to pre-built content and libraries of scenes and assets
Pros
- Easily share and distribute your virtual projects
- Deliver final projects offline and online
- An interactive multi-user engine is available
Cons
- Usable for a niche audience and does not include standard video editing tools
- Jahshaka V2 legacy support is no longer active
OS Compatibility: Windows , Linux , OsX
SourceForge Rating: 4.4 out of 5
Best For: Professional video editors who want a collaborative experience in VR-based development and publishing.
What users say:
Jahshaka is a suitable program for optimized VR-based editing with many preset features and themes to choose from. Most users enjoy the new features and worlds and can work with them efficiently.
9. Final Cut Pro
One of the top Sony Vegas alternatives Mac users can safely turn to is Final Cut Pro, which has powerful modern video editing features. With this software, you will access Cinematic Mode, which you can use to create stylish and thematic video scenes.
Similarly, the Object Tracker features utilize ML technology to automatically detect objects and faces in moving videos. It can align effects and titles accurately with the graphical elements in videos.
Main Features:
- Object Tracker feature for using color correction and adding texts into moving videos.
- Accelerated functional for motion tracking with Apple Neural Engine.
- Add high-quality effects and titles into videos with Cinematic Mode support.
- Preset audio tracks and royalty-free sound effects are available for editing.
Pros
- Handle color grading for optimized scene quality
- Adjust the field depth and focus depth in clips
- Share projects across iOS and macOS platforms
Cons
- Not valid for Windows users
- Relatively high cost to avail the paid version with all advanced features
OS Compatibility: Mac
TrustRadius Rating: 4.8 out of 5
Best For: Professional video editors, students, and filmmakers who want to create cinematic-quality video projects.
What users say:
Final Cut Pro is an efficient Mac-based video editing tool with easy sharing and editing capabilities, rich effects/transitions options, and fast rendering ability. Customers enjoy the intuitive non-linear editor, easy accessibility to social media platforms for file exporting, and live scrubbing, as noted in one review .
10. Cyberlink PowerDirector 365
Another Sony Vegas mac alternative for Windows you should give a try is PowerDirector 365 from Cyberlink. This software removes or compiles video clips and uses masking features like image/custom masks.
Preset special effects, blending modes, and sound effects are available here for quick editing. Additionally, the AI-powered Motion Tracking traces objects in clips and adds graphics, animations, and text quickly in line with it.
Main Features:
- You can create and remove videos with masking features.
- Drag and drop the pre-set effects and texts into videos.
- Adjust video clips with tools for border, gradation, and shadowing.
- Multiple animations, callouts, graphics, and stickers to add to videos.
Pros
- Use green screen functionality for quick background removal or editing
- Automatic audio mastering and mixing functionality are available
- Keyframing benefits for customized animations like scaling and positioning
Cons
- Dolby Digital-centric audio codec is not available for users
- Users can try features like Room Echo Removal and NVIDIA A/V Denoise only on Windows 11
OS Compatibility: Windows
TechRadar Rating: 4.5 out of 5
Best For: Professional videographers and regular users who want a Windows-based video editing software for standard video clip editing.
What users say:
Cyberlink PowerDirector is a powerful video editor with standard editing functions many users have tried and benefited from. According to customers , the program has high-quality video and audio editing benefits for presentations, with additional effects/splitting/cropping features.
Part 3: What are the limitations when using Sony Vegas (Vegas Pro) on Mac?
Yes, with the given Sony Vegas alternatives, Mac and Windows users can benefit heavily. But why is it important to try for a replacement when Sony Vegas Pro is relatively efficient software?
To know the answer, you should take the time to understand its limitations, which do exist.
It only works for Windows users
The Sony Vegas Pro software is not available for Mac or other operating systems besides Windows. In addition, it’ll be really complex and time-consuming, even if you opt for virtual machine software or handle dual booting techniques to configure the software on your Mac or Linux.
You need to invest in other hardware
Sony Vegas Pro does do not work within one comprehensive platform like other capable video editing software types, like Wondershare Filmora . You have to acquire a powerful PC and tools to operate it separately. The software works very slowly on older devices.
Not incredibly unique
The functions of Sony Vegas Pro match somewhat with other options in the market. So, users would not expect much value in purchasing this software’s plans that they want to upgrade from their previous system, but on the other hand, the available features are mostly standard-level in functionality as well.
Hot FAQs about Vegas Pro Alternatives
After knowing these details, many users still have specific common queries about opting for a Sony Vegas Pro alternatively. So these are some common FAQs about this- answered.
1. Can Sony Vegas be used on a Mac?
No, it is impossible to directly use Sony Vegas on macOS devices since it does not support it. Instead, you have to separately use a dual boot strategy or virtual machine software to activate the video editor on Mac devices, but the process for that is complex.
2. Is Wondershare Filmora or Vegas Pro better?
Wondershare Filmora and Vegas Pro are top-level options in video and audio editing projects with professional-level editing accuracy. However, Filmora has a cohesive ecosystem with rich AI and standard functions and comes with Mac/Windows support. So, in that sense, Filmora is comparatively a better choice.
Final Words
In place of Sony Vegas Pro, any of these options would also give you a great user experience. Out of them, Filmora is one that we will recommend due to its multi-faceted benefits and features for Mac and Windows users. Ultimately, make your decision based on your particular needs.
Free Download For Win 7 or later(64-bit)
Free Download For macOS 10.14 or later
Ken Burns Effect Tutorial: Add Movement to Your Photos
How to Make Ken Burns Effect in Final Cut Pro?

Liza Brown
Mar 27, 2024• Proven solutions
Ken Burns Effect is an advanced feature of Final Cut Pro that allows users to add creative animations to their videos and images within minutes. You just need to select your picture, add movements to the clip, and choose the start and the end position to produce high-resolution stills. Besides, you can do a tilt, zoom in, a pan, or a combination of these three moves on a single image. This way, you can use the Ken Burns Effect to highlight the stimulating features in your photograph and save your memories in the form of innovative and high-definition animated clips.
This article introduces the readers to Final Cut Pro and explains how to add the Ken Burns Effect in 8 simple steps.
- Part 1: How to Make a Ken Burns Effect in Final Cut Pro?[detaied steps]
- Part 2: How to add the Ken Burns Effect to Multiple Camera Movements?
- Extensive Reading: Why Ken Burns Effect is Named after Ken Burns?
Part 1: How to Make a Ken Burns Effect in Final Cut Pro?
Final Cut Pro is user-friendly software and makes it easy for you to create a Ken Burns Effect without having advanced skills and expertise. So, are you interested in knowing the best part? Given below are a few simple steps to create Ken Burns Effect and make your pictures and videos look adorable.
Step 1: Add Images to the Timeline
First of all, you should specify a name for your project and add photos to the timeline in Final Cut Pro. For this purpose, select multiple photos and press E. A clip will be added to the timeline as shown in figure 1.

Step 2: Check Your Settings
As you can see, our timeline has no other video clip. Hence, Final Cut Pro will not recognize the clip until you adjust the video properties such as format, resolution, and rate, etc. For this purpose, click OK to use your preferred settings and press Shift + Z to fit the picture to your timeline window. Once you’re done it’s time to apply the Ken Burns Effect.

Step 3: Add the Ken Burns Effect
The Ken Burns Effect is used to focus on specific parts of an image and bring motionless content in to provoke emotional reactions. Follow these steps to add the Ken Burns Effect:
- Select the clip or picture;
- See the lower left of the viewer;
- Go to the Viewer window using the drop-down menu;
- Tap on the pop-up menu located in the bottom left-hand corner;
- Choose the Crop option from the menu or press Shift + C;
- Press the Ken Burns button in the Crop onscreen controls to add the effect; and
- Finally, notice the start frame and the end frame controls.

Step 4: Customize Your Effect
In the Ken Burns display, you can see the controls for adjusting the panning and zooms effects by changing the size and position of two-colored rectangles overlaying on the clip. To customize the Ken Burns effect:
- Adjust the green rectangle’s size and position to set the start position;
- Adjust the red rectangle’s size and position to set the end position;
- The arrow depicts the direction of camera position between start and end position;
- In the top left-hand corner, click on the Swap button to exchange the two positions as per your requirements;
- You can see the preview of the animation on the screen.

Step 5: Add a Freeze Frame
You’re not done yet because you need to hold your picture at the end of the animation. For this purpose, you should create a freezing frame at the end of the clip to make Ken Burns do this. Here’s the deal:
- Press the Down arrow followed by the Left arrow to go to the last frame;
- Press Option-F to add a freeze-frame;
- Make sure that your added frame matches the ending frame of the Ken Burns Effect.

Step 6: Adjust the Duration of the Freeze Frame
The users can also adjust the speed of the animation and the duration of the freeze-frame by trimming your clip. For this purpose, trim the length as per your requirement and it will optimize the speed as shown in figure 6.

Step 7: Swap the Start and End Frame
Now, swap the start and ending frame as per your preference for the Ken Burns animation. Here’s how you can do this:
- Click on the Swap button;
- The start frame will match the still frame (previous one);
- Grab the end frame and move it to your desired position;
- Apply enough zoom in to make the black areas disappear;
- Preview to see how your animation looks.

Step 8: Play/Preview Looping
After you have optimized the speed of the Ken Burns Effect by trimming the clip’s length and have widened the shot to include everyone, it’s time to preview the changes you have made. Given below are simple steps:
- Press the Play Loop button;
- Tap on the Pause icon and return to editing;
- Click Done and enjoy your animation.
Seems a little complicated? Filmora allows users to do Ken Burns effect, or pan and zoom effect, in much easier steps, click to download and have a try!


Part 2: How to add the Ken Burns Effect to Multiple Camera Movements?
Although you can apply a single Ken Burns movement to your image, you can still give the impression of multiple movements being used. This means the Ken Burns Effect can be added to multiple camera movements by duplicating the photo and building numerous movements in sequence.
- Add the first camera movement to your image;
- Duplicate the clip by click and drag option or copy and paste option;
- Press the Swap button in the Ken Burns settings to reverse the start and end positions;
- Verify if multiple camera movements have been added.
Extensive Reading: Why Ken Burns Effect is Named after Ken Burns?
What is the Ken Burns Effect?
The Ken Burns Effect is a feature in Final Cut Pro to create a pan and zoom effect by using your predefined start and end positions. Basically, it is a crop effect with one crop at the start of the clip while the other at the end. Ken Burns Effect can be further customized by adjusting the smoothness of the animation. While creating a Ken Burns Effect, the motion applied to the video clips gets automatically smoothed to accelerate and decelerate the movement slowly at the start and the end of the animation.
Why the Effect is named after Ken Burns?
Now, as you have learned the purpose of the Ken Burns Effect, you must be curious about its name. It is named after American documentarian Ken Burns, who is known for his instantly recognizable and highly influential visual aesthetic. Surprisingly, Ken Burns did not invent this Ken Burns Effect; rather, it has existed for decades. You might be wondering why the technique was then named after Ken Burns. This was due to the persistent and adroit use of this technique that it is now known as the Ken Burns Effect.

What are the Applications of Ken Burns Effect?
Primarily, the Ken Burns Effect is used due to the unavailability of a film or video. The technique gives action to still photographs to glorify the subjects of interest like couples in wedding photography. It gets better and better as you apply simulated parallax with Ken Burns Effect to make your 2D images appear as 3D plus advanced zooming visuals. You can also use the Ken Burns effect to make a video of your graduation ceremony pictures or memorable moments of reunion. Ken Burns Effect is also used in documentaries by professional filmmakers and editors.
Conclusion
Adding animated effects to your pictures and videos makes them look gorgeous. This is crazy, isn’t it, when you impress your peers with your editing skills. So, what’s the bottom line of this whole discussion? Try adding the Ken Burns Effect with Final Cut Pro to create a pan and zoom effect on your pictures and clips get the output in your desired format.
Liza Brown
Liza Brown is a writer and a lover of all things video.
Follow @Liza Brown
Liza Brown
Mar 27, 2024• Proven solutions
Ken Burns Effect is an advanced feature of Final Cut Pro that allows users to add creative animations to their videos and images within minutes. You just need to select your picture, add movements to the clip, and choose the start and the end position to produce high-resolution stills. Besides, you can do a tilt, zoom in, a pan, or a combination of these three moves on a single image. This way, you can use the Ken Burns Effect to highlight the stimulating features in your photograph and save your memories in the form of innovative and high-definition animated clips.
This article introduces the readers to Final Cut Pro and explains how to add the Ken Burns Effect in 8 simple steps.
- Part 1: How to Make a Ken Burns Effect in Final Cut Pro?[detaied steps]
- Part 2: How to add the Ken Burns Effect to Multiple Camera Movements?
- Extensive Reading: Why Ken Burns Effect is Named after Ken Burns?
Part 1: How to Make a Ken Burns Effect in Final Cut Pro?
Final Cut Pro is user-friendly software and makes it easy for you to create a Ken Burns Effect without having advanced skills and expertise. So, are you interested in knowing the best part? Given below are a few simple steps to create Ken Burns Effect and make your pictures and videos look adorable.
Step 1: Add Images to the Timeline
First of all, you should specify a name for your project and add photos to the timeline in Final Cut Pro. For this purpose, select multiple photos and press E. A clip will be added to the timeline as shown in figure 1.
Step 2: Check Your Settings
As you can see, our timeline has no other video clip. Hence, Final Cut Pro will not recognize the clip until you adjust the video properties such as format, resolution, and rate, etc. For this purpose, click OK to use your preferred settings and press Shift + Z to fit the picture to your timeline window. Once you’re done it’s time to apply the Ken Burns Effect.
Step 3: Add the Ken Burns Effect
The Ken Burns Effect is used to focus on specific parts of an image and bring motionless content in to provoke emotional reactions. Follow these steps to add the Ken Burns Effect:
- Select the clip or picture;
- See the lower left of the viewer;
- Go to the Viewer window using the drop-down menu;
- Tap on the pop-up menu located in the bottom left-hand corner;
- Choose the Crop option from the menu or press Shift + C;
- Press the Ken Burns button in the Crop onscreen controls to add the effect; and
- Finally, notice the start frame and the end frame controls.
Step 4: Customize Your Effect
In the Ken Burns display, you can see the controls for adjusting the panning and zooms effects by changing the size and position of two-colored rectangles overlaying on the clip. To customize the Ken Burns effect:
- Adjust the green rectangle’s size and position to set the start position;
- Adjust the red rectangle’s size and position to set the end position;
- The arrow depicts the direction of camera position between start and end position;
- In the top left-hand corner, click on the Swap button to exchange the two positions as per your requirements;
- You can see the preview of the animation on the screen.
Step 5: Add a Freeze Frame
You’re not done yet because you need to hold your picture at the end of the animation. For this purpose, you should create a freezing frame at the end of the clip to make Ken Burns do this. Here’s the deal:
- Press the Down arrow followed by the Left arrow to go to the last frame;
- Press Option-F to add a freeze-frame;
- Make sure that your added frame matches the ending frame of the Ken Burns Effect.
Step 6: Adjust the Duration of the Freeze Frame
The users can also adjust the speed of the animation and the duration of the freeze-frame by trimming your clip. For this purpose, trim the length as per your requirement and it will optimize the speed as shown in figure 6.
Step 7: Swap the Start and End Frame
Now, swap the start and ending frame as per your preference for the Ken Burns animation. Here’s how you can do this:
- Click on the Swap button;
- The start frame will match the still frame (previous one);
- Grab the end frame and move it to your desired position;
- Apply enough zoom in to make the black areas disappear;
- Preview to see how your animation looks.
Step 8: Play/Preview Looping
After you have optimized the speed of the Ken Burns Effect by trimming the clip’s length and have widened the shot to include everyone, it’s time to preview the changes you have made. Given below are simple steps:
- Press the Play Loop button;
- Tap on the Pause icon and return to editing;
- Click Done and enjoy your animation.
Seems a little complicated? Filmora allows users to do Ken Burns effect, or pan and zoom effect, in much easier steps, click to download and have a try!
Part 2: How to add the Ken Burns Effect to Multiple Camera Movements?
Although you can apply a single Ken Burns movement to your image, you can still give the impression of multiple movements being used. This means the Ken Burns Effect can be added to multiple camera movements by duplicating the photo and building numerous movements in sequence.
- Add the first camera movement to your image;
- Duplicate the clip by click and drag option or copy and paste option;
- Press the Swap button in the Ken Burns settings to reverse the start and end positions;
- Verify if multiple camera movements have been added.
Extensive Reading: Why Ken Burns Effect is Named after Ken Burns?
What is the Ken Burns Effect?
The Ken Burns Effect is a feature in Final Cut Pro to create a pan and zoom effect by using your predefined start and end positions. Basically, it is a crop effect with one crop at the start of the clip while the other at the end. Ken Burns Effect can be further customized by adjusting the smoothness of the animation. While creating a Ken Burns Effect, the motion applied to the video clips gets automatically smoothed to accelerate and decelerate the movement slowly at the start and the end of the animation.
Why the Effect is named after Ken Burns?
Now, as you have learned the purpose of the Ken Burns Effect, you must be curious about its name. It is named after American documentarian Ken Burns, who is known for his instantly recognizable and highly influential visual aesthetic. Surprisingly, Ken Burns did not invent this Ken Burns Effect; rather, it has existed for decades. You might be wondering why the technique was then named after Ken Burns. This was due to the persistent and adroit use of this technique that it is now known as the Ken Burns Effect.
What are the Applications of Ken Burns Effect?
Primarily, the Ken Burns Effect is used due to the unavailability of a film or video. The technique gives action to still photographs to glorify the subjects of interest like couples in wedding photography. It gets better and better as you apply simulated parallax with Ken Burns Effect to make your 2D images appear as 3D plus advanced zooming visuals. You can also use the Ken Burns effect to make a video of your graduation ceremony pictures or memorable moments of reunion. Ken Burns Effect is also used in documentaries by professional filmmakers and editors.
Conclusion
Adding animated effects to your pictures and videos makes them look gorgeous. This is crazy, isn’t it, when you impress your peers with your editing skills. So, what’s the bottom line of this whole discussion? Try adding the Ken Burns Effect with Final Cut Pro to create a pan and zoom effect on your pictures and clips get the output in your desired format.
Liza Brown
Liza Brown is a writer and a lover of all things video.
Follow @Liza Brown
Download the Best Video Dubbing Software for PC: 2024 Review
Best 6 Video Dubbing Software for PC in 2024

Shanoon Cox
Mar 27, 2024• Proven solutions
If you are a content creator and want to make your videos appealing to the masses, then you must master the art of video dubbing . It has become a vital part of post-production, making your videos available to an international audience. To get that effortless playback experience, you need to use the best video dubbing software. In this post, I will familiarize you with 6 of the best video dubbing software for PC with a free download option. Let’s begin!
- Part 1: What to Consider before Choosing Video Dubbing Software?
- Part 2: 6 Best Video Dubbing Software for PC [Free Download]
What to Consider While Choosing Video Dubbing Software?
Since there are so many videos dubbing software , picking the right tool to fit your needs can be crucial. I recommend considering the following things in mind while selecting a dubbing tool.
Voice Recording
If you are using different tools for voice recording and dubbing, then it will create a lot of problems. Therefore, getting an all-in-one solution to meet your post-production needs is better.
Audio Editing and Syncing
The tool should be able to extract the audio segment from the video, letting you edit it the way you like. Some applications even come with a syncing tool to save you time.
Learn how to sync video and audio in FCPX here.
Compatibility
Also, ensure that the hardware (like microphone or audio card) you use is supported by the tool. Besides that, it should also be compatible with your computer and the video and audio formats you are using.
Import/Export Features
You should be able to import files from different formats and export the dubbed video in the format of your choice.
Have problems exported? See how to export with Compressor here.
Other Things
Make sure that the application is easy to use. Otherwise, you would have to spend a lot of time learning its features. It should have good customer support and positive feedback from existing users and must come within your budget.
The 6 Best Video Dubbing Software for PC [Free Download]
After carefully considering the above things, I have come up with the following video dubbing software you can try.
1. Wondershare Filmora
Filmora is a complete video editing tool that will meet every requirement of yours in post-production. This video dubbing software has a dedicated music and audio mixer tool that can easily help you dub your videos and add voiceovers.
- With just a single click, you can start recording the voiceover for an existing video and make further edits to it.
- There are already 100+ audio tracks that you will get in the tool to help you manage your video’s voiceover.
- It has a seamless drag-and-drop interface to easily sync your voiceover component with the picture in less time.
- You can extract the audio components separately from the video and make changes to them.
- Other features include audio fade-in/fade-out, noise removal, keyframing, and many others.
Pros
- Tons of video editing features.
- Can import/export files in different formats.
- Extremely easy to use.
Cons
- The premium version is needed to use all features.
2.Magix
Magix is another reliable video dubbing software for PC with a free download option that you can explore. Though, if you want to experience its premium features, you must buy the Magix Pro version.
- Using Magix, you can do audio voiceovers, adjust the recordings, and further edit them for a perfect dubbing experience.
- There are inbuilt audio mixers and editing tools that you can use during the post-production of videos.
- You can also find inbuilt wizards, one-click audio effects, compressors, noise cancelation, and other features.
- Magix also has hundreds of effects and templates that you can try.
Pros
- Easy to use.
- Extensive compatibility.
Cons
- The Pro version is not available for free.
3.CamStudio
If you are looking for video dubbing software for a PC free download option, then CamStudio would be an ideal pick. Since this is an open-source desktop application, you can use it without paying anything.
- You can use this tool to add music and voiceover to your videos.
- It will let you reduce the audio noise, compress it, and further edit it.
- The tool follows a lossless codec compression to ensure your videos stay of the best quality.
- Besides being a video dubbing software, you can also use it to edit your videos.
Pros
- The tool is open-source and free available.
Cons
- Limited features.
- Only supports AVI files.
- Not as user-friendly as other tools.
4.Free Audio Dub
This is another resourceful video dubbing software for PC with a free download that you can consider. While the video dubbing software does not have a lot of features, it will meet your basic post-production needs.
- You can load the video and audio files, and the application will automatically merge them.
- It has an inbuilt algorithm to sync both files and give the best-suited dubbing results.
- Furthermore, you can crop any video/audio file section or move it to sync them together.
Pros
- Lightweight.
- Free available.
Cons
- Limited features.
5.Audacity
Audacity is one of the most popular audio editing tools available for leading platforms. Since it is an open-source application, it can also be used as video dubbing software for free.
- You can import and export your audio files in different formats so that they would be compatible with your video.
- It lets us record audio for voiceover and further make changes in it with its existing presets.
- There are several features to edit, fade in/out, clip, minimize noise, and perform many operations on your audio files.
- You can also put numerous effects on your audio before exporting it for dubbing.
Pros
- Free available.
- Various audio editing features.
Cons
- There are no video editing options.
- You can only record and edit audio, but later, you will need another tool for merging with videos.
6.ApowerSoft Video Editor
Lastly, you can also use the ApowerSoft video editor as a video dubbing software as it has built-in features to record and edit audio.
- The tool is pretty easy to use and lets us record audio and perform different operations on it.
- You can drag and adjust the audio component to sync it with the picture.
- There are several existing effects and presets that you can further implement to save your time.
- Apart from importing files of different formats, you can also export them in the format of your choice.
Pros
- Easy to use.
Cons
- Fewer features for audio editing.
- The premium version is paid.
Conclusion:
Now when you know six different video dubbing software for PC with free download options, you can easily pick up the best tool. While some are free applications, others only have a free demo version. You can explore the video dubbing software on your own and even try a few of them. I would recommend going with a multi-purpose tool like Filmora that will help you edit all kinds of videos and meet your post-production needs in one place.
FAQ:
- Can I use Filmora to make high-quality changes to videos?
Filmora is an all-in-one video editor with many features and can do many things well. It makes professional video editing easy because it offers a user-friendly interface, drag-and-drop editing, and other complex video editing functions.
- How well does Magix work?
Magix Movie Studio is an easy-to-use, stylish movie editor that doesn’t cost too much. There are still some problems, like the reverse track order, but it’s clear that this is a choice, and if you use other video editing programs, you’ll get used to it.
- Is Audacity good for the new learner?
Because it is so easy to use, Audacity is a great software for beginners who want to record and edit voices and recordings like a pro because it is so easy to use. Before we learn how to use Audacity step by step, let’s look at some of the things that make it useful.
- How long can Audacity record for?
Since Audacity stores samples as 64-bit values (even on 32-bit devices), there is no 32-bit rule that says recordings can’t be longer than 231 samples (which is for example, just over 13.5 hours at a 44,100 Hz sample rate).
- How do I change things in Apowersoft?
Use magic and fantasy to make your edits. To cut or crop a video file, click the scissors or cropping icon, depending on what you want to do. To join videos, drag files into the timeline in the order you want. Add filters and video overlay to your movie to make it look better.
Shanoon Cox
Shanoon Cox is a writer and a lover of all things video.
Follow @Shanoon Cox
Shanoon Cox
Mar 27, 2024• Proven solutions
If you are a content creator and want to make your videos appealing to the masses, then you must master the art of video dubbing . It has become a vital part of post-production, making your videos available to an international audience. To get that effortless playback experience, you need to use the best video dubbing software. In this post, I will familiarize you with 6 of the best video dubbing software for PC with a free download option. Let’s begin!
- Part 1: What to Consider before Choosing Video Dubbing Software?
- Part 2: 6 Best Video Dubbing Software for PC [Free Download]
What to Consider While Choosing Video Dubbing Software?
Since there are so many videos dubbing software , picking the right tool to fit your needs can be crucial. I recommend considering the following things in mind while selecting a dubbing tool.
Voice Recording
If you are using different tools for voice recording and dubbing, then it will create a lot of problems. Therefore, getting an all-in-one solution to meet your post-production needs is better.
Audio Editing and Syncing
The tool should be able to extract the audio segment from the video, letting you edit it the way you like. Some applications even come with a syncing tool to save you time.
Learn how to sync video and audio in FCPX here.
Compatibility
Also, ensure that the hardware (like microphone or audio card) you use is supported by the tool. Besides that, it should also be compatible with your computer and the video and audio formats you are using.
Import/Export Features
You should be able to import files from different formats and export the dubbed video in the format of your choice.
Have problems exported? See how to export with Compressor here.
Other Things
Make sure that the application is easy to use. Otherwise, you would have to spend a lot of time learning its features. It should have good customer support and positive feedback from existing users and must come within your budget.
The 6 Best Video Dubbing Software for PC [Free Download]
After carefully considering the above things, I have come up with the following video dubbing software you can try.
1. Wondershare Filmora
Filmora is a complete video editing tool that will meet every requirement of yours in post-production. This video dubbing software has a dedicated music and audio mixer tool that can easily help you dub your videos and add voiceovers.
- With just a single click, you can start recording the voiceover for an existing video and make further edits to it.
- There are already 100+ audio tracks that you will get in the tool to help you manage your video’s voiceover.
- It has a seamless drag-and-drop interface to easily sync your voiceover component with the picture in less time.
- You can extract the audio components separately from the video and make changes to them.
- Other features include audio fade-in/fade-out, noise removal, keyframing, and many others.
Pros
- Tons of video editing features.
- Can import/export files in different formats.
- Extremely easy to use.
Cons
- The premium version is needed to use all features.
2.Magix
Magix is another reliable video dubbing software for PC with a free download option that you can explore. Though, if you want to experience its premium features, you must buy the Magix Pro version.
- Using Magix, you can do audio voiceovers, adjust the recordings, and further edit them for a perfect dubbing experience.
- There are inbuilt audio mixers and editing tools that you can use during the post-production of videos.
- You can also find inbuilt wizards, one-click audio effects, compressors, noise cancelation, and other features.
- Magix also has hundreds of effects and templates that you can try.
Pros
- Easy to use.
- Extensive compatibility.
Cons
- The Pro version is not available for free.
3.CamStudio
If you are looking for video dubbing software for a PC free download option, then CamStudio would be an ideal pick. Since this is an open-source desktop application, you can use it without paying anything.
- You can use this tool to add music and voiceover to your videos.
- It will let you reduce the audio noise, compress it, and further edit it.
- The tool follows a lossless codec compression to ensure your videos stay of the best quality.
- Besides being a video dubbing software, you can also use it to edit your videos.
Pros
- The tool is open-source and free available.
Cons
- Limited features.
- Only supports AVI files.
- Not as user-friendly as other tools.
4.Free Audio Dub
This is another resourceful video dubbing software for PC with a free download that you can consider. While the video dubbing software does not have a lot of features, it will meet your basic post-production needs.
- You can load the video and audio files, and the application will automatically merge them.
- It has an inbuilt algorithm to sync both files and give the best-suited dubbing results.
- Furthermore, you can crop any video/audio file section or move it to sync them together.
Pros
- Lightweight.
- Free available.
Cons
- Limited features.
5.Audacity
Audacity is one of the most popular audio editing tools available for leading platforms. Since it is an open-source application, it can also be used as video dubbing software for free.
- You can import and export your audio files in different formats so that they would be compatible with your video.
- It lets us record audio for voiceover and further make changes in it with its existing presets.
- There are several features to edit, fade in/out, clip, minimize noise, and perform many operations on your audio files.
- You can also put numerous effects on your audio before exporting it for dubbing.
Pros
- Free available.
- Various audio editing features.
Cons
- There are no video editing options.
- You can only record and edit audio, but later, you will need another tool for merging with videos.
6.ApowerSoft Video Editor
Lastly, you can also use the ApowerSoft video editor as a video dubbing software as it has built-in features to record and edit audio.
- The tool is pretty easy to use and lets us record audio and perform different operations on it.
- You can drag and adjust the audio component to sync it with the picture.
- There are several existing effects and presets that you can further implement to save your time.
- Apart from importing files of different formats, you can also export them in the format of your choice.
Pros
- Easy to use.
Cons
- Fewer features for audio editing.
- The premium version is paid.
Conclusion:
Now when you know six different video dubbing software for PC with free download options, you can easily pick up the best tool. While some are free applications, others only have a free demo version. You can explore the video dubbing software on your own and even try a few of them. I would recommend going with a multi-purpose tool like Filmora that will help you edit all kinds of videos and meet your post-production needs in one place.
FAQ:
- Can I use Filmora to make high-quality changes to videos?
Filmora is an all-in-one video editor with many features and can do many things well. It makes professional video editing easy because it offers a user-friendly interface, drag-and-drop editing, and other complex video editing functions.
- How well does Magix work?
Magix Movie Studio is an easy-to-use, stylish movie editor that doesn’t cost too much. There are still some problems, like the reverse track order, but it’s clear that this is a choice, and if you use other video editing programs, you’ll get used to it.
- Is Audacity good for the new learner?
Because it is so easy to use, Audacity is a great software for beginners who want to record and edit voices and recordings like a pro because it is so easy to use. Before we learn how to use Audacity step by step, let’s look at some of the things that make it useful.
- How long can Audacity record for?
Since Audacity stores samples as 64-bit values (even on 32-bit devices), there is no 32-bit rule that says recordings can’t be longer than 231 samples (which is for example, just over 13.5 hours at a 44,100 Hz sample rate).
- How do I change things in Apowersoft?
Use magic and fantasy to make your edits. To cut or crop a video file, click the scissors or cropping icon, depending on what you want to do. To join videos, drag files into the timeline in the order you want. Add filters and video overlay to your movie to make it look better.
Shanoon Cox
Shanoon Cox is a writer and a lover of all things video.
Follow @Shanoon Cox
Also read:
- Updated Best iPhone and iPad Apps for Watching Movie Trailers for 2024
- 2024 Approved Stop Time in Its Tracks How to Freeze Frame in Videos Easily
- New In 2024, FCPX Audio Techniques Mastering L-Cuts, J-Cuts, and Beyond
- Updated 2024 Approved The Ultimate Guide to 16X9 Ratio Calculations Top 5 Takeaways
- Updated 2024 Approved Unlock Chromecasts Full Potential Streaming Local Videos From Windows, Mac, Android, and iOS Devices
- 2024 Approved Unlock Adobe Premieres Full Potential Top 15 Plugins (Free Download)
- 2024 Approved Top 5 Best Free MOV Video Joiners
- New Free and Paid Android Video Editing Apps Compared Top 10 for 2024
- 2024 Approved The Art of Stillness Freezing Frames in Videos Made Easy
- Updated How to Crop a Video with Avidemux for 2024
- Updated 2024 Approved Unleash Your Creativity Top Free Video Editors for Chrome OS
- 2024 Approved Transform Your Memories Video Editing Secrets for Beginners
- Updated 2024 Approved Free QuickTime Video Editing Software Top 10 Choices
- New Video Resume Builder Showdown 4 Best Options Free Templates for 2024
- Updated Speed Up Video Playback in QuickTime Player A Step-by-Step Guide
- Updated In 2024, Create Stunning Video Invites Best Apps for iOS and Android
- Updated 2024 Approved Discover the Secret to Seamless Music Conversion A Must-Read Article
- 2024 Approved Unleash Your Creativity A Comprehensive Guide to Making Video Slideshows with Final Cut Pro
- New The Best Free AVI Video Rotators A Comprehensive Review
- 2024 Approved Video to Live Photo Conversion Top-Rated Apps and Guides
- Updated Slow Motion Magic on Kapwing A Step-by-Step Guide to Editing Like a Pro
- New In 2024, Resize Videos in No Time A Simple Tutorial
- Updated 2024 Approved How to Make a Time Lapse Video in Final Cut Pro
- In 2024, Screen Record with Ease Top 10 Webcam Software for Windows 10
- Updated In 2024, Unleash Your Creativity Editing Nikon Videos with Ease
- New The Ultimate Video Editors Handbook Download and Learn for 2024
- New Seamless Video Editing on ARM Devices Filmora X Makes It Happen for 2024
- Updated The Ultimate List of Free Online Photo Background Blur Tools
- Updated 2024 Approved Final Cut Pro X The Art of Freeze Frames and Slow Motion Storytelling
- New 2024 Approved 10 Powerful Video Editing Software Alternatives to Final Cut Pro X
- New 2024 Approved Get the Picture Free Commercial Image Solutions
- New Unleash the Power of Final Cut Pro Creating Engaging Video Slideshows for 2024
- Updated 2024 Approved Top 5 Best Windows Movie Maker Mac Equivalents
- Updated Choosing the Right Video Editing Software Program to Edit Videos Shot by Sony Digital Camcorder for 2024
- New The Ultimate Guide to Pinnacle Studio Alternatives on Mac
- Updated 2024 Approved The Ultimate Guide to Video Brightening Apps
- Updated Splice Video Editor A Complete Breakdown of Its Capabilities for 2024
- Updated Trim Videos for Free Top Watermark-Free Editors for 2024
- 2024 Approved FCPX Problem-Solving Essentials Top Tips and Tricks
- Updated 2024 Approved Authors Recommended The Best Text Voice Generators for All Platforms
- 2024 Approved 20 Wonderful Stop Motion Ideas for Beginners and Kids
- How to Use Pokémon Emerald Master Ball Cheat On Oppo K11 5G | Dr.fone
- In 2024, Lock Your Motorola Moto G04 Phone in Style The Top 5 Gesture Lock Screen Apps
- Full Solutions to Fix Error Code 920 In Google Play on OnePlus Ace 2V | Dr.fone
- How to Quickly Fix Bluetooth Not Working on Realme Narzo 60 Pro 5G | Dr.fone
- Updated Ideas That Will Help You Out in Making Transparent Image for 2024
- Updated 2024 Approved Chrome Video Translator Select the Perfect Platform
- How to Turn Off Find My iPhone XS Max when Phone is Broken?
- 10 Free Location Spoofers to Fake GPS Location on your Samsung Galaxy Z Fold 5 | Dr.fone
- Title: Updated 2024 Approved Design Your Dream Invite Top 10 Free Online Video Makers
- Author: MdadeLe
- Created at : 2024-05-19 08:28:25
- Updated at : 2024-05-20 08:28:25
- Link: https://smart-video-editing.techidaily.com/updated-2024-approved-design-your-dream-invite-top-10-free-online-video-makers/
- License: This work is licensed under CC BY-NC-SA 4.0.
