
:max_bytes(150000):strip_icc():format(webp)/GettyImages-769729481-5bd367dcc9e77c007c015257.jpg)
New Maximize Storage A Step-by-Step Guide to Clearing Space for FCPX for 2024
Maximize Storage: A Step-by-Step Guide to Clearing Space for FCPX
How to Free Up Disk Space for Final Cut Pro X?

Benjamin Arango
Mar 27, 2024• Proven solutions
Whenever you are working on a Mac ensure that 10% of your storage is ideal and free. Without free space, your work is going to get slow. Sometimes you have to erase a portion of things occupying extra storage to work smoothly.
Never ignore and disregard the errors and alerts of the space disk being full. This article is all about how to fix the disk space in the final cut Pro X. Moreover, this article will cover the different ways via which you can check mac storage space, and how to free up space in FCPX and Mac.
Quick Guide:
Part 1: How to free up space from Final Cut Pro Library?
It takes three steps, and here are these steps.


Step1: Remember to delete unused clips and original medias
To make room in your final cut pro, delete all the unused clips and original media. Delete the generated library files and delete the render files. Before deleting make sure to check whether to delete unused or used render files.

Step 2: How to save space with files and transcoding options?
It happens in final cut pro, that while working, it creates records, proxy files, and rendered files. To save space, you have to delete these files. It is advised to delete the generated rendered files before moving the library to mac Final Cut pro. Moreover, Mac recovers all the files the following time you open the project
Step 3: How to stop background rendering and how to delete render files in Fcpx?
Sometimes temporary videos and audios are created in Final cut pro X . Background rendering starts just after 5 seconds you quit working in mac. You can physically control the background rendering in Final cut pro. When you want to have more control, disable rendering in FCP and choose which clip you would like to render. You can change the preferences to disable or enable through the FCPx settings. Once you disable the rendering, it is your choice to select the specific clips to render.
Open the preferences menu in your mac and render the highlighted clips in your Fcpx timeline. Use the control+R shortcut to render the files.
To delete the render files in Fcpx, Delete the generated files. Files> generated files. A window will appear, Click ok on delete render files.

Part2: What to do with the “not enough disk space” error even with enough space in Mac?
Sometimes still having a lot of space, Your final cut pro X shows not enough disk space error in FCP X. Help!
Have you ever got the error of not having enough space at available destinations whenever you import anything to FCP X.?
Quick GuideFollow the below steps to solve this problem
- Click and select the library in FCPX
- Then go to the File menu and select “Delete generated library file”
- Next, Select all the render and proxy files
- You might not be using optimized files, In that case, select optimized files
- Exit FCPX.
- To reboot, hold down both option and command keys
- Delete the preference files
- If the error persists, run the utility folder that is inside the Application folder.
- Execute First aid in all the units.
- If the error persists, obtain a copy of the disk, and repair the directories on all the drives.
Part 3: How much space can FCPX take in Mac?
Today, when we have hard drives and multi-terabytes, many of us have stopped looking at the disk space. Many of you usually don’t bother until you get an alert that the disk is full.
Sometimes the largest drives get filled eventually. If you haven’t checked your disk space yet, use your Mac and follow the instructions given below. You may be surprised about how much space can FCPX take.
Here is how you will do it:
Option 1: Checking the mac storage through “About this Mac”
Now it is a bit easy to check the storage from about the section. You will find this in most of the recent MAC versions.
Click on the mac logo and then click on “About this mac”.
Click on “storage” and you will see a reference chart stacked portraying the capacity of the disk and the absolute amount of storage taken by different categories of information. Moreover, you will find out the space that is yet accessible to you.
Option 2: Checking the mac storage through “Disk utility”
If you’re a Mac user, you might know that there is a disk utility app. You can easily get a readout of the available space from there.
Open your Finder and click “Applications” on the left side.
Or click the magnifying glass in the upper right to find disk utility.
You will find utilities in Applications. Applications> utilities.
After the disk utility opens, you can see the available used spaces. Remember to put your hard drive’s name from the list. The popup window that opens up will also tell you the free space of any device connected to your Mac.

Option3: Checking the storage from the Finder
You can get a preview of your storage device by clicking an item in the Finder and pressing the spacebar on your keyboard. Let’s suppose you need to check a particular document without opening it.
Select that document and press the spacebar. You will know what’s inside without even opening it.
Quick Guide Here is how you can do it
- Go to Finder and select Finder>Preferences, next Click General, modify the settings and you will see the storage device on the desktop.
- To check the available or remaining space, click the spacebar. As you click it a window popup will show you the remaining space.
- Press the spacebar again to close the window or you can do it via command. Press Command-W.
- Turn on the finder status bar on your window. In case you want to check the disk space frequently.
- Open a Finder window and next open the view menu. As you select the show status bar option, you will see the number of items in the folders. In the other case, if you are viewing the folder you’ll get the idea of remaining or free space
If you’re looking for a lighter alternative to Final Cut Pro, try Filmora to save more space!
So, is your FCPX good to go? Get your tutorials for FCPX here!
Part 4: How to free up space in Mac?
Find out what’s occupying the room in your Mac to save room for final cut pro. Get familiar with how to deal with your Mac’s capacity. Acquaint yourself with the ideal approaches to free up space in Mac.
Nowadays, Macs have limited and restricted capacity due to the SSDs present in them. When there were hard drives in Mac, we had a huge room on them. In recent memory, high-resolution videos, music, and other functional records take up more capacity. When you run out of space, it hampers your work and processing.
Quickly clear your mac space.
If you are in a hurry, you can do the below things to quickly clear up the space in your mac.
- Select the download folder and open it in the Finder. Now select the folder whose content you don’t need and trash it.
- Move to the home folder and open a new Find window. Press command-F.
- Click the drop-down menu to choose “other.”Look to the box next to “Document size”. Press ok. Choose” greater than” in the next dropdown menu. With this choose the unwanted file or the one that is no longer useful to throw in the trash.
- Another thing that you can do is, move those files in the trash that you haven’t opened in the last year.
- If your desktop has a lot of unused stuff and is taking space, then delete the folders on the desktop.
Ways to clean junk on your Mac
There are many ways to clean garbage records on Mac. You may have different types of garbage in your Mac. Here is a simple solution for the elimination of junk from your Mac. Along with occupying the space, junk slows down your Pc, phone, and Mac.
Cleaning cache files: Every Mac has some files stored which are known as cache files. Some temporary files are kept in Mac to speed up the Apple software. It better to clean the files before it gets accumulated and hampers the performance.
- Press command +shift+G after opening the Finder.
- Enter this command in the field box~/Library/Caches.
- See all the visible files on the appearing window
- Select all files to delete, and you can delete one by one
- Enter the username and password in the popup window
Similarly, you can clean the system log files too from your mac by below steps:
- Go to the folder. Before selecting Go, enter the /var/log/.
- All the system files are visible to you. Now, you can easily delete unwanted files.
Clean with Clean MyMacX
You can now clean your mac with this application. Download this application for free. After launching it, see the features on left and click on the system junk. Do scanning and check the opposite side of user cache files and delete the items, you want to delete. Lastly, press clean to clean it. Your Mac is now as new as before. Clean MyMacX cleans all the junk and makes your mac clutter-free.
Conclusion
Move the unwanted and unused clips from your Mac final cut pro X. Even you can free up the storage by deleting the whole event. A few media files stay in the library as many projects use the same media.
Benjamin Arango
Benjamin Arango is a writer and a lover of all things video.
Follow @Benjamin Arango
Benjamin Arango
Mar 27, 2024• Proven solutions
Whenever you are working on a Mac ensure that 10% of your storage is ideal and free. Without free space, your work is going to get slow. Sometimes you have to erase a portion of things occupying extra storage to work smoothly.
Never ignore and disregard the errors and alerts of the space disk being full. This article is all about how to fix the disk space in the final cut Pro X. Moreover, this article will cover the different ways via which you can check mac storage space, and how to free up space in FCPX and Mac.
Quick Guide:
Part 1: How to free up space from Final Cut Pro Library?
It takes three steps, and here are these steps.
Step1: Remember to delete unused clips and original medias
To make room in your final cut pro, delete all the unused clips and original media. Delete the generated library files and delete the render files. Before deleting make sure to check whether to delete unused or used render files.
Step 2: How to save space with files and transcoding options?
It happens in final cut pro, that while working, it creates records, proxy files, and rendered files. To save space, you have to delete these files. It is advised to delete the generated rendered files before moving the library to mac Final Cut pro. Moreover, Mac recovers all the files the following time you open the project
Step 3: How to stop background rendering and how to delete render files in Fcpx?
Sometimes temporary videos and audios are created in Final cut pro X . Background rendering starts just after 5 seconds you quit working in mac. You can physically control the background rendering in Final cut pro. When you want to have more control, disable rendering in FCP and choose which clip you would like to render. You can change the preferences to disable or enable through the FCPx settings. Once you disable the rendering, it is your choice to select the specific clips to render.
Open the preferences menu in your mac and render the highlighted clips in your Fcpx timeline. Use the control+R shortcut to render the files.
To delete the render files in Fcpx, Delete the generated files. Files> generated files. A window will appear, Click ok on delete render files.
Part2: What to do with the “not enough disk space” error even with enough space in Mac?
Sometimes still having a lot of space, Your final cut pro X shows not enough disk space error in FCP X. Help!
Have you ever got the error of not having enough space at available destinations whenever you import anything to FCP X.?
Quick GuideFollow the below steps to solve this problem
- Click and select the library in FCPX
- Then go to the File menu and select “Delete generated library file”
- Next, Select all the render and proxy files
- You might not be using optimized files, In that case, select optimized files
- Exit FCPX.
- To reboot, hold down both option and command keys
- Delete the preference files
- If the error persists, run the utility folder that is inside the Application folder.
- Execute First aid in all the units.
- If the error persists, obtain a copy of the disk, and repair the directories on all the drives.
Part 3: How much space can FCPX take in Mac?
Today, when we have hard drives and multi-terabytes, many of us have stopped looking at the disk space. Many of you usually don’t bother until you get an alert that the disk is full.
Sometimes the largest drives get filled eventually. If you haven’t checked your disk space yet, use your Mac and follow the instructions given below. You may be surprised about how much space can FCPX take.
Here is how you will do it:
Option 1: Checking the mac storage through “About this Mac”
Now it is a bit easy to check the storage from about the section. You will find this in most of the recent MAC versions.
Click on the mac logo and then click on “About this mac”.
Click on “storage” and you will see a reference chart stacked portraying the capacity of the disk and the absolute amount of storage taken by different categories of information. Moreover, you will find out the space that is yet accessible to you.
Option 2: Checking the mac storage through “Disk utility”
If you’re a Mac user, you might know that there is a disk utility app. You can easily get a readout of the available space from there.
Open your Finder and click “Applications” on the left side.
Or click the magnifying glass in the upper right to find disk utility.
You will find utilities in Applications. Applications> utilities.
After the disk utility opens, you can see the available used spaces. Remember to put your hard drive’s name from the list. The popup window that opens up will also tell you the free space of any device connected to your Mac.
Option3: Checking the storage from the Finder
You can get a preview of your storage device by clicking an item in the Finder and pressing the spacebar on your keyboard. Let’s suppose you need to check a particular document without opening it.
Select that document and press the spacebar. You will know what’s inside without even opening it.
Quick Guide Here is how you can do it
- Go to Finder and select Finder>Preferences, next Click General, modify the settings and you will see the storage device on the desktop.
- To check the available or remaining space, click the spacebar. As you click it a window popup will show you the remaining space.
- Press the spacebar again to close the window or you can do it via command. Press Command-W.
- Turn on the finder status bar on your window. In case you want to check the disk space frequently.
- Open a Finder window and next open the view menu. As you select the show status bar option, you will see the number of items in the folders. In the other case, if you are viewing the folder you’ll get the idea of remaining or free space
If you’re looking for a lighter alternative to Final Cut Pro, try Filmora to save more space!
So, is your FCPX good to go? Get your tutorials for FCPX here!
Part 4: How to free up space in Mac?
Find out what’s occupying the room in your Mac to save room for final cut pro. Get familiar with how to deal with your Mac’s capacity. Acquaint yourself with the ideal approaches to free up space in Mac.
Nowadays, Macs have limited and restricted capacity due to the SSDs present in them. When there were hard drives in Mac, we had a huge room on them. In recent memory, high-resolution videos, music, and other functional records take up more capacity. When you run out of space, it hampers your work and processing.
Quickly clear your mac space.
If you are in a hurry, you can do the below things to quickly clear up the space in your mac.
- Select the download folder and open it in the Finder. Now select the folder whose content you don’t need and trash it.
- Move to the home folder and open a new Find window. Press command-F.
- Click the drop-down menu to choose “other.”Look to the box next to “Document size”. Press ok. Choose” greater than” in the next dropdown menu. With this choose the unwanted file or the one that is no longer useful to throw in the trash.
- Another thing that you can do is, move those files in the trash that you haven’t opened in the last year.
- If your desktop has a lot of unused stuff and is taking space, then delete the folders on the desktop.
Ways to clean junk on your Mac
There are many ways to clean garbage records on Mac. You may have different types of garbage in your Mac. Here is a simple solution for the elimination of junk from your Mac. Along with occupying the space, junk slows down your Pc, phone, and Mac.
Cleaning cache files: Every Mac has some files stored which are known as cache files. Some temporary files are kept in Mac to speed up the Apple software. It better to clean the files before it gets accumulated and hampers the performance.
- Press command +shift+G after opening the Finder.
- Enter this command in the field box~/Library/Caches.
- See all the visible files on the appearing window
- Select all files to delete, and you can delete one by one
- Enter the username and password in the popup window
Similarly, you can clean the system log files too from your mac by below steps:
- Go to the folder. Before selecting Go, enter the /var/log/.
- All the system files are visible to you. Now, you can easily delete unwanted files.
Clean with Clean MyMacX
You can now clean your mac with this application. Download this application for free. After launching it, see the features on left and click on the system junk. Do scanning and check the opposite side of user cache files and delete the items, you want to delete. Lastly, press clean to clean it. Your Mac is now as new as before. Clean MyMacX cleans all the junk and makes your mac clutter-free.
Conclusion
Move the unwanted and unused clips from your Mac final cut pro X. Even you can free up the storage by deleting the whole event. A few media files stay in the library as many projects use the same media.
Benjamin Arango
Benjamin Arango is a writer and a lover of all things video.
Follow @Benjamin Arango
To Help You Evaluate Which Webcam Software Best Suits Your Needs, I’ve Featured Pros, Cons, Etc in This List of the Best Free Webcam Software for Windows 10
10 Best Webcam Recording Software for Windows 10

Richard Bennett
Mar 27, 2024• Proven solutions
Which webcam softwarehave you installed on your laptop or desktop? Using the right webcam software to live stream videos, screen record videos, or chat on Skype results in high-quality images, smooth streaming, and high-quality images and videos.
There is a huge number of free webcam software with advanced features yet free for you to download, and use on your PC.
But how would you determine the best webcam software to use?
Before you mounted that webcam on your desktop or laptop, you had a reason. It’s your webcam features and purpose that should guide you to select the right software for the webcam camera.
In this article, we will show you 10 webcam software for Windows in this guide. Included are the most useful factors to consider as you make your choice – complexity of use, free/paid, integrations, editing tools, and more. You will learn:
- Part 1: The Best Webcam & Screen Recorder for Windows and Mac [Video Tutorial]
- Part 2: Top 10 Best Free Webcam Software for Windows
First take a quick look of the 10 best webcam software that is available on your Windows from a video:
For Win 7 or later (64-bit)
 Secure Download
For macOS 10.14 or later
Secure Download
Part 1: The Best Webcam & Screen Recorder for Computer
You need a sound and webcam recorder to record your video tutorials, streaming videos, presentations, or any other type of video. Wondershare Filmora is the software to use. Other than its most admired friendly intuitive interface, it’s simple and easy to use-suitable for both beginners and professionals.
For Win 7 or later (64-bit)
Secure Download
For macOS 10.14 or later
Secure Download
Among the outstanding features, you’ll find in Filmora include,
- Fast-paced recording speed of up to 120 fps
- Adverse professional editing tools that are easy to use
- Simultaneous recording from both webcam and computer screen
- Compatible with 50+ different file formats
- Rich title text and tutorial features
It’s free to download. Have a try now! Join in the Wondershare Video Community and get some inspiration from other Filomora users.
Part 2: Top 10 Best Free Webcam Software for Windows
To help you evaluate which webcam software best suits your needs, I’ve featured the strengths, shortcomings, and support services in each software review.
This is the list of the best free webcam software for Windows 10.
| 1 - Logitech Capture | 2 - CyberLink Youcam |
|---|---|
| 3 - ManyCam | 4 - SplitCam |
| 5 - Bandicam | 6 - NCH - Video Capture Software |
| 7 - YAWCAM | 8 - Windows Camera |
| 9 - Fake Webcam | 10 - IP Camera Viewer |
1. Logitech Capture
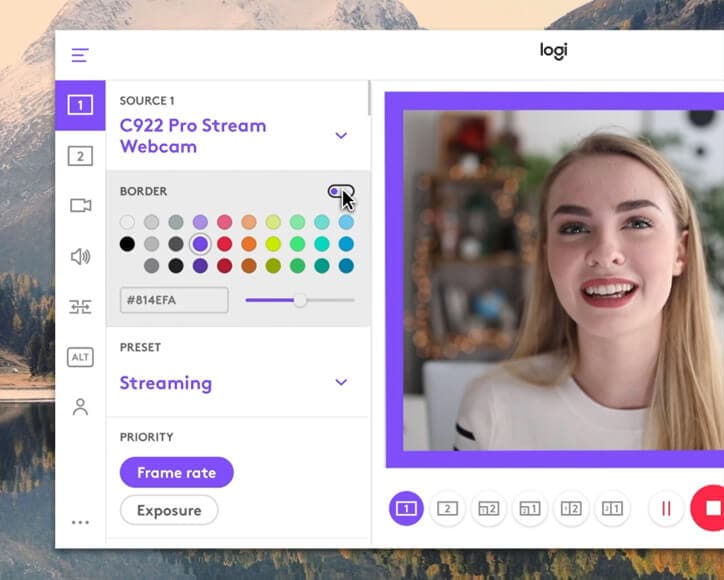
The multiple source recording feature and direct streaming app are the key strengths of this software. According to its mission statement- All-In-One Content Creation- you can use this software to record, edit, customize, and stream to your favorite channel.
Operating systems: Windows 10/8/7
Price: Free
Supported webcams: 1080P PRO STREAM, BRIO STREAM, C920s HD PRO, C922 PRO STREAM
Logitech Capture is among the few free webcam recording software for Windows 10 with studio controls applicable during recording. You can use this feature to adjust your image, create frames, adjust focus and transitions, and enable ChromaKey as you record.
In case you want to create a picture-in-picture presentation, this software allows you to use two webcams simultaneously. With the source switching and the auto-focus features, you can record the best tutorials or guides that show all dimensions and your image.
Pros
- Rich in transitions and effects
- Portrait optimization for mobile devices
- Its Capture app offers direct streaming to YouTube
- You can take passports or still images
Cons
- Limited to YouTube channel
- Account registration is mandatory
2. CyberLink Youcam
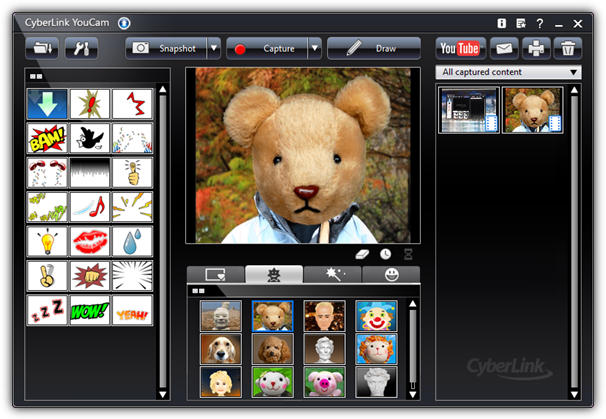
If you are used to video chatting and video recording, then, you’ll have 200+ fun effects to make your real-time videos as interesting as possible. In fact, the seamless app integration feature will keep your live streaming chats without buffering for long.
Operating systems: Windows 10/8/1.8/7
Price: Free/ Paid
Supported file formats: WMV, MP4, AVI
YouCam is the best free webcam software Windows 10 for YouTubers, business professionals, Streamers, home users, and Vloggers. It seamlessly integrates with live streaming media channels like Twitch, Wirecast, OBS Studio, Facebook Live, Xsplit, and YouTube Live.
The YouCam’s AR technology is one of its hidden treasures that will lighten up your skin by applying a natural-looking makeup. If your room is badly light, use the Live Skin Smoothing feature. Just below it is the TrueTheater Enhancement option to help you automatically adjust your facial sharpness and lighting.
Pros
- Hundreds of animated emojis
- Suitable for video conferencing services
- Plenty of interactive colorful particles and distortions
- Availability of face beautification tool
Cons
- Only limited to the Windows operating system
- Very few features for the free plan
3. ManyCam
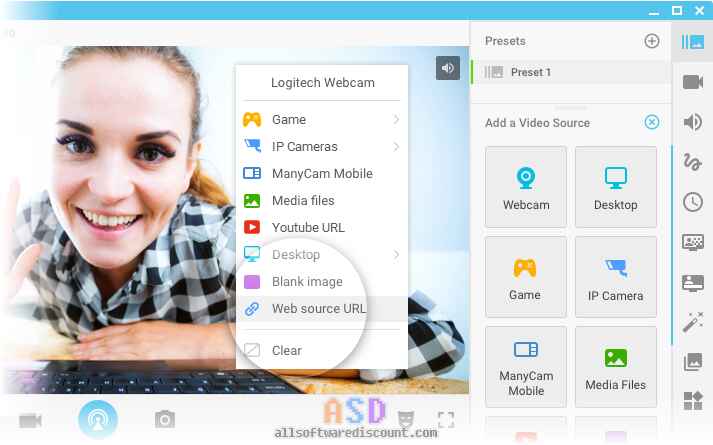
Downloading this webcam software guarantees you smooth streaming and effortless recording of videos. Also, this software will help you during game steaming, online education, mobile live streaming, and live telehealth communication.
Operating systems: Windows 10/8/7 and macOS X
Price: Free /Paid
Supported file formats: MJPEG, IP, MP4, AVI, MPEG, MOV
ManyCam is a free webcam recording software for windows 10 . It’s among the most widely used software internationally-not for many reasons, but because of its friendly intuitive user interface and live streaming tools for lessons and lecturers.
So, if you are a lecturer/teacher, you can use the Software Development Kit (SDK) to integrate the webcam with any online teaching platform. Among the features designed to facilitate better online teaching include the picture in picture, Chroma Key, multiple video sources, and screen sharing.
Pro
- Ability to stream 4K videos
- Real-time camera control settings
- No watermark even on the free plan
- Screencasting and screen recording feature
- Real-time drop and drag effects
Cons
- Expensive business subscription plans
- No Light enhancement features
- Most features are manual as opposed to being automatic

Filmora WebCame & Screen Recorder
Filmora - WebCame & Screen Recorder
• No-time delay to record webcam and screen while live streaming or gaming
• Edit recording video for marketing replay or adding game commentary
• Cross-platform supported - (Windows, Mac, iOS, Android)
Start Webcam & Screen Record Start Webcam & Screen Record Start Webcam & Screen Record Learn More >
4. SplitCam
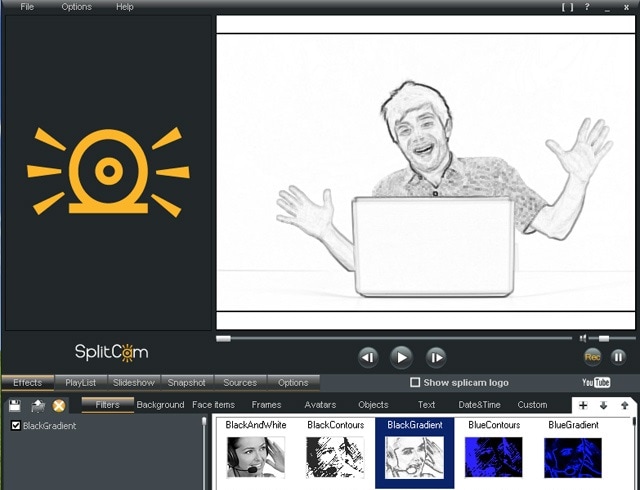
To stream your desktop/laptop screen SplitCam is the most appropriate software. With only the inbuilt virtual webcam, you can share your screen videos to media channels and IMS. Other uses of this software are recording webcam chatting , streaming live videos, and messaging.
Operating systems: Windows 10/8/7
Price: Free
SplitCam is not as popular as the other free webcam software windows 10 like ManyCam and YouCam. This is because it doesn’t integrate with some of the world’s renowned social media platforms- Facebook and Instagram. However, you can use this software to stream, take snapshots, and record videos for YouTube, Skype, Justin.tv, Gtalk, and Windows Live Messenger.
SplitCam is rich in fantastic webcam effects. Haven’t you been surprised to see someone appear to be streaming from the ocean or the Amazon Mountain? This is what you can do with SplitCam. Other cool effects are frames, texts on videos, filters, and facial items like masks and fake face glasses.
Pros
- Open and simple interface
- Integratable with the messaging apps
- Supports a wide range of resolutions ( between 320x180 and 2048x1536)
Cons
- Applicable to a small number of channels
- Supported file formats not defined
5. Bandicam
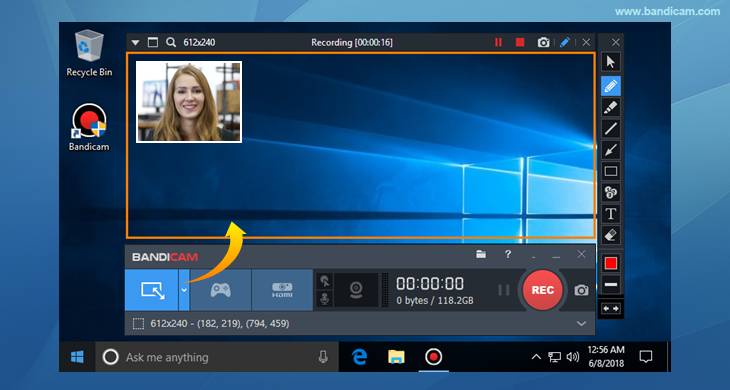
Do you want a recorder for screen recording, recording your gameplay, or capturing videos from devices like smartphones and PlayStation? Look for no other software but BandiCam. You can also merge two or more video files, remove unwanted parts, and select the only part to screen record.
Operating systems: Windows Vista, 10/8/7
Price: Free/paid
Supported file format: AVI, MP4, JPEG, TIF, GIF, PNG
Supported graphics cards: Nvidia NVENC, Nvidia NVENC (),
BandiCam is another HD webcam software Windows 10 with the capability of capturing high compression videos and games on your PC screen videos without compromising the video quality. Don’t forget to record all webinars aired in your niche.
Netflix is becoming more popular each day due to the thrilling videos. With the BandiCam screen recorder, you can record live-streamed videos on Netflix for over 24hrs. These are the tools to edit your recorded video: real-time drawing tool, webcam overlay, sound mixer, and Chroma Key.
Pros
- No hidden features
- Widescreen capture
- Can record 2D/3D videos in HD mode
- Can capture fast-paced videos of up to 144 FPS
Cons
- Not suitable for beginners
- Cannot be used to live stream videos
6. NCH - Video Capture Software

Of all the listed webcam software in this review, this software has the most diverse functions. You can record streaming videos, record your computer screen, record from external devices, and record from a webcam. It’s also perfect for recording audios and simultaneous recording from screen and webcam.
Operating systems: Windows 10, 8, 8.1, 7, XP, Vista 64 bit and Mac OS X 10.5 and above
Price: Free/paid
Supported file formats: MP4, WMV, AVI, MPG, FLV, MOV
Debut Video Capture is the only free webcam recording software for Windows 10 believed to capture or record videos from any external source. It has also preset settings for HD and TV with pre-production enhancement features like color adjustment settings, overlay buttons and frame rate, aspect ratio, and resolution settings.
If you always think of becoming rich, the Express Burn Disc Burner is the tool that will help you make money. Record the most trending videos and use this tool to burn DVDs and CDs.
Pros
- Can record videos for any social media platform
- Supports a wide range of audio and video file formats
- All features are open and easy to use
- Availability of video editing software
Cons
- Only monthly subscriptions for paid plans
- Watermark for the free download
- Difficult to record a full-screen movie
Try Filmora to Smoothly Record WebCame and Screen!
Filmora Web Camera & Screen Recorder can capture any area of the PC screen and webcam. It’s perfect to capture and record while making a live gaming match, marketing promotion, guiding a tour, and more. Plus, you can edit the recording video files in Filmora directly! Worth to have a try!
Start Webcam & Screen Recording Start Webcam & Screen Recording Start Webcam & Screen Recording Learn More >
7. YAWCAM
This webcam software can be referred to as the simplest for all beginners with the will to start streaming and recording videos for personal or home use.
Supported file formats: PNG, JPG, MJPEG, GIF, JavaScript
Price: Free
Supported operating systems: Windows 2000/10/8/7/ Vista and XP
YAWCAM is an absolutely free webcam software windows 10. Why is it the simplest software to use? Just download and you will find all features on one page. Simple language commands aligned in a drop-down menu ready to be used with only one click.
Some of the best features include overlay texts and images, scheduler, motion detection, and an inbuilt webserver. For you to use this webcam software, use these supported devices; DirectX compatible webcams, DV-camera, or video capture devices.
Pros
- No watermark
- Easy to use
- Friendly user interface
Cons
- Few transitions and effects
8. Windows Camera
We all trust any app or software by Microsoft over others! If you also do, then you can download Windows Camera and use it to record videos, take snapshots and shoot videos.
Operating system: Windows 10
Price: Free
Supported devices: Xbox One, Windows, mobile
Windows Camera is among the best free webcam software for Windows 10. This is because of the software’s few but easy-to-use and effective features that are expertly designed for PCs and tablets installed with Windows 10.
The automatic photo back combined with the photo-shoot timer makes it perfect for taking selfies and passports. Using the panorama feature, you can take photos of the best scenes and share them on media platforms.
Pros
- Simplicity is its main strength
- Supports resolutions above 1080p
- Good for photographers
Cons
- Has no built-in virtual webcam
- Requires a camera to support 4K videos
9. Fake Webcam

Supported file formats: AVI, MPEG, DVD, VCD, WMV, 3GP, MP4, SVCD, MOV, ASF,
Price: Free /paid
Operating systems: Windows 7/8/10 (32/64 bit)
Fake Webcam is a free webcam software Windows 10 whose name is creatively used to suggest it almost functions like a webcam. This doesn’t fall far from the truth! You can truly use this software to broadcast, add effects and filters, record on full screen, and fake your voice.
To share or stream your photos and videos on Skype, YIM, or Gtalk, using the screen recorder would give the best results. What makes Fake Webcam stand out is the free video converter and the free video toolkit.
Pros
- Free support tools
- Supports all video and audio formats
- Can convert file formats and stream to any channel
- Availability of the screen recorder
- Integratable with almost all instant messengers
Cons
- Major tools not free(Fake Webcam and Screen recorder)
10. IP Camera Viewer
Do you run a supermarket store, mall or you’ve installed security surveillance cameras in your compound? IP Camera Viewer is the most effective webcam software for video monitoring systems.
Supported file formats: JPEG, MPEG-4, MJPEG, and
Price: Free
Operating systems: Windows 10 / 8 / 7 /2012 /Vista and XP
IP Camera Viewer is the most used free webcam recording software for windows 10 as its compatible with almost all IP camera models like Panasonic, Toshiba, Canon, D-Link, Sony, and more the 2000 others. With the capability of viewing and controlling 4 camera feeds at once, you can use this software to monitor your entire compound.
Some of the important advanced IP Camera Viewer functions include listening to webcam audios, adjust image settings, zoom or tilt images, schedule monitoring times, and detect motions.
Pros
- Automatically uploads recorded videos and photos to a server
- Compatible with almost all IP camera models
- Simple and easy to use
Cons
- No inbuilt media player
- Cannot adjust the image or video quality
You may also want to read >>> 10 Best Webcams | A Buyer’s Guide
![]()
A cross-platform for making videos anywhere for all creators

Why your video editing isn’t good enough? How about some creative inspo?
- 100 Million+ Users
- 150+ Countries and Regions
- 4 Million+ Social Media Followers
- 5 Million+ Stock Media for Use
* Secure Download

FAQs about Webcam Software for Windows
1. What is Webcam Software?
A webcam is a video camera that feeds or streams images or video in real-time to or over a computer network. And webcam software enables users to record video or stream video over the Internet.
Webcam software is an application that allows you to capture video from your laptop/desktop webcam and record or stream video over the Internet. You can use them to deliver professional videos, streaming, and online courses easily.
2. Does Windows have built-in webcam software?
Windows 10 has an in-built webcam app called Camera that lets you record videos and take pictures with your webcam. This is definitely better than downloading 3rd party webcam recording software where spyware/malware is rampant.
3. Does a webcam need software?
Yes, if the camera hardware offers depth, low-light support, night vision, etc. If you use any software on the camera, these functions are only available if the driver is installed.
Conclusion
After a keen of all the webcam software above, it’s evident that every developer had an intended purpose. You cannot therefore just randomly wake up and download any without considering its functions, supported devices, file formats, and the auxiliary apps available. All this information is contained herein.
According to some users, there are free webcam software Windows 10 that more often would not show any video images but the audio is absolutely clear. To help your fellow user, what bad experience have you ever had after recording a game using webcam software ? Kindly share your comment or suggestion on our social media platforms.
Richard Bennett
Richard Bennett is a writer and a lover of all things video.
Follow @Richard Bennett
Richard Bennett
Mar 27, 2024• Proven solutions
Which webcam softwarehave you installed on your laptop or desktop? Using the right webcam software to live stream videos, screen record videos, or chat on Skype results in high-quality images, smooth streaming, and high-quality images and videos.
There is a huge number of free webcam software with advanced features yet free for you to download, and use on your PC.
But how would you determine the best webcam software to use?
Before you mounted that webcam on your desktop or laptop, you had a reason. It’s your webcam features and purpose that should guide you to select the right software for the webcam camera.
In this article, we will show you 10 webcam software for Windows in this guide. Included are the most useful factors to consider as you make your choice – complexity of use, free/paid, integrations, editing tools, and more. You will learn:
- Part 1: The Best Webcam & Screen Recorder for Windows and Mac [Video Tutorial]
- Part 2: Top 10 Best Free Webcam Software for Windows
First take a quick look of the 10 best webcam software that is available on your Windows from a video:
For Win 7 or later (64-bit)
Secure Download
For macOS 10.14 or later
Secure Download
Part 1: The Best Webcam & Screen Recorder for Computer
You need a sound and webcam recorder to record your video tutorials, streaming videos, presentations, or any other type of video. Wondershare Filmora is the software to use. Other than its most admired friendly intuitive interface, it’s simple and easy to use-suitable for both beginners and professionals.
For Win 7 or later (64-bit)
Secure Download
For macOS 10.14 or later
Secure Download
Among the outstanding features, you’ll find in Filmora include,
- Fast-paced recording speed of up to 120 fps
- Adverse professional editing tools that are easy to use
- Simultaneous recording from both webcam and computer screen
- Compatible with 50+ different file formats
- Rich title text and tutorial features
It’s free to download. Have a try now! Join in the Wondershare Video Community and get some inspiration from other Filomora users.
Part 2: Top 10 Best Free Webcam Software for Windows
To help you evaluate which webcam software best suits your needs, I’ve featured the strengths, shortcomings, and support services in each software review.
This is the list of the best free webcam software for Windows 10.
| 1 - Logitech Capture | 2 - CyberLink Youcam |
|---|---|
| 3 - ManyCam | 4 - SplitCam |
| 5 - Bandicam | 6 - NCH - Video Capture Software |
| 7 - YAWCAM | 8 - Windows Camera |
| 9 - Fake Webcam | 10 - IP Camera Viewer |
1. Logitech Capture
The multiple source recording feature and direct streaming app are the key strengths of this software. According to its mission statement- All-In-One Content Creation- you can use this software to record, edit, customize, and stream to your favorite channel.
Operating systems: Windows 10/8/7
Price: Free
Supported webcams: 1080P PRO STREAM, BRIO STREAM, C920s HD PRO, C922 PRO STREAM
Logitech Capture is among the few free webcam recording software for Windows 10 with studio controls applicable during recording. You can use this feature to adjust your image, create frames, adjust focus and transitions, and enable ChromaKey as you record.
In case you want to create a picture-in-picture presentation, this software allows you to use two webcams simultaneously. With the source switching and the auto-focus features, you can record the best tutorials or guides that show all dimensions and your image.
Pros
- Rich in transitions and effects
- Portrait optimization for mobile devices
- Its Capture app offers direct streaming to YouTube
- You can take passports or still images
Cons
- Limited to YouTube channel
- Account registration is mandatory
2. CyberLink Youcam
If you are used to video chatting and video recording, then, you’ll have 200+ fun effects to make your real-time videos as interesting as possible. In fact, the seamless app integration feature will keep your live streaming chats without buffering for long.
Operating systems: Windows 10/8/1.8/7
Price: Free/ Paid
Supported file formats: WMV, MP4, AVI
YouCam is the best free webcam software Windows 10 for YouTubers, business professionals, Streamers, home users, and Vloggers. It seamlessly integrates with live streaming media channels like Twitch, Wirecast, OBS Studio, Facebook Live, Xsplit, and YouTube Live.
The YouCam’s AR technology is one of its hidden treasures that will lighten up your skin by applying a natural-looking makeup. If your room is badly light, use the Live Skin Smoothing feature. Just below it is the TrueTheater Enhancement option to help you automatically adjust your facial sharpness and lighting.
Pros
- Hundreds of animated emojis
- Suitable for video conferencing services
- Plenty of interactive colorful particles and distortions
- Availability of face beautification tool
Cons
- Only limited to the Windows operating system
- Very few features for the free plan
3. ManyCam
Downloading this webcam software guarantees you smooth streaming and effortless recording of videos. Also, this software will help you during game steaming, online education, mobile live streaming, and live telehealth communication.
Operating systems: Windows 10/8/7 and macOS X
Price: Free /Paid
Supported file formats: MJPEG, IP, MP4, AVI, MPEG, MOV
ManyCam is a free webcam recording software for windows 10 . It’s among the most widely used software internationally-not for many reasons, but because of its friendly intuitive user interface and live streaming tools for lessons and lecturers.
So, if you are a lecturer/teacher, you can use the Software Development Kit (SDK) to integrate the webcam with any online teaching platform. Among the features designed to facilitate better online teaching include the picture in picture, Chroma Key, multiple video sources, and screen sharing.
Pro
- Ability to stream 4K videos
- Real-time camera control settings
- No watermark even on the free plan
- Screencasting and screen recording feature
- Real-time drop and drag effects
Cons
- Expensive business subscription plans
- No Light enhancement features
- Most features are manual as opposed to being automatic
Filmora WebCame & Screen Recorder
Filmora - WebCame & Screen Recorder
• No-time delay to record webcam and screen while live streaming or gaming
• Edit recording video for marketing replay or adding game commentary
• Cross-platform supported - (Windows, Mac, iOS, Android)
Start Webcam & Screen Record Start Webcam & Screen Record Start Webcam & Screen Record Learn More >
4. SplitCam
To stream your desktop/laptop screen SplitCam is the most appropriate software. With only the inbuilt virtual webcam, you can share your screen videos to media channels and IMS. Other uses of this software are recording webcam chatting , streaming live videos, and messaging.
Operating systems: Windows 10/8/7
Price: Free
SplitCam is not as popular as the other free webcam software windows 10 like ManyCam and YouCam. This is because it doesn’t integrate with some of the world’s renowned social media platforms- Facebook and Instagram. However, you can use this software to stream, take snapshots, and record videos for YouTube, Skype, Justin.tv, Gtalk, and Windows Live Messenger.
SplitCam is rich in fantastic webcam effects. Haven’t you been surprised to see someone appear to be streaming from the ocean or the Amazon Mountain? This is what you can do with SplitCam. Other cool effects are frames, texts on videos, filters, and facial items like masks and fake face glasses.
Pros
- Open and simple interface
- Integratable with the messaging apps
- Supports a wide range of resolutions ( between 320x180 and 2048x1536)
Cons
- Applicable to a small number of channels
- Supported file formats not defined
5. Bandicam
Do you want a recorder for screen recording, recording your gameplay, or capturing videos from devices like smartphones and PlayStation? Look for no other software but BandiCam. You can also merge two or more video files, remove unwanted parts, and select the only part to screen record.
Operating systems: Windows Vista, 10/8/7
Price: Free/paid
Supported file format: AVI, MP4, JPEG, TIF, GIF, PNG
Supported graphics cards: Nvidia NVENC, Nvidia NVENC (),
BandiCam is another HD webcam software Windows 10 with the capability of capturing high compression videos and games on your PC screen videos without compromising the video quality. Don’t forget to record all webinars aired in your niche.
Netflix is becoming more popular each day due to the thrilling videos. With the BandiCam screen recorder, you can record live-streamed videos on Netflix for over 24hrs. These are the tools to edit your recorded video: real-time drawing tool, webcam overlay, sound mixer, and Chroma Key.
Pros
- No hidden features
- Widescreen capture
- Can record 2D/3D videos in HD mode
- Can capture fast-paced videos of up to 144 FPS
Cons
- Not suitable for beginners
- Cannot be used to live stream videos
6. NCH - Video Capture Software
Of all the listed webcam software in this review, this software has the most diverse functions. You can record streaming videos, record your computer screen, record from external devices, and record from a webcam. It’s also perfect for recording audios and simultaneous recording from screen and webcam.
Operating systems: Windows 10, 8, 8.1, 7, XP, Vista 64 bit and Mac OS X 10.5 and above
Price: Free/paid
Supported file formats: MP4, WMV, AVI, MPG, FLV, MOV
Debut Video Capture is the only free webcam recording software for Windows 10 believed to capture or record videos from any external source. It has also preset settings for HD and TV with pre-production enhancement features like color adjustment settings, overlay buttons and frame rate, aspect ratio, and resolution settings.
If you always think of becoming rich, the Express Burn Disc Burner is the tool that will help you make money. Record the most trending videos and use this tool to burn DVDs and CDs.
Pros
- Can record videos for any social media platform
- Supports a wide range of audio and video file formats
- All features are open and easy to use
- Availability of video editing software
Cons
- Only monthly subscriptions for paid plans
- Watermark for the free download
- Difficult to record a full-screen movie
Try Filmora to Smoothly Record WebCame and Screen!
Filmora Web Camera & Screen Recorder can capture any area of the PC screen and webcam. It’s perfect to capture and record while making a live gaming match, marketing promotion, guiding a tour, and more. Plus, you can edit the recording video files in Filmora directly! Worth to have a try!
Start Webcam & Screen Recording Start Webcam & Screen Recording Start Webcam & Screen Recording Learn More >
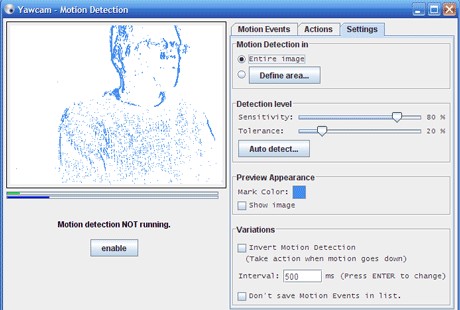
7. YAWCAM
This webcam software can be referred to as the simplest for all beginners with the will to start streaming and recording videos for personal or home use.
Supported file formats: PNG, JPG, MJPEG, GIF, JavaScript
Price: Free
Supported operating systems: Windows 2000/10/8/7/ Vista and XP
YAWCAM is an absolutely free webcam software windows 10. Why is it the simplest software to use? Just download and you will find all features on one page. Simple language commands aligned in a drop-down menu ready to be used with only one click.
Some of the best features include overlay texts and images, scheduler, motion detection, and an inbuilt webserver. For you to use this webcam software, use these supported devices; DirectX compatible webcams, DV-camera, or video capture devices.
Pros
- No watermark
- Easy to use
- Friendly user interface
Cons
- Few transitions and effects
8. Windows Camera
We all trust any app or software by Microsoft over others! If you also do, then you can download Windows Camera and use it to record videos, take snapshots and shoot videos.
Operating system: Windows 10
Price: Free
Supported devices: Xbox One, Windows, mobile
Windows Camera is among the best free webcam software for Windows 10. This is because of the software’s few but easy-to-use and effective features that are expertly designed for PCs and tablets installed with Windows 10.
The automatic photo back combined with the photo-shoot timer makes it perfect for taking selfies and passports. Using the panorama feature, you can take photos of the best scenes and share them on media platforms.
Pros
- Simplicity is its main strength
- Supports resolutions above 1080p
- Good for photographers
Cons
- Has no built-in virtual webcam
- Requires a camera to support 4K videos
9. Fake Webcam
Supported file formats: AVI, MPEG, DVD, VCD, WMV, 3GP, MP4, SVCD, MOV, ASF,
Price: Free /paid
Operating systems: Windows 7/8/10 (32/64 bit)
Fake Webcam is a free webcam software Windows 10 whose name is creatively used to suggest it almost functions like a webcam. This doesn’t fall far from the truth! You can truly use this software to broadcast, add effects and filters, record on full screen, and fake your voice.
To share or stream your photos and videos on Skype, YIM, or Gtalk, using the screen recorder would give the best results. What makes Fake Webcam stand out is the free video converter and the free video toolkit.
Pros
- Free support tools
- Supports all video and audio formats
- Can convert file formats and stream to any channel
- Availability of the screen recorder
- Integratable with almost all instant messengers
Cons
- Major tools not free(Fake Webcam and Screen recorder)
10. IP Camera Viewer
Do you run a supermarket store, mall or you’ve installed security surveillance cameras in your compound? IP Camera Viewer is the most effective webcam software for video monitoring systems.
Supported file formats: JPEG, MPEG-4, MJPEG, and
Price: Free
Operating systems: Windows 10 / 8 / 7 /2012 /Vista and XP
IP Camera Viewer is the most used free webcam recording software for windows 10 as its compatible with almost all IP camera models like Panasonic, Toshiba, Canon, D-Link, Sony, and more the 2000 others. With the capability of viewing and controlling 4 camera feeds at once, you can use this software to monitor your entire compound.
Some of the important advanced IP Camera Viewer functions include listening to webcam audios, adjust image settings, zoom or tilt images, schedule monitoring times, and detect motions.
Pros
- Automatically uploads recorded videos and photos to a server
- Compatible with almost all IP camera models
- Simple and easy to use
Cons
- No inbuilt media player
- Cannot adjust the image or video quality
You may also want to read >>> 10 Best Webcams | A Buyer’s Guide
![]()
A cross-platform for making videos anywhere for all creators
Why your video editing isn’t good enough? How about some creative inspo?
- 100 Million+ Users
- 150+ Countries and Regions
- 4 Million+ Social Media Followers
- 5 Million+ Stock Media for Use
* Secure Download
FAQs about Webcam Software for Windows
1. What is Webcam Software?
A webcam is a video camera that feeds or streams images or video in real-time to or over a computer network. And webcam software enables users to record video or stream video over the Internet.
Webcam software is an application that allows you to capture video from your laptop/desktop webcam and record or stream video over the Internet. You can use them to deliver professional videos, streaming, and online courses easily.
2. Does Windows have built-in webcam software?
Windows 10 has an in-built webcam app called Camera that lets you record videos and take pictures with your webcam. This is definitely better than downloading 3rd party webcam recording software where spyware/malware is rampant.
3. Does a webcam need software?
Yes, if the camera hardware offers depth, low-light support, night vision, etc. If you use any software on the camera, these functions are only available if the driver is installed.
Conclusion
After a keen of all the webcam software above, it’s evident that every developer had an intended purpose. You cannot therefore just randomly wake up and download any without considering its functions, supported devices, file formats, and the auxiliary apps available. All this information is contained herein.
According to some users, there are free webcam software Windows 10 that more often would not show any video images but the audio is absolutely clear. To help your fellow user, what bad experience have you ever had after recording a game using webcam software ? Kindly share your comment or suggestion on our social media platforms.
Richard Bennett
Richard Bennett is a writer and a lover of all things video.
Follow @Richard Bennett
Richard Bennett
Mar 27, 2024• Proven solutions
Which webcam softwarehave you installed on your laptop or desktop? Using the right webcam software to live stream videos, screen record videos, or chat on Skype results in high-quality images, smooth streaming, and high-quality images and videos.
There is a huge number of free webcam software with advanced features yet free for you to download, and use on your PC.
But how would you determine the best webcam software to use?
Before you mounted that webcam on your desktop or laptop, you had a reason. It’s your webcam features and purpose that should guide you to select the right software for the webcam camera.
In this article, we will show you 10 webcam software for Windows in this guide. Included are the most useful factors to consider as you make your choice – complexity of use, free/paid, integrations, editing tools, and more. You will learn:
- Part 1: The Best Webcam & Screen Recorder for Windows and Mac [Video Tutorial]
- Part 2: Top 10 Best Free Webcam Software for Windows
First take a quick look of the 10 best webcam software that is available on your Windows from a video:
For Win 7 or later (64-bit)
Secure Download
For macOS 10.14 or later
Secure Download
Part 1: The Best Webcam & Screen Recorder for Computer
You need a sound and webcam recorder to record your video tutorials, streaming videos, presentations, or any other type of video. Wondershare Filmora is the software to use. Other than its most admired friendly intuitive interface, it’s simple and easy to use-suitable for both beginners and professionals.
For Win 7 or later (64-bit)
Secure Download
For macOS 10.14 or later
Secure Download
Among the outstanding features, you’ll find in Filmora include,
- Fast-paced recording speed of up to 120 fps
- Adverse professional editing tools that are easy to use
- Simultaneous recording from both webcam and computer screen
- Compatible with 50+ different file formats
- Rich title text and tutorial features
It’s free to download. Have a try now! Join in the Wondershare Video Community and get some inspiration from other Filomora users.
Part 2: Top 10 Best Free Webcam Software for Windows
To help you evaluate which webcam software best suits your needs, I’ve featured the strengths, shortcomings, and support services in each software review.
This is the list of the best free webcam software for Windows 10.
| 1 - Logitech Capture | 2 - CyberLink Youcam |
|---|---|
| 3 - ManyCam | 4 - SplitCam |
| 5 - Bandicam | 6 - NCH - Video Capture Software |
| 7 - YAWCAM | 8 - Windows Camera |
| 9 - Fake Webcam | 10 - IP Camera Viewer |
1. Logitech Capture
The multiple source recording feature and direct streaming app are the key strengths of this software. According to its mission statement- All-In-One Content Creation- you can use this software to record, edit, customize, and stream to your favorite channel.
Operating systems: Windows 10/8/7
Price: Free
Supported webcams: 1080P PRO STREAM, BRIO STREAM, C920s HD PRO, C922 PRO STREAM
Logitech Capture is among the few free webcam recording software for Windows 10 with studio controls applicable during recording. You can use this feature to adjust your image, create frames, adjust focus and transitions, and enable ChromaKey as you record.
In case you want to create a picture-in-picture presentation, this software allows you to use two webcams simultaneously. With the source switching and the auto-focus features, you can record the best tutorials or guides that show all dimensions and your image.
Pros
- Rich in transitions and effects
- Portrait optimization for mobile devices
- Its Capture app offers direct streaming to YouTube
- You can take passports or still images
Cons
- Limited to YouTube channel
- Account registration is mandatory
2. CyberLink Youcam
If you are used to video chatting and video recording, then, you’ll have 200+ fun effects to make your real-time videos as interesting as possible. In fact, the seamless app integration feature will keep your live streaming chats without buffering for long.
Operating systems: Windows 10/8/1.8/7
Price: Free/ Paid
Supported file formats: WMV, MP4, AVI
YouCam is the best free webcam software Windows 10 for YouTubers, business professionals, Streamers, home users, and Vloggers. It seamlessly integrates with live streaming media channels like Twitch, Wirecast, OBS Studio, Facebook Live, Xsplit, and YouTube Live.
The YouCam’s AR technology is one of its hidden treasures that will lighten up your skin by applying a natural-looking makeup. If your room is badly light, use the Live Skin Smoothing feature. Just below it is the TrueTheater Enhancement option to help you automatically adjust your facial sharpness and lighting.
Pros
- Hundreds of animated emojis
- Suitable for video conferencing services
- Plenty of interactive colorful particles and distortions
- Availability of face beautification tool
Cons
- Only limited to the Windows operating system
- Very few features for the free plan
3. ManyCam
Downloading this webcam software guarantees you smooth streaming and effortless recording of videos. Also, this software will help you during game steaming, online education, mobile live streaming, and live telehealth communication.
Operating systems: Windows 10/8/7 and macOS X
Price: Free /Paid
Supported file formats: MJPEG, IP, MP4, AVI, MPEG, MOV
ManyCam is a free webcam recording software for windows 10 . It’s among the most widely used software internationally-not for many reasons, but because of its friendly intuitive user interface and live streaming tools for lessons and lecturers.
So, if you are a lecturer/teacher, you can use the Software Development Kit (SDK) to integrate the webcam with any online teaching platform. Among the features designed to facilitate better online teaching include the picture in picture, Chroma Key, multiple video sources, and screen sharing.
Pro
- Ability to stream 4K videos
- Real-time camera control settings
- No watermark even on the free plan
- Screencasting and screen recording feature
- Real-time drop and drag effects
Cons
- Expensive business subscription plans
- No Light enhancement features
- Most features are manual as opposed to being automatic
Filmora WebCame & Screen Recorder
Filmora - WebCame & Screen Recorder
• No-time delay to record webcam and screen while live streaming or gaming
• Edit recording video for marketing replay or adding game commentary
• Cross-platform supported - (Windows, Mac, iOS, Android)
Start Webcam & Screen Record Start Webcam & Screen Record Start Webcam & Screen Record Learn More >
4. SplitCam
To stream your desktop/laptop screen SplitCam is the most appropriate software. With only the inbuilt virtual webcam, you can share your screen videos to media channels and IMS. Other uses of this software are recording webcam chatting , streaming live videos, and messaging.
Operating systems: Windows 10/8/7
Price: Free
SplitCam is not as popular as the other free webcam software windows 10 like ManyCam and YouCam. This is because it doesn’t integrate with some of the world’s renowned social media platforms- Facebook and Instagram. However, you can use this software to stream, take snapshots, and record videos for YouTube, Skype, Justin.tv, Gtalk, and Windows Live Messenger.
SplitCam is rich in fantastic webcam effects. Haven’t you been surprised to see someone appear to be streaming from the ocean or the Amazon Mountain? This is what you can do with SplitCam. Other cool effects are frames, texts on videos, filters, and facial items like masks and fake face glasses.
Pros
- Open and simple interface
- Integratable with the messaging apps
- Supports a wide range of resolutions ( between 320x180 and 2048x1536)
Cons
- Applicable to a small number of channels
- Supported file formats not defined
5. Bandicam
Do you want a recorder for screen recording, recording your gameplay, or capturing videos from devices like smartphones and PlayStation? Look for no other software but BandiCam. You can also merge two or more video files, remove unwanted parts, and select the only part to screen record.
Operating systems: Windows Vista, 10/8/7
Price: Free/paid
Supported file format: AVI, MP4, JPEG, TIF, GIF, PNG
Supported graphics cards: Nvidia NVENC, Nvidia NVENC (),
BandiCam is another HD webcam software Windows 10 with the capability of capturing high compression videos and games on your PC screen videos without compromising the video quality. Don’t forget to record all webinars aired in your niche.
Netflix is becoming more popular each day due to the thrilling videos. With the BandiCam screen recorder, you can record live-streamed videos on Netflix for over 24hrs. These are the tools to edit your recorded video: real-time drawing tool, webcam overlay, sound mixer, and Chroma Key.
Pros
- No hidden features
- Widescreen capture
- Can record 2D/3D videos in HD mode
- Can capture fast-paced videos of up to 144 FPS
Cons
- Not suitable for beginners
- Cannot be used to live stream videos
6. NCH - Video Capture Software
Of all the listed webcam software in this review, this software has the most diverse functions. You can record streaming videos, record your computer screen, record from external devices, and record from a webcam. It’s also perfect for recording audios and simultaneous recording from screen and webcam.
Operating systems: Windows 10, 8, 8.1, 7, XP, Vista 64 bit and Mac OS X 10.5 and above
Price: Free/paid
Supported file formats: MP4, WMV, AVI, MPG, FLV, MOV
Debut Video Capture is the only free webcam recording software for Windows 10 believed to capture or record videos from any external source. It has also preset settings for HD and TV with pre-production enhancement features like color adjustment settings, overlay buttons and frame rate, aspect ratio, and resolution settings.
If you always think of becoming rich, the Express Burn Disc Burner is the tool that will help you make money. Record the most trending videos and use this tool to burn DVDs and CDs.
Pros
- Can record videos for any social media platform
- Supports a wide range of audio and video file formats
- All features are open and easy to use
- Availability of video editing software
Cons
- Only monthly subscriptions for paid plans
- Watermark for the free download
- Difficult to record a full-screen movie
Try Filmora to Smoothly Record WebCame and Screen!
Filmora Web Camera & Screen Recorder can capture any area of the PC screen and webcam. It’s perfect to capture and record while making a live gaming match, marketing promotion, guiding a tour, and more. Plus, you can edit the recording video files in Filmora directly! Worth to have a try!
Start Webcam & Screen Recording Start Webcam & Screen Recording Start Webcam & Screen Recording Learn More >
7. YAWCAM
This webcam software can be referred to as the simplest for all beginners with the will to start streaming and recording videos for personal or home use.
Supported file formats: PNG, JPG, MJPEG, GIF, JavaScript
Price: Free
Supported operating systems: Windows 2000/10/8/7/ Vista and XP
YAWCAM is an absolutely free webcam software windows 10. Why is it the simplest software to use? Just download and you will find all features on one page. Simple language commands aligned in a drop-down menu ready to be used with only one click.
Some of the best features include overlay texts and images, scheduler, motion detection, and an inbuilt webserver. For you to use this webcam software, use these supported devices; DirectX compatible webcams, DV-camera, or video capture devices.
Pros
- No watermark
- Easy to use
- Friendly user interface
Cons
- Few transitions and effects
8. Windows Camera
We all trust any app or software by Microsoft over others! If you also do, then you can download Windows Camera and use it to record videos, take snapshots and shoot videos.
Operating system: Windows 10
Price: Free
Supported devices: Xbox One, Windows, mobile
Windows Camera is among the best free webcam software for Windows 10. This is because of the software’s few but easy-to-use and effective features that are expertly designed for PCs and tablets installed with Windows 10.
The automatic photo back combined with the photo-shoot timer makes it perfect for taking selfies and passports. Using the panorama feature, you can take photos of the best scenes and share them on media platforms.
Pros
- Simplicity is its main strength
- Supports resolutions above 1080p
- Good for photographers
Cons
- Has no built-in virtual webcam
- Requires a camera to support 4K videos
9. Fake Webcam
Supported file formats: AVI, MPEG, DVD, VCD, WMV, 3GP, MP4, SVCD, MOV, ASF,
Price: Free /paid
Operating systems: Windows 7/8/10 (32/64 bit)
Fake Webcam is a free webcam software Windows 10 whose name is creatively used to suggest it almost functions like a webcam. This doesn’t fall far from the truth! You can truly use this software to broadcast, add effects and filters, record on full screen, and fake your voice.
To share or stream your photos and videos on Skype, YIM, or Gtalk, using the screen recorder would give the best results. What makes Fake Webcam stand out is the free video converter and the free video toolkit.
Pros
- Free support tools
- Supports all video and audio formats
- Can convert file formats and stream to any channel
- Availability of the screen recorder
- Integratable with almost all instant messengers
Cons
- Major tools not free(Fake Webcam and Screen recorder)
10. IP Camera Viewer
Do you run a supermarket store, mall or you’ve installed security surveillance cameras in your compound? IP Camera Viewer is the most effective webcam software for video monitoring systems.
Supported file formats: JPEG, MPEG-4, MJPEG, and
Price: Free
Operating systems: Windows 10 / 8 / 7 /2012 /Vista and XP
IP Camera Viewer is the most used free webcam recording software for windows 10 as its compatible with almost all IP camera models like Panasonic, Toshiba, Canon, D-Link, Sony, and more the 2000 others. With the capability of viewing and controlling 4 camera feeds at once, you can use this software to monitor your entire compound.
Some of the important advanced IP Camera Viewer functions include listening to webcam audios, adjust image settings, zoom or tilt images, schedule monitoring times, and detect motions.
Pros
- Automatically uploads recorded videos and photos to a server
- Compatible with almost all IP camera models
- Simple and easy to use
Cons
- No inbuilt media player
- Cannot adjust the image or video quality
You may also want to read >>> 10 Best Webcams | A Buyer’s Guide
![]()
A cross-platform for making videos anywhere for all creators
Why your video editing isn’t good enough? How about some creative inspo?
- 100 Million+ Users
- 150+ Countries and Regions
- 4 Million+ Social Media Followers
- 5 Million+ Stock Media for Use
* Secure Download
FAQs about Webcam Software for Windows
1. What is Webcam Software?
A webcam is a video camera that feeds or streams images or video in real-time to or over a computer network. And webcam software enables users to record video or stream video over the Internet.
Webcam software is an application that allows you to capture video from your laptop/desktop webcam and record or stream video over the Internet. You can use them to deliver professional videos, streaming, and online courses easily.
2. Does Windows have built-in webcam software?
Windows 10 has an in-built webcam app called Camera that lets you record videos and take pictures with your webcam. This is definitely better than downloading 3rd party webcam recording software where spyware/malware is rampant.
3. Does a webcam need software?
Yes, if the camera hardware offers depth, low-light support, night vision, etc. If you use any software on the camera, these functions are only available if the driver is installed.
Conclusion
After a keen of all the webcam software above, it’s evident that every developer had an intended purpose. You cannot therefore just randomly wake up and download any without considering its functions, supported devices, file formats, and the auxiliary apps available. All this information is contained herein.
According to some users, there are free webcam software Windows 10 that more often would not show any video images but the audio is absolutely clear. To help your fellow user, what bad experience have you ever had after recording a game using webcam software ? Kindly share your comment or suggestion on our social media platforms.
Richard Bennett
Richard Bennett is a writer and a lover of all things video.
Follow @Richard Bennett
Top 10 Movie Trailer Apps for iPhones and iPads
Top 10 Movie Trailer Apps for iPhones and iPads

Ollie Mattison
Mar 27, 2024• Proven solutions
The staggering amounts of video content on the Internet are making it difficult to attract the attention of the audience you are targeting. Summarizing the highlights of your video in a short twenty to thirty-second trailer is one of the techniques you can use to spark the audience’s attention and ultimately increase the number of views your videos are getting.
Besides the promotional purposes, you can also use trailers to create entertaining short videos in order to have fun with your friends. Fortunately, you don’t need a professional video editing suite to perform this task since there are hundreds of video editing apps that allow you to create trailers on iPhones and iPads.
So, in this article we are going to take you through the top ten movie trailer apps for iPhones and iPads you can use to create eye-catching trailers for all types of videos you create.
Top 10 Movie Trailer Apps for iPhones and iPads
Selecting the footage you are going to include in the trailer you are making, is probably the most difficult part of the process, since most movie trailer apps for iPhones and iPads offer customizable templates. In addition, the music you choose as the soundtrack for your trailer needs to match with the visuals and the editing style you opted for. Let’s take a look at the top 10 movie trailer apps for iPhones and iPads.
1. iMovie
Price: Free
All iPhones and iPads offer a free way to edit all videos you record with them. All you need to do is make sure that iMovie is installed on your iPhone or iPad and you can start editing the footage you recorded. In addition, you can also import videos recorded with different types of cameras into iMovie, as long as they are saved in the file format that is compatible with this app.
iMovie offers a variety of predesigned trailer themes, so you just have to pick the one you like the most and then choose the footage you want to include in your trailer. Keep in mind that you cannot add music to any of the trailer themes, but you can export the trailer you created and create the soundtrack from iMovie’s Video mode. What’s more, you can also use this app to add transitions , visual effects or titles to the trailers you create with iMovie.
2. Intro.Maker +3D Movie Trailer
Price: Free, offers in-app purchases

You don’t have to be a seasoned filmmaker to create professionally looking trailers with Intro.Maker + 3D Movie Trailer. The app lets you choose from hundreds of HD templates that can be customized quickly to meet the demands of your project. Moreover, you can create your own templates and use them on all future projects. Videos that are saved on the device’s camera roll can be easily imported into the app, which means that you can start making a new trailer just moments after recording the footage.
The trailers you create with the free version of Intro.Maker + 3D Movie Trailer are going to be watermarked and you must make an in-app purchase in order to remove the watermark . Furthermore, features like Voice Record, Transitions or Fonts are not available on the free version of the app, which is the reason why it is advisable to purchase a monthly or the annual subscription if you are planning to create trailers with this app on a constant basis.
3. Intro Designer Lite – Create Intros for iMovie
Price: Free

The fact that Intro Designer Lite has more than five million downloads says a lot about its popularity. This iOS-based app is equipped with just six built-in templates, but you can download two more for free. Creating new trailers, openers or end credits requires you to go through three easy steps since you only have to select the template, add the footage and export the video.
Additionally, you can use this app to snap photos that you can use in the final cut of your trailer. Intro Designer Lite allows you to move and rotate all pictures you take with it so that they fit the trailer perfectly. This movie trailer app for iPhone and iPad devices is equipped with a plethora of text tools, which enables you to resize, move or even animate all text you add to the trailer you are working on. The best part is that you can save all your projects, and continue working on them whenever you want.
4. Intro Maker – YT Intro Designer
Price: Free, offers in-app purchases

If you are looking for an app that lets you create intros for your YouTube videos effortlessly, then Intro Maker is the right choice for you. There are more than a thousand available templates, while new templates are added on a weekly basis, which means that you are never going to run out of ideas for your next intro.
Besides the rich selection of templates the Intro Maker grants you access to hundreds of fonts, and effects stickers you can add to your projects with a single tap. Creating the soundtrack for the intro you’re working on is easy since there are more than 200 songs and sound effects to choose from. The number of projects you can create is not limited and each of them can be saved, which allows you to just modify an existing intro or a trailer and use it for a different purpose. However, you must upgrade to the VIP version of the app if you want to use all of its features.
5. Intro Maker: Vlog Video Maker
Price: Free, offers in-app purchases

Making a trailer or an intro for the videos you share online shouldn’t take too much of your time. This iPhone app offers an easy solution to all vloggers and video content creators who want to create trailers for their film projects from their phones. There are more than a thousand customizable templates to choose from, as well as over 700 motion stickers. In addition, the app doesn’t limit the number of titles you can add to a single project, and it lets you adjust the size, shadow and stroke values for each title you include in a video.
Even though the app doesn’t have a library of royalty-free songs , you can still use it to create soundtracks or even record voiceovers for your trailers. Moreover, the app’s file-sharing capabilities are underwhelming since you can only export videos to the camera roll. Purchasing the Intro Maker Premium or Premium Life Time subscription plans can be a good idea if you want to create new trailers and intros frequently.
6. IntroMate: Video Intro Maker
Price: $3.99, offers in-app purchases

In case you are looking for an app that makes the process of creating a trailer easy, then IntroMate may be one of the best choices you have. With the selection of over fifty HD templates and 240 fonts, this app enables you to create new trailers in minutes. Simply choose a template that best fits the project you’re working on, import the footage from the camera roll, customize the template and export it from the app.
All fonts are fully customizable, which enables you to choose their size, color or on-screen position, while you can also add music and sound effects to your projects . If you are using iPhoto, you can sync it with IntroMate and import your trailers into Final Cut Pro or iMovie. Each trailer you create with this app can be exported in 4K, Full HD or some lower resolution. Keep in mind that you must make an in-app purchase if you want to apply glitch effects to the footage you’re editing with IntroMate.
7. FX Special Effects for Videos
Price: Free, offers in-app purchases

Professional video editing tools or amazing video effects and filters are just a few reasons why this app is so popular among video content creators. Sadly, you cannot use this app to record video, but you can edit all videos stored in your iPhone’s or iPad’s camera roll.
The app’s library of filters and effects is frequently updated, which enables you to experiment with new visual styles almost every week. Adjusting brightness, saturation or contrast values requires a minimum amount of effort, which enables you to enhance the colors of the footage you include in your trailers. What’s more FX Special Effects for Videos also features a sound effect library and it also enables you to import music from your device’s memory card. The free version of the app watermarks all videos and you must make an in-app purchase if you want to remove it or gain access to bokeh, light leaks and other types of video filters.
8. Video Editor Movie Music Maker
Price: Free, offers in-app purchases

This iOS app allows its users to trim the video clips they want to use in their trailers before they apply visual effects to them. Each visual effect, as well as animations, this app offers can be applied to the footage with a single tap. In addition, Video Editor Movie Music Maker lets you combine multiple video clips and create stunning video collages.
Furthermore, the app is equipped with the tools you can use to create vignettes , adjust brightness, contrast, saturation or sharpness. Video Editor Movie Maker also enables you to create the mirror effect, play videos in reverse and adjust their playback speed. Adding music to your videos is an effortless process since you just have to pick a song from your music library and it will be imported to your project immediately. Keep in mind that you have to make in-app purchases in order to unlock all of the app’s features.
9. Video FX: Movie Maker & Editor
Price: Free, offers in-app purchases

Video content creators who post their videos on Instagram, YouTube, TikTok or Facebook are going to love using this app. Making a trailer with Video FX app is remarkably simple, as you just have to import a video from the camera roll, add text or visual effects to the footage and share your creations on the social media platform of your choosing. The app lets you choose from more than ten different visual effects such as Party Time or TV Glitch and you just have to tap on them to apply them.
Video FX also offers audio editing features that allow you to create soundtracks for your trailers. Optionally, you can also add sound effects to the audio files you use in your projects if you want to make the trailer more convincing or more entertaining. Opting for the weekly, monthly or annual subscription is a great option if you are planning to edit videos with Video FX for a longer period of time.
10. Intro Music Video, Movie Maker
Price: Free, offers in-app purchases

As its name suggests, this iOS-based app is designed to simplify the process of creating an intro for a video. Besides making intros, you can also use it to create dynamic trailers for the videos you share on social media. You can choose from a broad range of templates, and pick the one that best matches the style of the video you would like to promote.
Moreover, the app lets you animate all text overlays, apply transitions between video clips and you can use the music library to create soundtracks for trailers. Optionally, you can import your own music into the app and use it as a soundtrack for the intro or the trailer you’re working on. The only downside is that you must make an in-app purchase if you want to animate text or add transitions to your videos. Also, you should keep in mind that the free version of this app watermarks all intros and trailers you create with it.
Conclusion
All major movie productions utilize trailers as an advertising tool that helps them inform the audience about their new projects. The movie trailer apps for iPads and iPhones allow you to do the same without having to spend a lot of time and money on making them. Which of the top ten movie trailer apps for iPhones and iPads are you going to choose? Leave a comment and let us know.
Ollie Mattison
Ollie Mattison is a writer and a lover of all things video.
Follow @Ollie Mattison
Ollie Mattison
Mar 27, 2024• Proven solutions
The staggering amounts of video content on the Internet are making it difficult to attract the attention of the audience you are targeting. Summarizing the highlights of your video in a short twenty to thirty-second trailer is one of the techniques you can use to spark the audience’s attention and ultimately increase the number of views your videos are getting.
Besides the promotional purposes, you can also use trailers to create entertaining short videos in order to have fun with your friends. Fortunately, you don’t need a professional video editing suite to perform this task since there are hundreds of video editing apps that allow you to create trailers on iPhones and iPads.
So, in this article we are going to take you through the top ten movie trailer apps for iPhones and iPads you can use to create eye-catching trailers for all types of videos you create.
Top 10 Movie Trailer Apps for iPhones and iPads
Selecting the footage you are going to include in the trailer you are making, is probably the most difficult part of the process, since most movie trailer apps for iPhones and iPads offer customizable templates. In addition, the music you choose as the soundtrack for your trailer needs to match with the visuals and the editing style you opted for. Let’s take a look at the top 10 movie trailer apps for iPhones and iPads.
1. iMovie
Price: Free
All iPhones and iPads offer a free way to edit all videos you record with them. All you need to do is make sure that iMovie is installed on your iPhone or iPad and you can start editing the footage you recorded. In addition, you can also import videos recorded with different types of cameras into iMovie, as long as they are saved in the file format that is compatible with this app.
iMovie offers a variety of predesigned trailer themes, so you just have to pick the one you like the most and then choose the footage you want to include in your trailer. Keep in mind that you cannot add music to any of the trailer themes, but you can export the trailer you created and create the soundtrack from iMovie’s Video mode. What’s more, you can also use this app to add transitions , visual effects or titles to the trailers you create with iMovie.
2. Intro.Maker +3D Movie Trailer
Price: Free, offers in-app purchases
You don’t have to be a seasoned filmmaker to create professionally looking trailers with Intro.Maker + 3D Movie Trailer. The app lets you choose from hundreds of HD templates that can be customized quickly to meet the demands of your project. Moreover, you can create your own templates and use them on all future projects. Videos that are saved on the device’s camera roll can be easily imported into the app, which means that you can start making a new trailer just moments after recording the footage.
The trailers you create with the free version of Intro.Maker + 3D Movie Trailer are going to be watermarked and you must make an in-app purchase in order to remove the watermark . Furthermore, features like Voice Record, Transitions or Fonts are not available on the free version of the app, which is the reason why it is advisable to purchase a monthly or the annual subscription if you are planning to create trailers with this app on a constant basis.
3. Intro Designer Lite – Create Intros for iMovie
Price: Free
The fact that Intro Designer Lite has more than five million downloads says a lot about its popularity. This iOS-based app is equipped with just six built-in templates, but you can download two more for free. Creating new trailers, openers or end credits requires you to go through three easy steps since you only have to select the template, add the footage and export the video.
Additionally, you can use this app to snap photos that you can use in the final cut of your trailer. Intro Designer Lite allows you to move and rotate all pictures you take with it so that they fit the trailer perfectly. This movie trailer app for iPhone and iPad devices is equipped with a plethora of text tools, which enables you to resize, move or even animate all text you add to the trailer you are working on. The best part is that you can save all your projects, and continue working on them whenever you want.
4. Intro Maker – YT Intro Designer
Price: Free, offers in-app purchases
If you are looking for an app that lets you create intros for your YouTube videos effortlessly, then Intro Maker is the right choice for you. There are more than a thousand available templates, while new templates are added on a weekly basis, which means that you are never going to run out of ideas for your next intro.
Besides the rich selection of templates the Intro Maker grants you access to hundreds of fonts, and effects stickers you can add to your projects with a single tap. Creating the soundtrack for the intro you’re working on is easy since there are more than 200 songs and sound effects to choose from. The number of projects you can create is not limited and each of them can be saved, which allows you to just modify an existing intro or a trailer and use it for a different purpose. However, you must upgrade to the VIP version of the app if you want to use all of its features.
5. Intro Maker: Vlog Video Maker
Price: Free, offers in-app purchases
Making a trailer or an intro for the videos you share online shouldn’t take too much of your time. This iPhone app offers an easy solution to all vloggers and video content creators who want to create trailers for their film projects from their phones. There are more than a thousand customizable templates to choose from, as well as over 700 motion stickers. In addition, the app doesn’t limit the number of titles you can add to a single project, and it lets you adjust the size, shadow and stroke values for each title you include in a video.
Even though the app doesn’t have a library of royalty-free songs , you can still use it to create soundtracks or even record voiceovers for your trailers. Moreover, the app’s file-sharing capabilities are underwhelming since you can only export videos to the camera roll. Purchasing the Intro Maker Premium or Premium Life Time subscription plans can be a good idea if you want to create new trailers and intros frequently.
6. IntroMate: Video Intro Maker
Price: $3.99, offers in-app purchases
In case you are looking for an app that makes the process of creating a trailer easy, then IntroMate may be one of the best choices you have. With the selection of over fifty HD templates and 240 fonts, this app enables you to create new trailers in minutes. Simply choose a template that best fits the project you’re working on, import the footage from the camera roll, customize the template and export it from the app.
All fonts are fully customizable, which enables you to choose their size, color or on-screen position, while you can also add music and sound effects to your projects . If you are using iPhoto, you can sync it with IntroMate and import your trailers into Final Cut Pro or iMovie. Each trailer you create with this app can be exported in 4K, Full HD or some lower resolution. Keep in mind that you must make an in-app purchase if you want to apply glitch effects to the footage you’re editing with IntroMate.
7. FX Special Effects for Videos
Price: Free, offers in-app purchases
Professional video editing tools or amazing video effects and filters are just a few reasons why this app is so popular among video content creators. Sadly, you cannot use this app to record video, but you can edit all videos stored in your iPhone’s or iPad’s camera roll.
The app’s library of filters and effects is frequently updated, which enables you to experiment with new visual styles almost every week. Adjusting brightness, saturation or contrast values requires a minimum amount of effort, which enables you to enhance the colors of the footage you include in your trailers. What’s more FX Special Effects for Videos also features a sound effect library and it also enables you to import music from your device’s memory card. The free version of the app watermarks all videos and you must make an in-app purchase if you want to remove it or gain access to bokeh, light leaks and other types of video filters.
8. Video Editor Movie Music Maker
Price: Free, offers in-app purchases
This iOS app allows its users to trim the video clips they want to use in their trailers before they apply visual effects to them. Each visual effect, as well as animations, this app offers can be applied to the footage with a single tap. In addition, Video Editor Movie Music Maker lets you combine multiple video clips and create stunning video collages.
Furthermore, the app is equipped with the tools you can use to create vignettes , adjust brightness, contrast, saturation or sharpness. Video Editor Movie Maker also enables you to create the mirror effect, play videos in reverse and adjust their playback speed. Adding music to your videos is an effortless process since you just have to pick a song from your music library and it will be imported to your project immediately. Keep in mind that you have to make in-app purchases in order to unlock all of the app’s features.
9. Video FX: Movie Maker & Editor
Price: Free, offers in-app purchases
Video content creators who post their videos on Instagram, YouTube, TikTok or Facebook are going to love using this app. Making a trailer with Video FX app is remarkably simple, as you just have to import a video from the camera roll, add text or visual effects to the footage and share your creations on the social media platform of your choosing. The app lets you choose from more than ten different visual effects such as Party Time or TV Glitch and you just have to tap on them to apply them.
Video FX also offers audio editing features that allow you to create soundtracks for your trailers. Optionally, you can also add sound effects to the audio files you use in your projects if you want to make the trailer more convincing or more entertaining. Opting for the weekly, monthly or annual subscription is a great option if you are planning to edit videos with Video FX for a longer period of time.
10. Intro Music Video, Movie Maker
Price: Free, offers in-app purchases
As its name suggests, this iOS-based app is designed to simplify the process of creating an intro for a video. Besides making intros, you can also use it to create dynamic trailers for the videos you share on social media. You can choose from a broad range of templates, and pick the one that best matches the style of the video you would like to promote.
Moreover, the app lets you animate all text overlays, apply transitions between video clips and you can use the music library to create soundtracks for trailers. Optionally, you can import your own music into the app and use it as a soundtrack for the intro or the trailer you’re working on. The only downside is that you must make an in-app purchase if you want to animate text or add transitions to your videos. Also, you should keep in mind that the free version of this app watermarks all intros and trailers you create with it.
Conclusion
All major movie productions utilize trailers as an advertising tool that helps them inform the audience about their new projects. The movie trailer apps for iPads and iPhones allow you to do the same without having to spend a lot of time and money on making them. Which of the top ten movie trailer apps for iPhones and iPads are you going to choose? Leave a comment and let us know.
Ollie Mattison
Ollie Mattison is a writer and a lover of all things video.
Follow @Ollie Mattison
Green Screen Magic in FCP X: Tips, Tricks, and Techniques
FCP X: Create a Chroma-Key (Green-screen) Effect
Benjamin Arango
Mar 27, 2024• Proven solutions
Chroma-key (also called “green screen”) effects are a staple in video production. What FCP X effect does is allow you to make the background behind an actor transparent so you can place the actor into a different environment than a studio.
This is a basic tutorial about Apple Final Cut Pro X, professional video editing software. However, if video editing is new to you, consider Wondershare Filmora for Mac . This is a powerful but easy-to-use tool for users just starting out. Download the free trial version below.
Download Mac Version ](https://tools.techidaily.com/wondershare/filmora/download/ )
Getting Started
First, the best thing you can do to improve the quality of your keys is to improve how you shoot them. Here are seven basic production rules:
- Actors should be at least 10 feet in front of the green screen. This avoids light from the background “spilling” around their body or shoulders.
- In general, don’t cast shadows on the green screen. Be very careful shooting feet.
- The green background should be as smooth as possible. Paint is always better than fabric; avoid wrinkles and folds.
- The green background should be lit smoothly, both from side to side and top to bottom. I try to have the green background display between 40-50% level on the waveform monitor.
- There is NO relationship between how the background is lit and how your actors are lit. This article will illustrate that.
- Light your background for smoothness. Light your actors for drama.
- Don’t worry about having the green background fill the frame. It only needs to completely surround the edges of your actors. Garbage mattes are used to get rid of junk around the edges.
Setting up the Key

The green screen image is always placed above the background. You can place either the green screen or background image into the Primary Storyline. I find it easier to put the background in the Primary Storyline, because it makes editing the green screen image easier. But this is purely personal choice.
Step 1: Select the green screen clip
From the Effects Browser > Keying category, double-click the Keyer effect, which applies it to the selected clip. (You can also drag the effect on top of the clip, if you forgot to select the green-screen clip first.)

Don’t panic if your image looks weird – we will fix it.

Click the Sample Color icon. This allows fine-tuning the selection of the background color.

In the green-screen image, drag to select a representative section of the background. I try to get close to the face, but not so close that I accidentally select loose hair or skin.
Your key should look better immediately. Most of the time, you can probably stop here. But there are three other adjustments that can make your key look even better:
- Cleaning up the matte
- Edge adjustments
- Light wrap

Click the Matte button to display your key as a white foreground on a black background.

Your goal is the make the foreground solid white, which means opaque, and the background solid black, which means transparent. Adjust the Fill Holes and Edge Distance sliders until your key looks solid. (For REALLY bad keys, you’ll need to also adjust Color Selection, mentioned below.)

If an edge is too pronounced, or needs help, click the Edges icon.

Step 2: Tweaks Video
Then, click and drag a line from the foreground to the background in the Canvas. Drag the midpoint slider (where my cursor is) until the edge looks the best it can. Different video formats make this easy (ProRes), while others (HDV, avchd) make this much harder. Perfection is impossible – do the best you can.

Final Cut provides four additional tweaks at the bottom of the keyer filter:
- Color Selection
- Matte Tools
- Spill Suppression
- Light Wrap
The first three are designed to clean up poorly shot keys – read the FCP X Help files to learn how these work. (I used the Color Selection tools to clean up the very dark key I use an example later in this article.)
Light wrap, though, is aesthetic. What it does is blend colors from the background into the edges of the foreground, to make the entire key look more “organic,” as if the foreground and background were actually in the same space.
This is a subtle effect, but very cool.

Twirl down Light Wrap and adjust the Amount slider and watch what happens. Drag the other sliders around and see what happens. The nice thing about this setting is that when it looks good to you, it is good. The amount of the effect is totally up to you. Remember, Light Wrap only affects the edges of the foreground and should be used subtly.

When you are done, you have a great looking key!
Clean up the Image with a Garbage Mask

Sometimes, however, you don’t have, ah, perhaps, the best green-screen image to work with. Here, for example, there are lighting instruments in the foreground, with a very inadequately lit green screen in the background. (Sigh… this is just pitiful.)
Once you pull the key – which is film-speak for creating a green-screen shot, as I described above – and get it looking as good as possible, there’s one more step: adding a garbage matte to get rid of all the garbage surrounding your actors.

Once you get your key looking as good as you can – which in this case isn’t all that good – drag the Mask effect (Effects > Keying > Mask) on top of the green-screen clip.
NOTE: The Mask effect should always be added after the Keying effect, so that the Mask is below the Keyer in the Inspector.

Then, drag each of the four circles to create a shape such that your foreground image is contained inside it, and everything you want to exclude is outside. Here, for instance, we removed the light stand, the edge of the green background and the tearing at the top of the image. I’ve found this Mask effect works best when applied to a connected clip.
However, the big limitation of the Mask effect is that you only have four points to work with. That’s where a free effect comes in, which allows you to create far more flexible shapes with it. It’s written by Alex Gollner and is available on his website – alex4d.wordpress.com/fcpx/ – I recommend his effects highly.
How to Create a Chroma-Key in easier ways?
Chroma-key, or green screen, is an essential part of every editor to make all kinds of effects. Is there any way to make this sophisticated procedure easier way? Yes, try Filmora.
In version 10.5 for Mac, Filmora added a new feature: AI portrait. It allows you to do a green screen effect with just one click.
By adopting AI portrait, you can add those stunning effects in simple steps: How to Remove or Change Video Background in One Step?
Or: How to Add a Shake Effect to your Videos?
Conclusion
The chroma-key filter in FCP X allows us to create some amazing effects. If you want to use green screen effects more easily, here is Filmora for you. You can appaly Chroma-Key effects with just a few click. Have fun playing with it.
Download Mac Version ](https://tools.techidaily.com/wondershare/filmora/download/ )
Benjamin Arango
Benjamin Arango is a writer and a lover of all things video.
Follow @Benjamin Arango
Benjamin Arango
Mar 27, 2024• Proven solutions
Chroma-key (also called “green screen”) effects are a staple in video production. What FCP X effect does is allow you to make the background behind an actor transparent so you can place the actor into a different environment than a studio.
This is a basic tutorial about Apple Final Cut Pro X, professional video editing software. However, if video editing is new to you, consider Wondershare Filmora for Mac . This is a powerful but easy-to-use tool for users just starting out. Download the free trial version below.
Download Mac Version ](https://tools.techidaily.com/wondershare/filmora/download/ )
Getting Started
First, the best thing you can do to improve the quality of your keys is to improve how you shoot them. Here are seven basic production rules:
- Actors should be at least 10 feet in front of the green screen. This avoids light from the background “spilling” around their body or shoulders.
- In general, don’t cast shadows on the green screen. Be very careful shooting feet.
- The green background should be as smooth as possible. Paint is always better than fabric; avoid wrinkles and folds.
- The green background should be lit smoothly, both from side to side and top to bottom. I try to have the green background display between 40-50% level on the waveform monitor.
- There is NO relationship between how the background is lit and how your actors are lit. This article will illustrate that.
- Light your background for smoothness. Light your actors for drama.
- Don’t worry about having the green background fill the frame. It only needs to completely surround the edges of your actors. Garbage mattes are used to get rid of junk around the edges.
Setting up the Key
The green screen image is always placed above the background. You can place either the green screen or background image into the Primary Storyline. I find it easier to put the background in the Primary Storyline, because it makes editing the green screen image easier. But this is purely personal choice.
Step 1: Select the green screen clip
From the Effects Browser > Keying category, double-click the Keyer effect, which applies it to the selected clip. (You can also drag the effect on top of the clip, if you forgot to select the green-screen clip first.)
Don’t panic if your image looks weird – we will fix it.
Click the Sample Color icon. This allows fine-tuning the selection of the background color.
In the green-screen image, drag to select a representative section of the background. I try to get close to the face, but not so close that I accidentally select loose hair or skin.
Your key should look better immediately. Most of the time, you can probably stop here. But there are three other adjustments that can make your key look even better:
- Cleaning up the matte
- Edge adjustments
- Light wrap
Click the Matte button to display your key as a white foreground on a black background.
Your goal is the make the foreground solid white, which means opaque, and the background solid black, which means transparent. Adjust the Fill Holes and Edge Distance sliders until your key looks solid. (For REALLY bad keys, you’ll need to also adjust Color Selection, mentioned below.)
If an edge is too pronounced, or needs help, click the Edges icon.
Step 2: Tweaks Video
Then, click and drag a line from the foreground to the background in the Canvas. Drag the midpoint slider (where my cursor is) until the edge looks the best it can. Different video formats make this easy (ProRes), while others (HDV, avchd) make this much harder. Perfection is impossible – do the best you can.
Final Cut provides four additional tweaks at the bottom of the keyer filter:
- Color Selection
- Matte Tools
- Spill Suppression
- Light Wrap
The first three are designed to clean up poorly shot keys – read the FCP X Help files to learn how these work. (I used the Color Selection tools to clean up the very dark key I use an example later in this article.)
Light wrap, though, is aesthetic. What it does is blend colors from the background into the edges of the foreground, to make the entire key look more “organic,” as if the foreground and background were actually in the same space.
This is a subtle effect, but very cool.
Twirl down Light Wrap and adjust the Amount slider and watch what happens. Drag the other sliders around and see what happens. The nice thing about this setting is that when it looks good to you, it is good. The amount of the effect is totally up to you. Remember, Light Wrap only affects the edges of the foreground and should be used subtly.
When you are done, you have a great looking key!
Clean up the Image with a Garbage Mask
Sometimes, however, you don’t have, ah, perhaps, the best green-screen image to work with. Here, for example, there are lighting instruments in the foreground, with a very inadequately lit green screen in the background. (Sigh… this is just pitiful.)
Once you pull the key – which is film-speak for creating a green-screen shot, as I described above – and get it looking as good as possible, there’s one more step: adding a garbage matte to get rid of all the garbage surrounding your actors.
Once you get your key looking as good as you can – which in this case isn’t all that good – drag the Mask effect (Effects > Keying > Mask) on top of the green-screen clip.
NOTE: The Mask effect should always be added after the Keying effect, so that the Mask is below the Keyer in the Inspector.
Then, drag each of the four circles to create a shape such that your foreground image is contained inside it, and everything you want to exclude is outside. Here, for instance, we removed the light stand, the edge of the green background and the tearing at the top of the image. I’ve found this Mask effect works best when applied to a connected clip.
However, the big limitation of the Mask effect is that you only have four points to work with. That’s where a free effect comes in, which allows you to create far more flexible shapes with it. It’s written by Alex Gollner and is available on his website – alex4d.wordpress.com/fcpx/ – I recommend his effects highly.
How to Create a Chroma-Key in easier ways?
Chroma-key, or green screen, is an essential part of every editor to make all kinds of effects. Is there any way to make this sophisticated procedure easier way? Yes, try Filmora.
In version 10.5 for Mac, Filmora added a new feature: AI portrait. It allows you to do a green screen effect with just one click.
By adopting AI portrait, you can add those stunning effects in simple steps: How to Remove or Change Video Background in One Step?
Or: How to Add a Shake Effect to your Videos?
Conclusion
The chroma-key filter in FCP X allows us to create some amazing effects. If you want to use green screen effects more easily, here is Filmora for you. You can appaly Chroma-Key effects with just a few click. Have fun playing with it.
Download Mac Version ](https://tools.techidaily.com/wondershare/filmora/download/ )
Benjamin Arango
Benjamin Arango is a writer and a lover of all things video.
Follow @Benjamin Arango
Also read:
- New 2024 Approved Best Free Open Source Video Editors
- Updated In 2024, Unleash Your Creativity Top 10 Free and Paid Android Video Editing Apps
- Updated Take Your Videos to the Next Level Mastering the Ken Burns Effect in Final Cut Pro for 2024
- Updated 2024 Approved Convert Video to Image A Step-by-Step Guide with 10 Best Tools
- New Dual-View Video Editing The Best Apps for iOS and Android for 2024
- 2024 Approved Make an Impact Learn to Create Slow-Motion Videos on Kapwing
- New 2024 Approved Mac Movie Magic 8 Essential Video Editing Tools
- Updated In 2024, Edit Like a Pro with Wax A Free Video Editing Software Guide
- Updated In 2024, 10 Best Vegas Pro Replacements for Mac Users (Free and Paid Options)
- New Analyze and Align Image Ratios for 2024
- Updated In 2024, Split Your MPEG Videos with Ease 5 Free Tools You Need to Try
- New Discover the Ultimate 1080P Video Editing Experience Top Software Picks for 2024
- New In 2024, The Ultimate Guide to MTS Video Editing Top 5 Software
- New In 2024, Create Music for Free Top 10 Recording Software Options
- Updated 2024 Approved Mac Users Guide to the Best MKV Trimming Tools
- The Ultimate 16X9 Ratio Calculator Guide 5 Surprising Insights for 2024
- Mavericks MP4 Video Editor Edit and Enhance Your Videos for 2024
- New In 2024, Get Animated Top 10 Software for 2D Animation Enthusiasts
- Updated Edit Like a Pro QuickTime Video Editing on Mac Made Easy for 2024
- Updated Create Unforgettable Intros 7 Leading Movie Intro Software for 2024
- New In 2024, Sizing Up Your Content How Aspect Ratio Affects YouTube Video Style
- New In 2024, 10 Reliable Aspect Ratio Conversion Applications
- Updated In 2024, AVS Video Editor Review
- New 2024 Approved Get Rid of Filmora Watermark With and Without Subscription
- New Transition Like a Pro Top 10 Premiere Pro Plugin Essentials
- In 2024, Best Anti Tracker Software For Vivo X Fold 2 | Dr.fone
- In 2024, 5 Ways to Move Contacts From Honor X50i to iPhone (13/14/15) | Dr.fone
- In 2024, How to Show Wi-Fi Password on Xiaomi 14 Ultra
- In 2024, Are You Trying to Make Slow-Mo Videos on Instagram? In This Article, We Will Discuss Top-Rated Ways to Produce Perfect Slow-Motion Videos for Instagram
- What to do if your iPhone 12 Pro Max has bad ESN or blacklisted IMEI?
- In 2024, Does Oppo A38 Have Find My Friends? | Dr.fone
- In 2024, How to Remove iPhone 14 Plus Device from iCloud
- In 2024, Top 4 SIM Location Trackers To Easily Find Your Lost Vivo Y17s Device
- New 2024 Approved Top 10 Free Football Streaming Websites for Live Matches
- In 2024, How to Come up With the Best Pokemon Team On Honor Magic 6? | Dr.fone
- How to Repair corrupt MP4 and MOV files of OnePlus Ace 2V using Video Repair Utility on Mac?
- How to Add Your Digital Signature to a .wps file Document
- In 2024, How to Transfer Data from Oppo Reno 11 Pro 5G to Samsung Phone | Dr.fone
- Top 15 Apps To Hack WiFi Password On Samsung Galaxy S24 Ultra
- In 2024, What Legendaries Are In Pokemon Platinum On Samsung Galaxy M34? | Dr.fone
- How to Mirror Motorola Razr 40 to Mac? | Dr.fone
- Top 4 Android System Repair Software for Itel P40 Bricked Devices | Dr.fone
- How to Fix Android.Process.Media Has Stopped on Realme 11 Pro+ | Dr.fone
- Looking For A Location Changer On Xiaomi Redmi 13C? Look No Further | Dr.fone
- The Ultimate Guide to Get the Rare Candy on Pokemon Go Fire Red On Poco X5 | Dr.fone
- Title: New Maximize Storage A Step-by-Step Guide to Clearing Space for FCPX for 2024
- Author: MdadeLe
- Created at : 2024-04-28 15:03:54
- Updated at : 2024-04-29 15:03:54
- Link: https://smart-video-editing.techidaily.com/new-maximize-storage-a-step-by-step-guide-to-clearing-space-for-fcpx-for-2024/
- License: This work is licensed under CC BY-NC-SA 4.0.
