

New In 2024, Sharpen Your Videos Top 10 Free Online Enhancement Solutions
Sharpen Your Videos: Top 10 Free Online Enhancement Solutions
Top 9 Best Online Video Quality Enhancer for FREE

Ollie Mattison
Apr 24, 2024• Proven solutions
In 2024, the average person will watch 17 hours of video content every week. Improving the quality of your videos can make your content more noticeable.
Fortunately, there are many excellent video quality enhancer tools to choose from. These tools can enhance both the visual and audio clarity of your content. Ultimately, this will enhance your professionalism and reputation as a trustworthy creator.
Are you wondering where to start when selecting an effective, user-friendly video enhancer? Here are some of our top recommendations to help you begin.
- Part 2: 5 Free AI Video Enhancers [Software Options]
- Part 3: Top 2 4K Video Enhancer Online Free Options
- Part 4: How to Choose the Best Video Enhancer
- In this article
Why Do You Need an AI Video Enhancer?
AI video enhancers utilize generative AI to remove noise, stabilize shaky videos, upscale, or enhance their overall appearance. These tools employ machine learning and neural network techniques to analyze videos and apply different effects for enhancement. Trained on extensive datasets, most AI video enhancers can understand video content like faces, scenes, and objects, automatically adjusting imperfections.
Using an AI video enhancer is an excellent way to boost video quality quickly. Unlike traditional methods, AI speeds up the enhancement process significantly. There are additional benefits, such as:
- **Enhanced Media Quality:**AI video enhancers enhance videos automatically with advanced algorithms, maintaining quality, clarity, and detail.
- Noise Reduction: Many AI video enhancer tools effectively reduce visual noise in videos, resulting in cleaner and clearer footage.
- **Reviving Old Clip:**AI video enhancers are adept at restoring old video footage to make it appear more vibrant.
5 Free AI Video Enhancers [Software Options]
Are blurry videos on your large screen getting on your nerves? Thanks to advancements in artificial intelligence (AI), you can now enhance your low-resolution videos for a crystal-clear viewing experience.
Whether you’re a video editor, content creator, or streamer, incorporating an AI video upscaler into your toolkit is a wise choice. Here are the top 5 picks for the best free AI video enhancer software to improve your video editing.
1.Wondershare Filmora - AI Video Enhancer

Pricing:Filmora offers a free trial without exporting.
Wondershare Filmora stands out in video editing by combining comprehensive editing features with AI-powered enhancement tools. With 4K editing, Filmora ensures videos are improved and future-proofed.
In addition to enhancement, Filmora offers over 300 unique transitions and effects catering to creative minds. Audio enthusiasts will enjoy advanced audio tools like audio ducking and equalizers.
Filmora’s standout feature is its motion tracking capability, enabling dynamic video compositions. While beginners may find the abundance of features overwhelming, regular updates and an active online community provide ample support.
Features
- Filmora’s advanced AI video-enhancing algorithms let you convert black-and-white footage to colored ones.
- It boosts frame rates up to 240 FPS using AI-enhanced frame interpolation technology and 4x super-resolution algorithms.
- Filmora enhances videos’ clarity and quality through audio ducking, equalizers, and more.
- This AI Video Enhancer tracks and attaches objects in videos.
- The tool preserves details and enhances quality in slow-motion scenes.
- Offers over 300 unique transitions and effects.
Pros
- Versatile editing and enhancement options.
- This AI video enhancer is designed to assist both beginners and professionals.
- It supports batch processing, enhancing 10+ videos simultaneously.
Cons
- The free version adds a watermark.
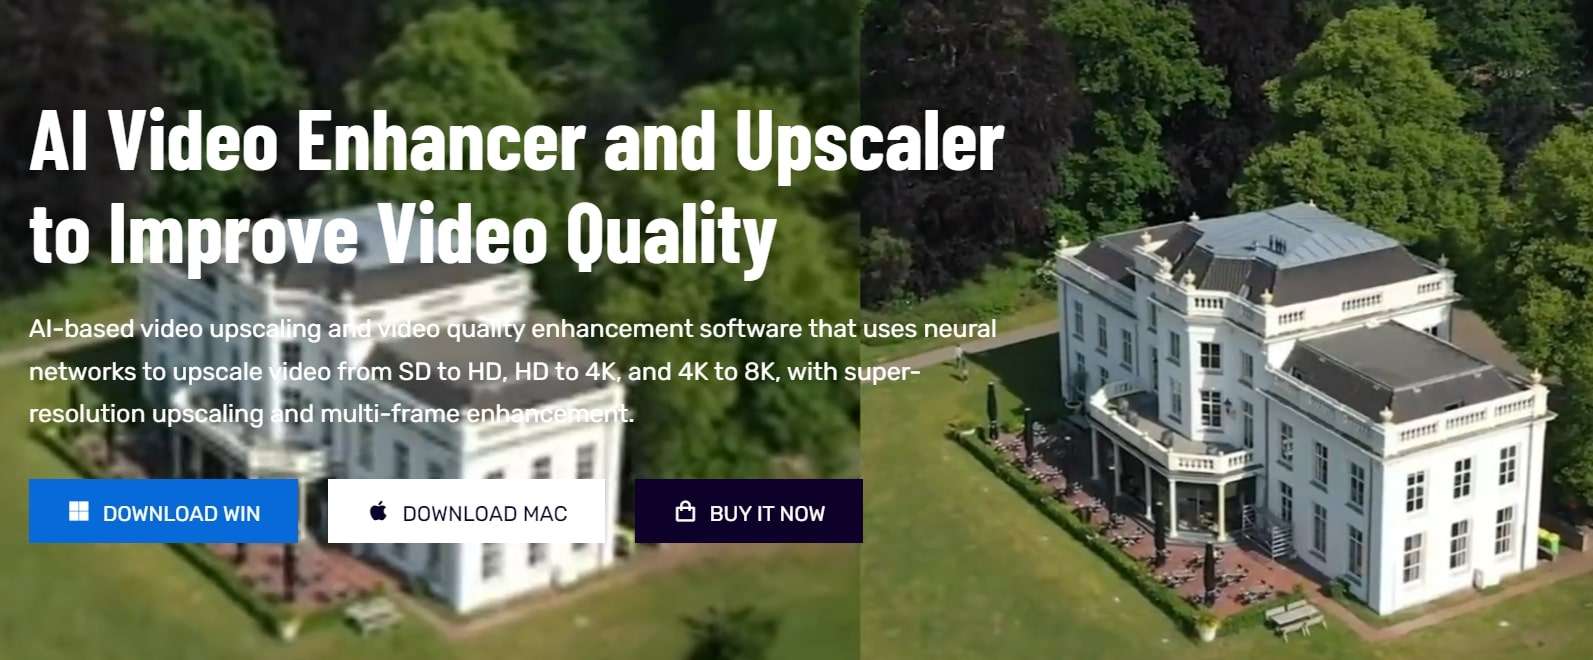
2.AVCLabs Video Enhancer AI
Pricing:AVCLabs offers new users a 7-day free trial.
AVCLabs Video Enhancer AI utilizes a neural network to improve video clip quality. With super-resolution AI video upscaling and multi-frame enhancement, it can easily upscale video from SD to HD (720p or 1080p) to 4K and up to 8K in just one click.
With support for various video and audio formats, users can work seamlessly without compatibility issues. A notable feature is its batch processing capability, enabling users to upscale and enhance multiple videos simultaneously, saving time. The real-time preview feature is invaluable for those who wish to see the software’s results before finalizing their project.
Features
- AVCLabs seamlessly enhances any video footage without quality loss. Whether single or multi-frame, you’ll experience smooth transitions and improved frames.
- With AVCLabs’ color correction feature, you can easily adjust each video frame’s brightness, saturation, and contrast. This tool employs AI video upscaling to create larger, more detailed images without sacrificing quality.
- This video enhancement tool offers automatic face refinement to enhance facial details, which is ideal for improving low-quality videos with excessive noise and blurriness.
- The Super Resolution feature recovers high-resolution videos from low-resolution materials by generating additional pixel data to fill gaps, resulting in enhanced output.
- AVCLabs Video Enhancer AI uses a multi-frame convolutional neural network to stabilize video shakes and remove motion artifacts, overlay noise, and grain, producing natural and enhanced results.
Pros
- AVCLabs features a color calibration algorithm that accurately portrays natural colors.
- It allows you to add color to old black-and-white videos.
- The video processing is fully automatic, requiring no manual fine-tuning.
Cons
- The app demands a significant amount of free space, up to 15 GB.
- It is only compatible with Windows and Mac operating systems.
- The free trial adds a watermark from AVC Labs to the videos.
3.UniFab Video Enhancer
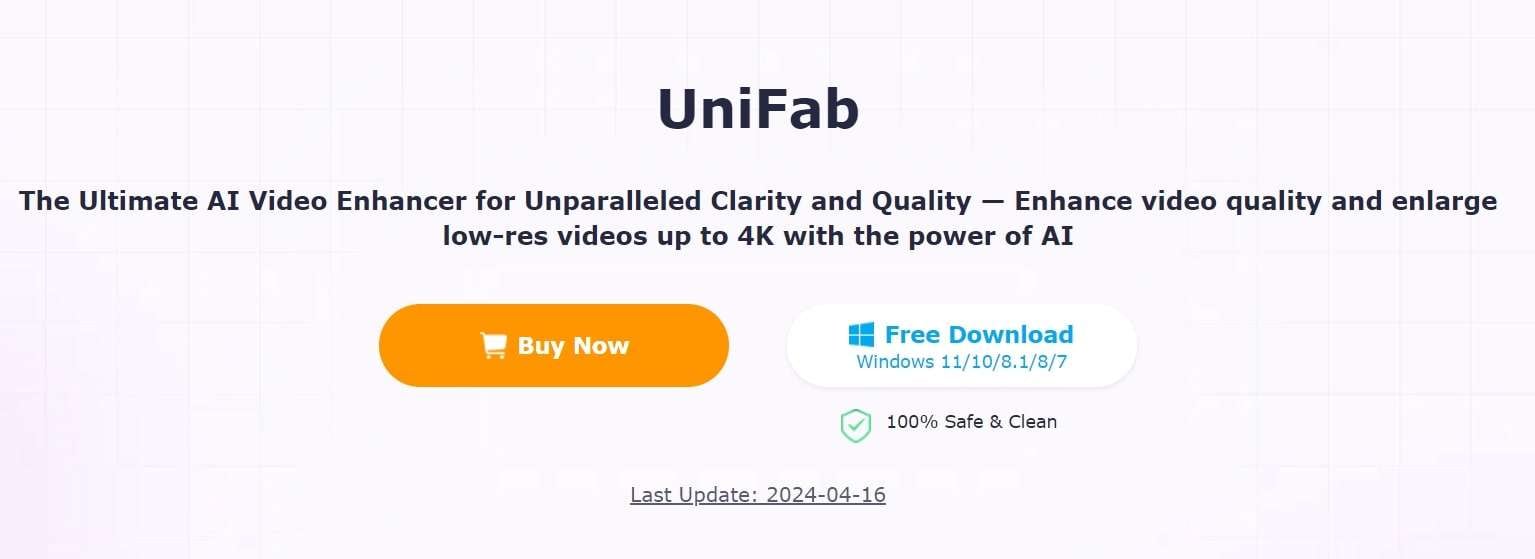
Pricing: UniFab provides a 30-day free trial for new AI users and a 30-day money-back guarantee for paid.
UniFab is a comprehensive AI-powered video enhancer to enhance video quality for all types of videos. Standout features like upscaling video to HDR10/Dolby Vision, denoising, and deinterlacing set this tool apart.
The models are regularly updated with the latest advancements in Deep Learning. Whether you’re a novice or an expert, UniFab offers both automatic and manual modes for video enhancement, making it easy to use without requiring complex settings.
Features
- Upgrade any video to 720p, 1080p, or even 4k resolution with remarkable clarity.
- Convert SDR videos to stunning HDR formats like HDR10+ and Dolby Vision. This feature revitalizes your videos, making them significantly more vibrant and immersive.
- Utilize AI technology to deinterlace your videos, ensuring smooth playback and a pristine viewing experience on modern displays.
- Specifically designed for videos captured in low-light conditions or with high ISO settings, this tool intuitively reduces grain and noise, restoring your footage’s true essence without sacrificing detail.
- Experience unprecedented fluidity as the software boosts your videos to an impressive 120FPS using AI. This transforms your content into a smooth motion stream, ideal for high-definition screens and attentive audiences.
Pros
- It allows audio up-mixing to EAC3 5.1/DTS 7.1 through AI.
- Utilizes GPU-accelerated technology.
- Supports video conversion, compression, and editing.
Cons
- The free trial is limited to 3 videos.
- Does not support Mac systems.
4.Topaz Video Enhance AI
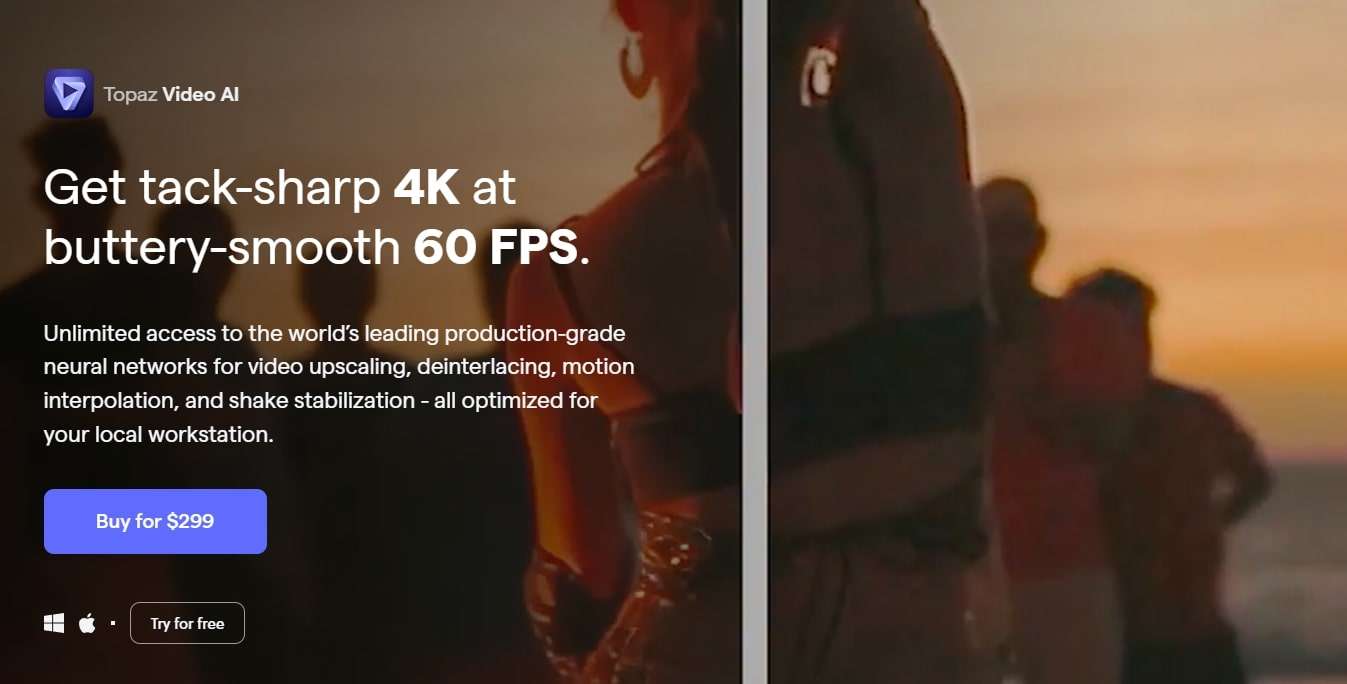
Pricing:Topaz video enhancement tool offers a 30-day no-questions-asked refund policy.
Topaz Video Enhance AI enhances video quality by increasing its resolution. It supports batch upscaling of videos and is compatible with DVD, DSLR, Game, and HD stock footage.
Many notable film studios consider Topaz Video Enhance AI one of the best video editing software tools. It is suitable for various uses, such as commercials, movie content, and YouTube videos.
Features
- This free video upscaling software swiftly analyzes video footage quality using AI tools and recreates it into high-resolution videos.
- Topaz offers Gaia CGI and Theia for enhancing CG and animated videos, along with Proteus and Artemis for noise removal and sharpening.
- Easily recover details from any video footage by injecting original details using adjacent frames’ additional information. It detects and corrects visual artifacts formed during compression.
- Topaz provides an automatic mode for quick video quality enhancement and manual fine-tuning options using available controls.
- With this free video enhancer software, preserve video audio tracks and select from different conversion options for optimal output in the final project.
Pros
- Reduces motion artifacts.
- Adds extra frames for smooth, slow-motion videos.
- Enhances video quality up to 8K.
Cons
- AI processing can be time-consuming, sometimes taking hours.
- Requires a high-quality graphics card.
5.HitPaw Video Enhancer

Pricing:HitPaw AI video enhancer offers a 30-day refund guarantee on paid plans.
HitPaw is a user-friendly video enhancer suitable for both beginners and professionals. It features an easy-to-navigate interface, ensuring even those with minimal experience can improve their videos. Despite its simplicity, HitPaw offers robust enhancement tools, including color correction and stabilization. Its extensive support for various video formats eliminates compatibility concerns.
The software prioritizes efficient video enhancement without compromising quality or speed. Comprehensive tutorials help users explore different editing tasks and unlock their content’s full potential.
Features
- Utilize advanced AI algorithms to upscale low-resolution videos for a more appealing look. The AI feature optimizes content for sharper and more vibrant visuals.
- The HitPaw video quality enhancer app uses AI tools to improve detailing on human faces. Apply filters and adjust settings to enhance facial output in videos.
- The app includes a video stabilization feature that eliminates shaky camera movements, producing smoother and clearer videos with a professional touch.
- HitPaw offers an AI video repair option to restore damaged, corrupted, and old videos. It can also use deep learning AI to colorize black-and-white videos.
- Remove noise from videos with the General Denoise feature, making them look sharper, clearer, and newer.
Pros
- Supports various video formats.
- Has a user-friendly and intuitive interface.
- Can repair and enhance animation videos.
Cons
- The free plan has limited editing features.
Top 2 4K Video Enhancer Online Free Options
The AI-enhanced video tools mentioned above excel in their field. However, there are times when you might run out of storage or need a quick fix through your browser. So, here are some online AI tools that can enhance your videos. Unlike offline video enhancer AIs, online tools are easily accessible. While they may offer fewer features than desktop solutions, they are still useful for some editors.
1.Cutout.Pro
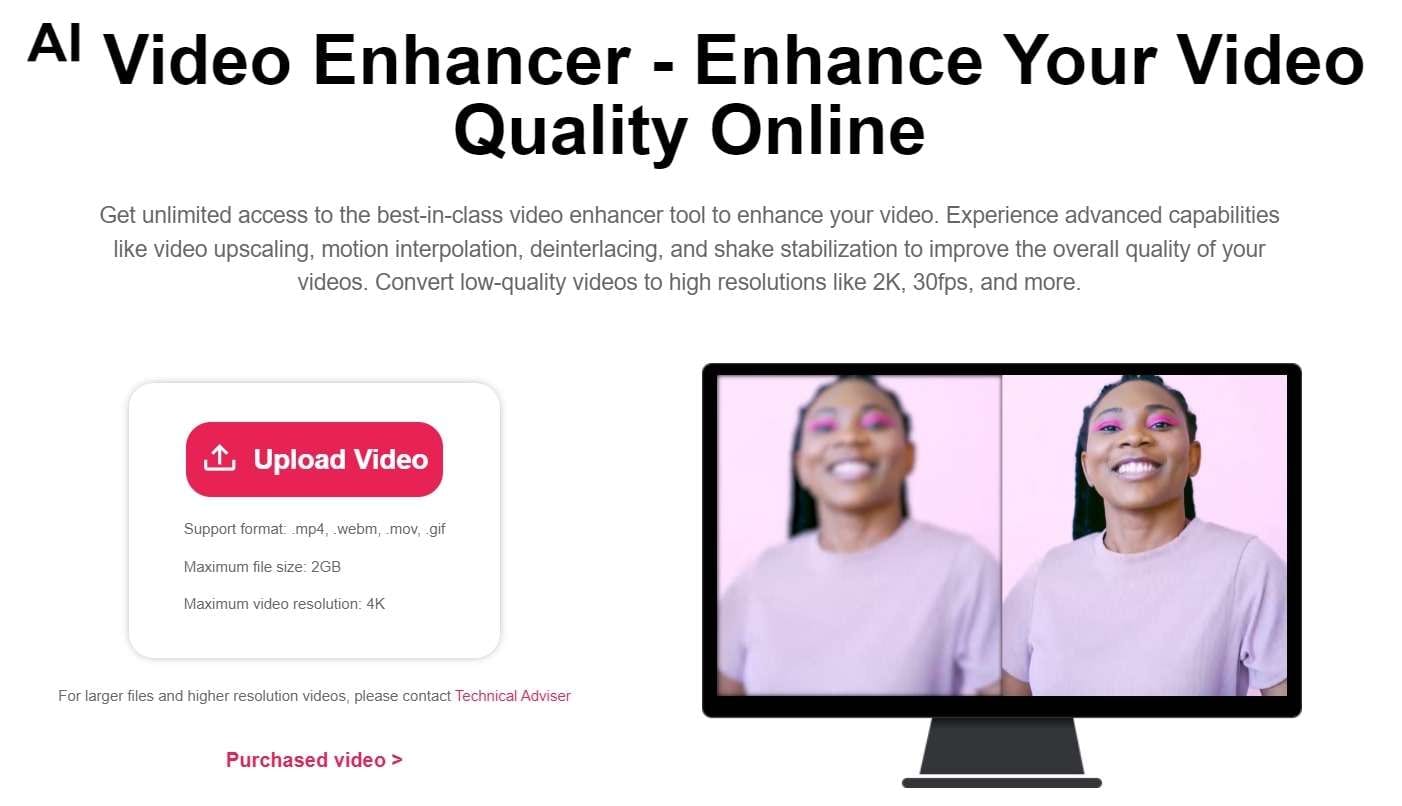
Many editing professionals rely on this free AI video enhancer for unlimited video improvements. Cutout.Pro utilizes advanced features such as video upscaling, motion interpolation, deinterlacing, and shake stabilization to enhance overall quality. This tool converts low-quality videos to higher resolutions like 2K, 30fps, and beyond. Moreover, this online tool swiftly reduces visual noise and other motion artifacts from clips using AI.
Features
- Reduce noise, motion artifacts, and improve video resolution significantly with this powerful online video quality enhancer and upscaler. Perfect for enhancing low-resolution videos like 240p, 360p, 480p, and more.
- Pro increases video frame rates without sacrificing quality. Smooth out shaky footage for better slow-motion effects.
- This tool enhances video resolution up to 2K at a maximum of 30fps effortlessly. It sharpens and defines your videos, bringing your story to life like a professional.
- This is perfect for filmmakers seeking to enhance footage quality and create professional-looking films. Improve video resolution and quality to unblur, upscale, and smooth videos for cinematic results.
- Enhance the quality of personal videos as this tool features shake stabilization for professional results.
- This video enhancer is ideal for professionals creating cinematic frames and restoring old footage. It’s also great for individuals looking to improve the quality of compressed videos downloaded from social media platforms like YouTube, Netflix, and TikTok.
Pros
- It boosts video frame rates and enables HD clip exports.
- Users can upload videos in MP4, MOV, WebM, and GIF formats for processing.
Cons
- It only offers a 5-second preview of the results after enhancement.
2.Clideo Video Enhancer
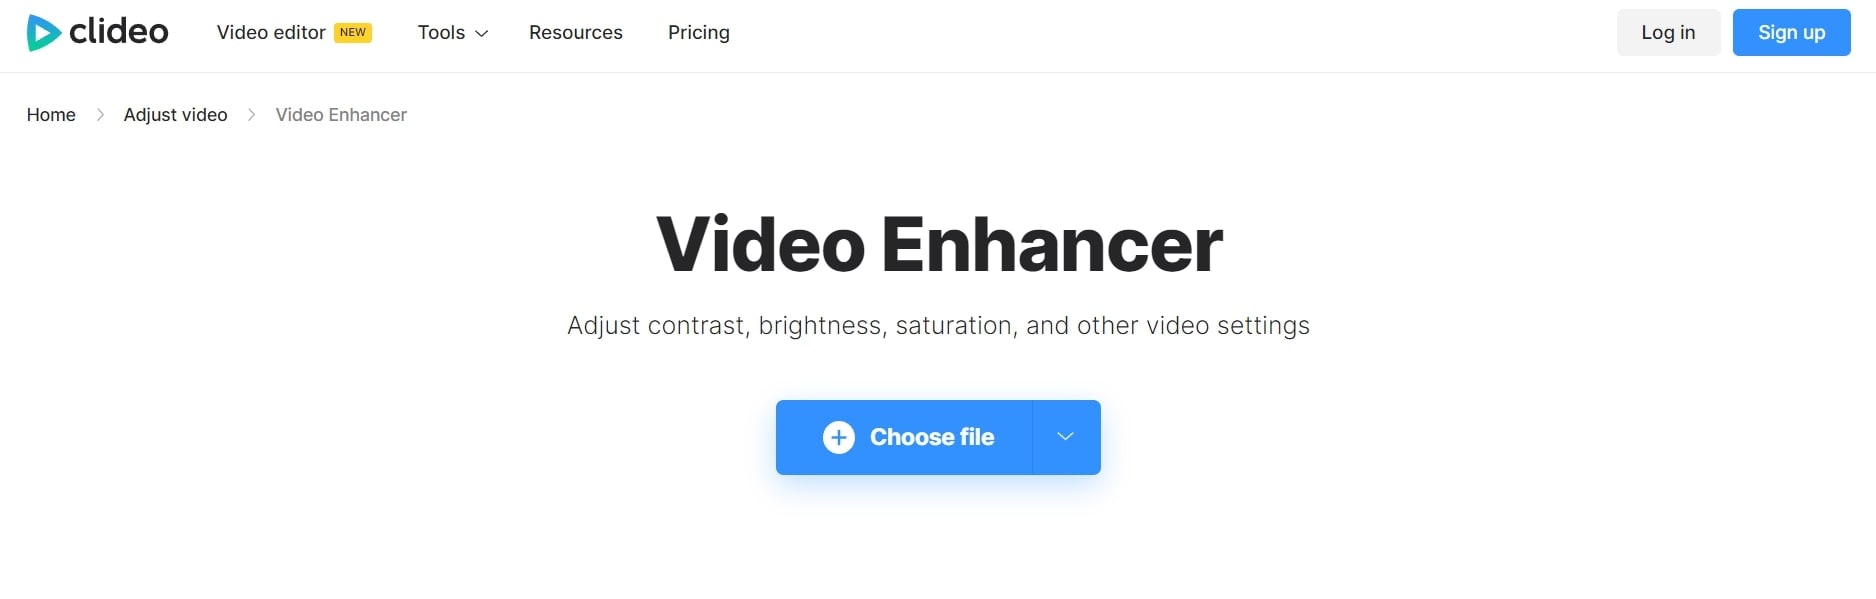
Clideo is an online video-enhancing tool that can completely transform any random video. It lets you add special AI effects and filters to adjust the video’s brightness, saturation, and contrast, making it stunning, vibrant, and attractive. You can enhance any video professionally for social media attention or business branding.
When it comes to video-enhancing tools, users seek maximum customization options. Clideo offers various features, functions, and facilities to transform average-looking videos into 4k video resolutions.
Features
- The interface is intuitive, so you don’t need any video editing experience to use it.
- You can enhance your video regardless of format because Clideo works with MP4, WMV, MOV, VOB, AVI, and other popular formats.
- You don’t need to download and install the video enhancer to your device. It’s not only faster but also more secure.
- Enhance multiple videos or images simultaneously.
- Add subtitles with customizable text fonts.
- Text Overlay feature with support for HD resolution.
- Access a media library with social sharing options.
Pros
- User-friendly tool is ideal for beginners.
- Supports multiple formats.
- As an online tool, it saves device storage space.
- Reasonable pricing.
- Provides uninterrupted video editing with customizable features.
Cons
- A premium subscription is required to remove watermarking.
- No offline app available; internet connection always necessary.
- No dedicated mobile app.
How to Choose the Best Video Enhancer
Consider the following to ensure you select the right video enhancer for your needs and creative vision.
1.Type of Content
Think about the type of content you’re working with. Are you creating short-form clips for social media or longer, more complex videos? Different enhancers may better suit different content types, so consider your file type and potential quality issues.
2.Consider The Features You Need
Consider the tools and features you need from your video quality enhancer software. Each system offers different capabilities, so planning can help you find the option that best fits your requirements.
3.Sharing Formats and Requirements
Determine the purpose of your video project and any specific sharing requirements. Understanding your goals will help you plan accordingly, whether for online sharing or commercial use.
4.Your Budget
Keep your budget in mind. Some enhancers offer free features, while others may require a purchase or subscription fee for full access. Budgeting effectively ensures you get the best value for your money while achieving great video results.
Conclusion
The video enhancement landscape has been transformed by artificial intelligence, providing numerous options to enhance your videos’ quality. Whether a professional filmmaker or a casual content creator, free AI video enhancers offer a chance to take your productions to the next level.
Each software has unique strengths, from Wondershare Filmora’s comprehensive editing features to AVCLabs’ neural network-powered upscaling and UniFab’s HDR conversion capabilities. User-friendly options like HitPaw cater to beginners while providing robust enhancement tools.
Moreover, for quick fixes or limited storage, online options like Cutout.Pro and Clideo offer accessible solutions with impressive results. With these advancements, achieving professional-quality videos is now achievable for everyone.
Ollie Mattison
Ollie Mattison is a writer and a lover of all things video.
Follow @Ollie Mattison
Ollie Mattison
Apr 24, 2024• Proven solutions
In 2024, the average person will watch 17 hours of video content every week. Improving the quality of your videos can make your content more noticeable.
Fortunately, there are many excellent video quality enhancer tools to choose from. These tools can enhance both the visual and audio clarity of your content. Ultimately, this will enhance your professionalism and reputation as a trustworthy creator.
Are you wondering where to start when selecting an effective, user-friendly video enhancer? Here are some of our top recommendations to help you begin.
- Part 2: 5 Free AI Video Enhancers [Software Options]
- Part 3: Top 2 4K Video Enhancer Online Free Options
- Part 4: How to Choose the Best Video Enhancer
- In this article
Why Do You Need an AI Video Enhancer?
AI video enhancers utilize generative AI to remove noise, stabilize shaky videos, upscale, or enhance their overall appearance. These tools employ machine learning and neural network techniques to analyze videos and apply different effects for enhancement. Trained on extensive datasets, most AI video enhancers can understand video content like faces, scenes, and objects, automatically adjusting imperfections.
Using an AI video enhancer is an excellent way to boost video quality quickly. Unlike traditional methods, AI speeds up the enhancement process significantly. There are additional benefits, such as:
- **Enhanced Media Quality:**AI video enhancers enhance videos automatically with advanced algorithms, maintaining quality, clarity, and detail.
- Noise Reduction: Many AI video enhancer tools effectively reduce visual noise in videos, resulting in cleaner and clearer footage.
- **Reviving Old Clip:**AI video enhancers are adept at restoring old video footage to make it appear more vibrant.
5 Free AI Video Enhancers [Software Options]
Are blurry videos on your large screen getting on your nerves? Thanks to advancements in artificial intelligence (AI), you can now enhance your low-resolution videos for a crystal-clear viewing experience.
Whether you’re a video editor, content creator, or streamer, incorporating an AI video upscaler into your toolkit is a wise choice. Here are the top 5 picks for the best free AI video enhancer software to improve your video editing.
1.Wondershare Filmora - AI Video Enhancer
Pricing:Filmora offers a free trial without exporting.
Wondershare Filmora stands out in video editing by combining comprehensive editing features with AI-powered enhancement tools. With 4K editing, Filmora ensures videos are improved and future-proofed.
In addition to enhancement, Filmora offers over 300 unique transitions and effects catering to creative minds. Audio enthusiasts will enjoy advanced audio tools like audio ducking and equalizers.
Filmora’s standout feature is its motion tracking capability, enabling dynamic video compositions. While beginners may find the abundance of features overwhelming, regular updates and an active online community provide ample support.
Features
- Filmora’s advanced AI video-enhancing algorithms let you convert black-and-white footage to colored ones.
- It boosts frame rates up to 240 FPS using AI-enhanced frame interpolation technology and 4x super-resolution algorithms.
- Filmora enhances videos’ clarity and quality through audio ducking, equalizers, and more.
- This AI Video Enhancer tracks and attaches objects in videos.
- The tool preserves details and enhances quality in slow-motion scenes.
- Offers over 300 unique transitions and effects.
Pros
- Versatile editing and enhancement options.
- This AI video enhancer is designed to assist both beginners and professionals.
- It supports batch processing, enhancing 10+ videos simultaneously.
Cons
- The free version adds a watermark.
2.AVCLabs Video Enhancer AI
Pricing:AVCLabs offers new users a 7-day free trial.
AVCLabs Video Enhancer AI utilizes a neural network to improve video clip quality. With super-resolution AI video upscaling and multi-frame enhancement, it can easily upscale video from SD to HD (720p or 1080p) to 4K and up to 8K in just one click.
With support for various video and audio formats, users can work seamlessly without compatibility issues. A notable feature is its batch processing capability, enabling users to upscale and enhance multiple videos simultaneously, saving time. The real-time preview feature is invaluable for those who wish to see the software’s results before finalizing their project.
Features
- AVCLabs seamlessly enhances any video footage without quality loss. Whether single or multi-frame, you’ll experience smooth transitions and improved frames.
- With AVCLabs’ color correction feature, you can easily adjust each video frame’s brightness, saturation, and contrast. This tool employs AI video upscaling to create larger, more detailed images without sacrificing quality.
- This video enhancement tool offers automatic face refinement to enhance facial details, which is ideal for improving low-quality videos with excessive noise and blurriness.
- The Super Resolution feature recovers high-resolution videos from low-resolution materials by generating additional pixel data to fill gaps, resulting in enhanced output.
- AVCLabs Video Enhancer AI uses a multi-frame convolutional neural network to stabilize video shakes and remove motion artifacts, overlay noise, and grain, producing natural and enhanced results.
Pros
- AVCLabs features a color calibration algorithm that accurately portrays natural colors.
- It allows you to add color to old black-and-white videos.
- The video processing is fully automatic, requiring no manual fine-tuning.
Cons
- The app demands a significant amount of free space, up to 15 GB.
- It is only compatible with Windows and Mac operating systems.
- The free trial adds a watermark from AVC Labs to the videos.
3.UniFab Video Enhancer
Pricing: UniFab provides a 30-day free trial for new AI users and a 30-day money-back guarantee for paid.
UniFab is a comprehensive AI-powered video enhancer to enhance video quality for all types of videos. Standout features like upscaling video to HDR10/Dolby Vision, denoising, and deinterlacing set this tool apart.
The models are regularly updated with the latest advancements in Deep Learning. Whether you’re a novice or an expert, UniFab offers both automatic and manual modes for video enhancement, making it easy to use without requiring complex settings.
Features
- Upgrade any video to 720p, 1080p, or even 4k resolution with remarkable clarity.
- Convert SDR videos to stunning HDR formats like HDR10+ and Dolby Vision. This feature revitalizes your videos, making them significantly more vibrant and immersive.
- Utilize AI technology to deinterlace your videos, ensuring smooth playback and a pristine viewing experience on modern displays.
- Specifically designed for videos captured in low-light conditions or with high ISO settings, this tool intuitively reduces grain and noise, restoring your footage’s true essence without sacrificing detail.
- Experience unprecedented fluidity as the software boosts your videos to an impressive 120FPS using AI. This transforms your content into a smooth motion stream, ideal for high-definition screens and attentive audiences.
Pros
- It allows audio up-mixing to EAC3 5.1/DTS 7.1 through AI.
- Utilizes GPU-accelerated technology.
- Supports video conversion, compression, and editing.
Cons
- The free trial is limited to 3 videos.
- Does not support Mac systems.
4.Topaz Video Enhance AI
Pricing:Topaz video enhancement tool offers a 30-day no-questions-asked refund policy.
Topaz Video Enhance AI enhances video quality by increasing its resolution. It supports batch upscaling of videos and is compatible with DVD, DSLR, Game, and HD stock footage.
Many notable film studios consider Topaz Video Enhance AI one of the best video editing software tools. It is suitable for various uses, such as commercials, movie content, and YouTube videos.
Features
- This free video upscaling software swiftly analyzes video footage quality using AI tools and recreates it into high-resolution videos.
- Topaz offers Gaia CGI and Theia for enhancing CG and animated videos, along with Proteus and Artemis for noise removal and sharpening.
- Easily recover details from any video footage by injecting original details using adjacent frames’ additional information. It detects and corrects visual artifacts formed during compression.
- Topaz provides an automatic mode for quick video quality enhancement and manual fine-tuning options using available controls.
- With this free video enhancer software, preserve video audio tracks and select from different conversion options for optimal output in the final project.
Pros
- Reduces motion artifacts.
- Adds extra frames for smooth, slow-motion videos.
- Enhances video quality up to 8K.
Cons
- AI processing can be time-consuming, sometimes taking hours.
- Requires a high-quality graphics card.
5.HitPaw Video Enhancer
Pricing:HitPaw AI video enhancer offers a 30-day refund guarantee on paid plans.
HitPaw is a user-friendly video enhancer suitable for both beginners and professionals. It features an easy-to-navigate interface, ensuring even those with minimal experience can improve their videos. Despite its simplicity, HitPaw offers robust enhancement tools, including color correction and stabilization. Its extensive support for various video formats eliminates compatibility concerns.
The software prioritizes efficient video enhancement without compromising quality or speed. Comprehensive tutorials help users explore different editing tasks and unlock their content’s full potential.
Features
- Utilize advanced AI algorithms to upscale low-resolution videos for a more appealing look. The AI feature optimizes content for sharper and more vibrant visuals.
- The HitPaw video quality enhancer app uses AI tools to improve detailing on human faces. Apply filters and adjust settings to enhance facial output in videos.
- The app includes a video stabilization feature that eliminates shaky camera movements, producing smoother and clearer videos with a professional touch.
- HitPaw offers an AI video repair option to restore damaged, corrupted, and old videos. It can also use deep learning AI to colorize black-and-white videos.
- Remove noise from videos with the General Denoise feature, making them look sharper, clearer, and newer.
Pros
- Supports various video formats.
- Has a user-friendly and intuitive interface.
- Can repair and enhance animation videos.
Cons
- The free plan has limited editing features.
Top 2 4K Video Enhancer Online Free Options
The AI-enhanced video tools mentioned above excel in their field. However, there are times when you might run out of storage or need a quick fix through your browser. So, here are some online AI tools that can enhance your videos. Unlike offline video enhancer AIs, online tools are easily accessible. While they may offer fewer features than desktop solutions, they are still useful for some editors.
1.Cutout.Pro
Many editing professionals rely on this free AI video enhancer for unlimited video improvements. Cutout.Pro utilizes advanced features such as video upscaling, motion interpolation, deinterlacing, and shake stabilization to enhance overall quality. This tool converts low-quality videos to higher resolutions like 2K, 30fps, and beyond. Moreover, this online tool swiftly reduces visual noise and other motion artifacts from clips using AI.
Features
- Reduce noise, motion artifacts, and improve video resolution significantly with this powerful online video quality enhancer and upscaler. Perfect for enhancing low-resolution videos like 240p, 360p, 480p, and more.
- Pro increases video frame rates without sacrificing quality. Smooth out shaky footage for better slow-motion effects.
- This tool enhances video resolution up to 2K at a maximum of 30fps effortlessly. It sharpens and defines your videos, bringing your story to life like a professional.
- This is perfect for filmmakers seeking to enhance footage quality and create professional-looking films. Improve video resolution and quality to unblur, upscale, and smooth videos for cinematic results.
- Enhance the quality of personal videos as this tool features shake stabilization for professional results.
- This video enhancer is ideal for professionals creating cinematic frames and restoring old footage. It’s also great for individuals looking to improve the quality of compressed videos downloaded from social media platforms like YouTube, Netflix, and TikTok.
Pros
- It boosts video frame rates and enables HD clip exports.
- Users can upload videos in MP4, MOV, WebM, and GIF formats for processing.
Cons
- It only offers a 5-second preview of the results after enhancement.
2.Clideo Video Enhancer
Clideo is an online video-enhancing tool that can completely transform any random video. It lets you add special AI effects and filters to adjust the video’s brightness, saturation, and contrast, making it stunning, vibrant, and attractive. You can enhance any video professionally for social media attention or business branding.
When it comes to video-enhancing tools, users seek maximum customization options. Clideo offers various features, functions, and facilities to transform average-looking videos into 4k video resolutions.
Features
- The interface is intuitive, so you don’t need any video editing experience to use it.
- You can enhance your video regardless of format because Clideo works with MP4, WMV, MOV, VOB, AVI, and other popular formats.
- You don’t need to download and install the video enhancer to your device. It’s not only faster but also more secure.
- Enhance multiple videos or images simultaneously.
- Add subtitles with customizable text fonts.
- Text Overlay feature with support for HD resolution.
- Access a media library with social sharing options.
Pros
- User-friendly tool is ideal for beginners.
- Supports multiple formats.
- As an online tool, it saves device storage space.
- Reasonable pricing.
- Provides uninterrupted video editing with customizable features.
Cons
- A premium subscription is required to remove watermarking.
- No offline app available; internet connection always necessary.
- No dedicated mobile app.
How to Choose the Best Video Enhancer
Consider the following to ensure you select the right video enhancer for your needs and creative vision.
1.Type of Content
Think about the type of content you’re working with. Are you creating short-form clips for social media or longer, more complex videos? Different enhancers may better suit different content types, so consider your file type and potential quality issues.
2.Consider The Features You Need
Consider the tools and features you need from your video quality enhancer software. Each system offers different capabilities, so planning can help you find the option that best fits your requirements.
3.Sharing Formats and Requirements
Determine the purpose of your video project and any specific sharing requirements. Understanding your goals will help you plan accordingly, whether for online sharing or commercial use.
4.Your Budget
Keep your budget in mind. Some enhancers offer free features, while others may require a purchase or subscription fee for full access. Budgeting effectively ensures you get the best value for your money while achieving great video results.
Conclusion
The video enhancement landscape has been transformed by artificial intelligence, providing numerous options to enhance your videos’ quality. Whether a professional filmmaker or a casual content creator, free AI video enhancers offer a chance to take your productions to the next level.
Each software has unique strengths, from Wondershare Filmora’s comprehensive editing features to AVCLabs’ neural network-powered upscaling and UniFab’s HDR conversion capabilities. User-friendly options like HitPaw cater to beginners while providing robust enhancement tools.
Moreover, for quick fixes or limited storage, online options like Cutout.Pro and Clideo offer accessible solutions with impressive results. With these advancements, achieving professional-quality videos is now achievable for everyone.
Ollie Mattison
Ollie Mattison is a writer and a lover of all things video.
Follow @Ollie Mattison
10+ Alternatives to Windows Movie Maker Alternatives
Windows Movie Maker has been a cornerstone tool for video editors for quite a while. There are a lot of amateurs who’ve made use of the free program and have done wonders with it. As it is discontinued, many Windows Movie Maker alternatives claim to offer ‘just the right video editing tool for you,’ few can live up to their promises—and most are very expensive.
We have ten other programs that can be used to create videos that include everything from Apple iMovie to other basic alternatives.
So whether you’re a beginner who wants to learn how to make a movie, a pro looking for an excellent alternative to Windows Movie Maker, or someone who wants to make a simple slide presentation or online video, you’re bound to find a video creation program here.
- Wondershare Filmora
- Avidemux Video Editor
- VirtualDub
- Sony Vegas Movie Studio
- WeVideo
- Lightworks
- ShotCut
- OpenShot
- Movavi Video Editor Plus
- VSDC Free Video Editor
- VideoPad Video Editor
- HitFilm
- Magix Movie Studio
- How To Edit a Video With a Windows Movie Maker Alternative
- Hot FAQs on Windows Movie Maker Alternatives
Part 1: Top 3 Picks for Windows Movie Maker Alternatives
The world’s best video editing software is about to change. We look at three of the most popular and valuable alternatives to Windows Movie Maker.
You will need to consider these alternatives to ensure they meet your expectations and needs.
1. Wondershare Filmora - Best Overall

Filmora is the best Windows Movie Maker Alternative designed according to your convenience.
Ratings: 4.4 Stars out 5
Starting from $49.99
2. Magix Movie Studio - Best for Collages

This alternative offers a variety of tools and plugins for anyone who wants to create professional-level videos in under a minute.
Download on Windows
Ratings: 4 stars out of 5
30-day free trials, then starts from $69.99 all the way to $129
3. Avidemux Video Editor - Best Open-Source Editor

An open-source editor that supports a wide range of formats is free! Avidemux has an interface similar to Windows Movie Maker, which makes it a perfect alternative.
Download on Windows
Ratings: 4.0 stars out of 5
Free Trial
Part 2: Ultimate Overview on 13 Best Alternatives to Windows Movie Maker
We live in visual culture, and we constantly see, capture, upload, and share videos on our smartphones, tablets, and laptops. So, it is only natural that more people seek ways to edit their videos. Windows Movie Maker was one of the most popular video editing apps. So it’s time to dig into the best Windows Movie Maker alternatives, which are arguably better and feature-rich.
| Software | OS | Media Resources | AI editing | Easy to Use | Free Trial |
|---|---|---|---|---|---|
| Wondershare Filmora | WindowsMacMobile | Yes | Yes | Yes | Yes |
| Avidemux | WindowsOS XLinuxBSD | Yes | No | Yes | Yes |
| Virtual Dub | Windows | No | No | Yes | Yes |
| Vegas Movie Studio | Windows | Yes | Yes | No | No |
| WeVideo | Online | Yes | No | Yes | Yes |
| Lightworks | LinuxOS X Windows | Yes | Yes | No | No |
| ShotCut | WindowsMacLinuxBSD | Yes | No | No | Yes |
| OpenShot | WindowsMacLinuxChrome OS | Yes | No | Yes | Yes |
| Movavi Plus | WindowsMac | Yes | No | Yes | Yes |
| VSDC | Windows | Yes | No | Yes | Yes |
| VideoPad | WindowsMaciPad/iPhone | Yes | No | Yes | Yes |
| HitFilm | WindowsMac | Yes | Yes | Yes | Yes |
| Magix Movie Studio | Windows | Yes | Yes | No | Yes |
Part 3: 13 Best Windows Movie Maker Alternatives for Windows
As we all know, Windows Movie Maker is the most used and trusted tool for creating videos in Windows. With its unique features and user-friendly interface, people often use this software to develop short and entertaining videos.
However, the fact is that Windows Movie Maker is not the current best video editing software for creating complex video projects. For this reason, we compiled a list of the 12 best alternatives to offer you a better option for Windows Movie Maker.
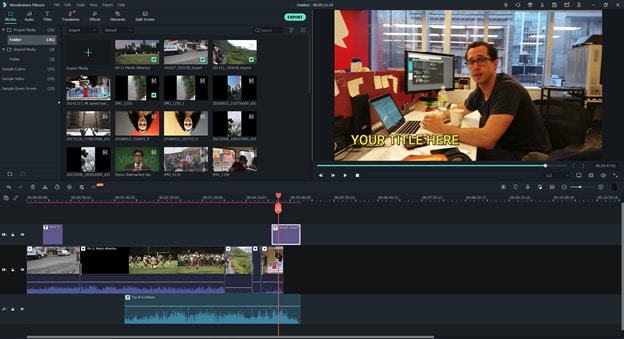
1. Wondershare Filmora
Filmora 11 is a powerful, easy-to-use video editor specially designed to streamline your workflow and save you hours weekly. It supports everything from Windows, Mac, and IOS to Android. The latest update to the flagship app includes several key enhancements that result in a much more efficient video creation workflow and one that’s easier to use than its rivals.
Key features
- Preset Templates
- Instant Mode
- Motion Tracking
- AI Editing Effects
- Auto Synchronization
- Plug-ins
Price
- Annual Plan: $49.99
- Perpetual Plan: $79.99
Pros
- Seamless interface for beginners
- Great customer support
- Plenty of effects and preset templates
- 4K video output options
Cons
- Rendering requires too much time
- The mobile app requires separate subscription
Supported OS: Windows , Mac , iOS , Android , iPad
G2 Ratings: 4.4 stars out of 5
Summary
Filmora’s intuitive interface allows experienced and brand-new users to create incredible videos with flawless special effects. Its high ratings and multiple supported formats make it quite popular among users.
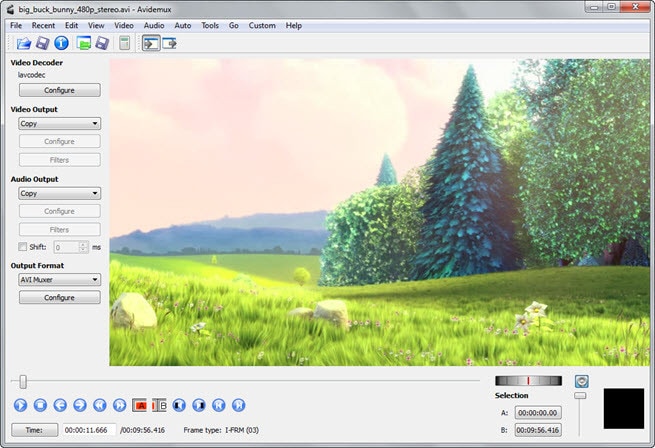
2. Avidemux Video Editor
If you are a beginner and want to use a free, open-source software program for basic video editing, then Avidemux is a good choice. The interface is not as fancy as it could be, but there are some presets that’ll save you a lot of time. Avidemux is a cross-platform video editor that allows you to create custom videos, but it doesn’t feature the ability to share the edited footage to social media directly,
Key features
- Video and Audio Filters
- Support Popular Formats
- Convert Video For Archiving or Publishing
Price: Free
Pros
- It can convert Video To A Smaller Size
- Easy cut, trim, split video
Cons
- Out-dated UI
- Lacks sharing option
Supported OS: Windows , OS X , Linux , BSD
Uptodown Ratings: 4.0 stars out of 5
Summary
An open-source video editor that supports most formats. Due to its obsolete UI and lack of sharing features, Avidemux has average ratings.
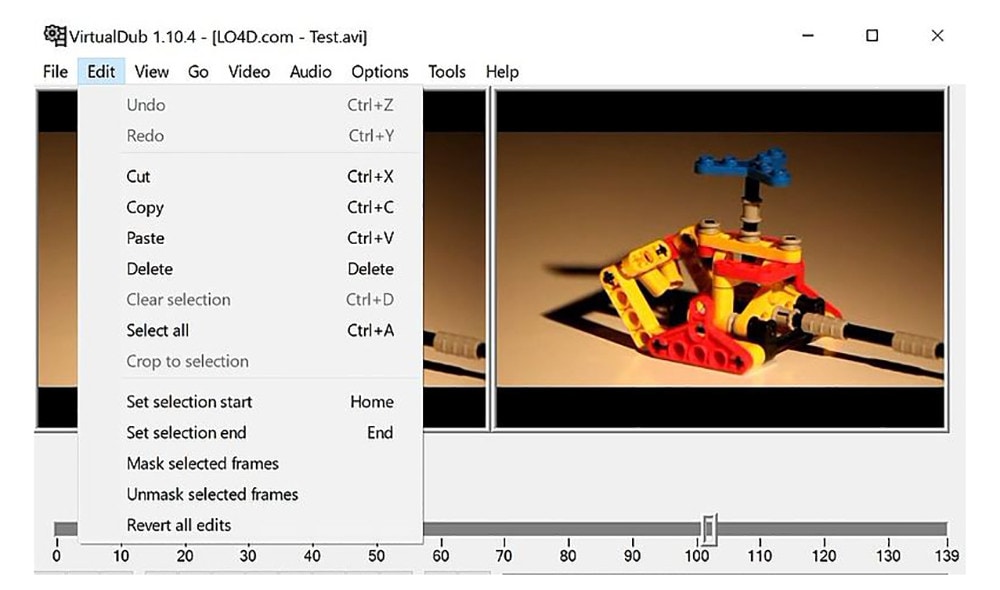
3. VirtualDub
This open-source software is user-friendly and allows users with little experience to navigate the software without much trouble. It supports 3rd party apps and also offers batch-processing, which means working on multiple videos simultaneously makes it possible.
Key features
- Integrated volume and histogram meter
- Optimized disk
- Noise reduction
- Fractional frame rates
Price: Free
Pros
- Clean interface, easy to use
- Keyboard and mouse shortcuts for faster operation
- Free to use
Cons
- Not suitable for 4K editing
- Lack learning material
- Obsolete Interface
Supported OS: Windows
Compare Camp Ratings: 4.0 stars out of 5
Summary
Virtual Dub supports multitasking, and its features are pretty helpful. However, it lacks 4k editing and a friendly interface. Overall Virtual Dub is a good choice.
4. Sony Vegas Movie Studio
This video editing software makes it easy to create professional-looking videos in minimum time and effort. Vegas Movie Studio software is best for video editing professionals who have been doing it for some time and are looking for something a little more sophisticated than free alternatives. Not only does it has a high retail price, but its internal elements can be too complex for those just beginning.
Key features
- Color correction
- HDV and AVCHD-editing
- DV batch capture
- Wide variety of file formats and codecs
Price: Starting from $7.99 USD per month
Pros
- Customizable interface
- Multicam editing
- Lots of effects and transitions, with plug-in capability
- Good slow motion and warp flow transition tools
Cons
- Less intuitive interface than competitors
- Import from camcorder not ideal
- Some tools are complex
Supported OS: Windows
G2 Ratings: 4.4 out of 5
Summary
Vegas Movie Studio is the choice of professionals. It does all the work without taking up a lot of resources, and like most programs, there is a learning curve. It’s not always intuitive for beginners, but its professional and powerful features score decent in most reviews.
5. WeVideo
This cloud-based application is a simple-to-use video editing and sharing suite. WeVideo is a full-featured video editing application that uses JumpStart technology to create amazing videos. It’s an innovative app that offers a seamless editing experience as it supports multiple formats of video, images, audio, and graphics.
Key features
- WeVideo JumpStart
- Cloud storage
- Built-in graphics
- Customizable environment
- Advanced text editing
- Multi-track editing and storyboard
Price
- Free trial
- Power Plan: $9.99/month
- Unlimited Plan: $15.99/month
- Professional Plan: $39.99/month
- Business Plan: $73.99/month
Pros
- Constantly improving features
- Ease of use
- Storage is cloud-based
Cons
- Old fashion transition
- Leaves a watermark on free trial
Supported OS: Online
Trustpilot Ratings: 4 stars out of 5
Summary
WeVideo is a straightforward yet robust video editor. It offers a variety of features and supports multiple formats, plus its comprehensive pricing plan makes it useful for everyone.
6. Lightworks
Lightworks is the most powerful video editor in its class and an excellent tool for professionals who want to make amazing videos quickly. Lightworks is very fast and straightforward to use, and it has some great features you won’t find in any other video editor. It is available on all popular OS.

Key features
- Audio and Video Effect Plugin Support
- Cloud Connected
- Motion Graphics
- Advanced Metadata
- Proxy Workflows
- Apple ProRes decoding
Price
- Monthly Plan: $9.99/user
- Yearly Plan: $9.99/user
- Perpetual: $154.99
Pros
- High-resolution timeline rendering
- It has social media export templates
- Interfaces for multiple OS are consistent
- Instant autosave
Cons
- Commands are not always intuitive
- A bit pricey as compared to its competitors
Supported OS: Windows , Mac , Linux
Techradar Pro Ratings: 4 stars out of 5
Summary
Lightworks is not any other video editing tool available on the market of video editing tools. This video editing tool provides amateurs with the most sophisticated features in an optimized platform. Its scores are the highest on almost every review site.
7. ShotCut
Shotcut is a multiplatform video editor that lets you work with various formats for audio, video, image files, etc. This video editor makes it easy to mix and match the resolution and frame rates in a video file. All the changes you make in the editor can be undone and redone often. Shotcut is the best choice for video editing, without question.

Key features
- Webcam capture
- Audio scopes and filters
- Deinterlacing
- Eyedropper tool
- Video wipe transitions
- Keyframes for filter parameters
Price: Free
Pros
- Support for 4K resolutions
- Free
Cons
- Less intuitive than commercial apps
- Lacks built-in sharing to popular sites
Supported OS: Windows , Mac , Linux
GetApp Ratings: 4.5 out of 5 stars
Summary
Shotcut is an open-source video editor for creative professionals and is available on mac, Windows, and Linux. The free version of Shotcut has many excellent features, but it doesn’t have the slick interface or advanced techniques of the top paid editors.
8. OpenShot
An award-winning open-source video editor that creates stunning videos. OpenShot is a fast, easy-to-use, and surprisingly powerful video editor. OpenShot Video Editor allows you to work with many different types of tracks so that your edits will seem natural. OpenShot Video Editor allows you to add your custom animations or titles. The options are endless, so it all depends on your time and interest. It is available in more than 70 languages, making it ideal for all types of users.
Key features
- 3D animations
- Animation and keyframes
- Multiple languages and formats
- Cross-platform
- Video-effects
Price: Free
Pros
- It is a non-linear editor with infinite tracks
- 100% free without watermark
- Frequent updates
Cons
- Obsolete interface
- Unstable performance
- Lacks some editing features
Supported OS: Window , Mac , Linux , Chrome OS
Getapp Ratings: 4.2 stars out of 5
Summary
Another open-source video-editor in the list is named OpenShot. It’s a multi-lingual and multi-supported app with unique features. Despite its unstable performance, OpenShot is still an ideal choice for many users.
9. Movavi Video Editor Plus
Movavi Video Editor Plus is the perfect tool to bring your creative ideas to life. It has special effects, ready-made intros, and keyframe animation. Using chroma keying, you can change the background of your video clips to any color or pattern that suits your need. Movavi has now redesigned its user interface to make it easy to use.
Key features
- Effects and transitions
- Built-in media pack
- Fast processing of 4K videos
- Keyframe animation
- Automatic video creation
- Cutting, trimming, joining
Price
- Free version: 7 days
- Video Editor Plus 1 year /1 PC: $49.95
- Video Editor Plus Lifetime /1 PC: $69.95
- Video Suite Lifetime /1 PC: $89.95
Pros
- Easy-to-understand user interface
- Transitions with sound
- Motion tracking and picture-in-picture tools
- Chroma-key capability
- Quick movie-creation tool
Cons
- Lacks advanced trim modes
- Slow rendering
PCMag Ratings: 4.0 stars out of 5
Summary
If you want to edit your videos with a minimal learning curve, try Movavi. You get PiP, chroma-keying, titling, basic keying, and motion tracking. The program is simple to use but doesn’t have all the features and stands four stars.
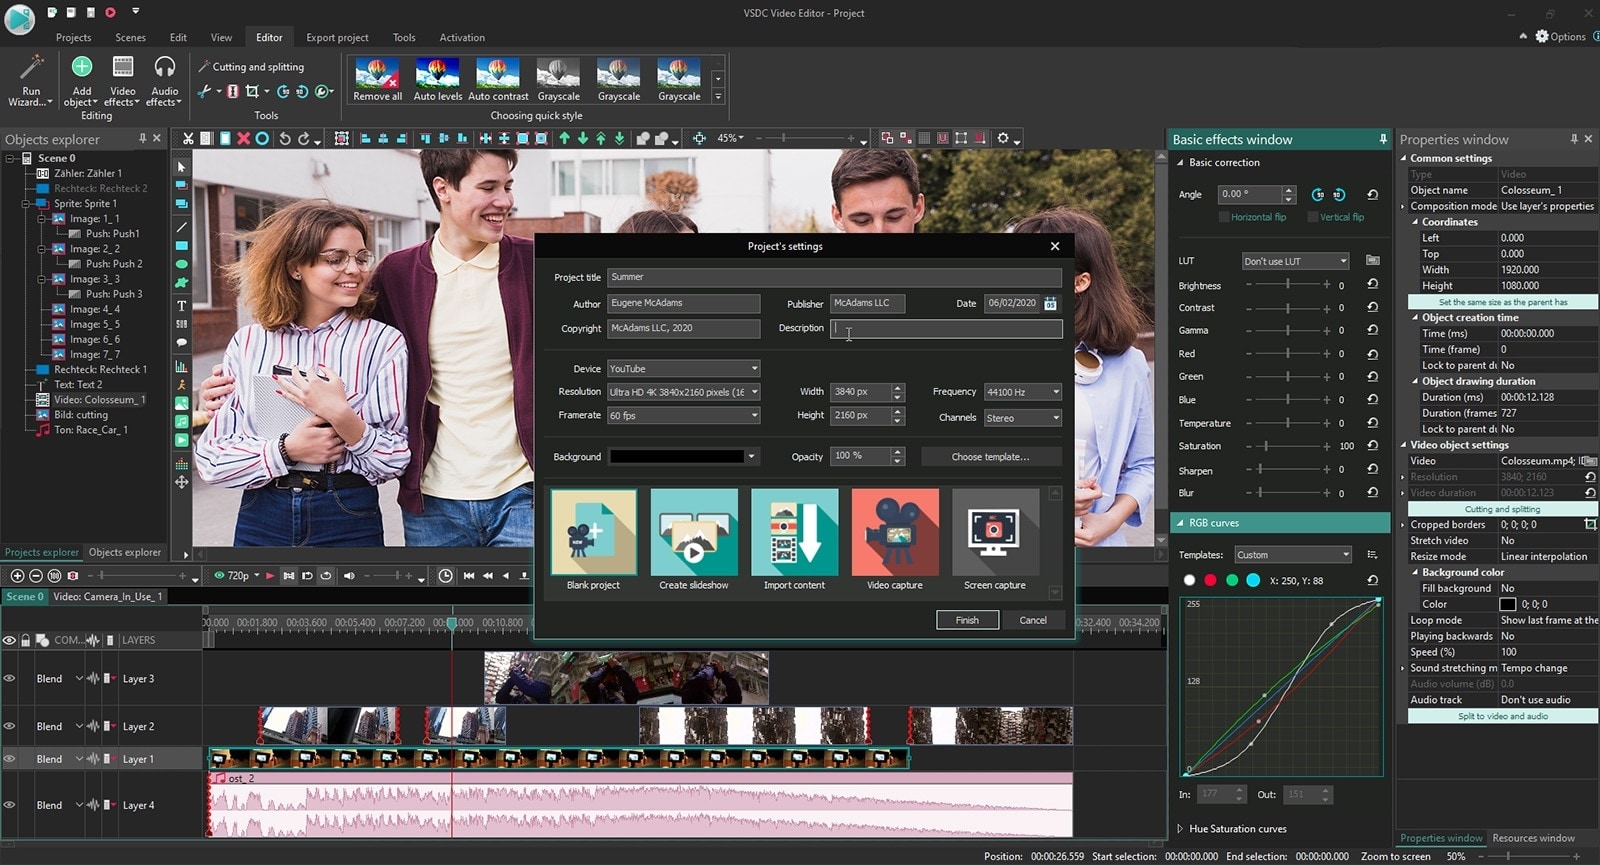
10. VSDC Free Video Editor
VSDC Free Video Editor is an online tool that lets you edit audio and video files to make your creations like movies, YouTube tutorial videos, and more. The audio and video files supported are extensive, and the software includes a codec manager. The Pro version isn’t necessary if you’re using the free edition of the software; it’s more than enough to get the job done.
Key features
- Dark theme
- Subpixel Accuracy
- Powerful Chroma Key tool
- Trendy video effects, filters, and transitions
- Color Blending And Filters
- Built-In DVD Burning Tool
Price: Free
Pros
- Non-linear
- Video effects library
- Video stabilization
- Masking
Cons
- Outdated interface
- Lack keyboard shortcuts
- Only available on Windows
Supported OS: Windows
Capterra Ratings: 4.5 stars out 5
Summary
VSDC is a non-linear editor with extensive format support. It includes all the essential features an editor requires but with an obsolete UI. It is also ideal for many who need a powerful yet free video editor.
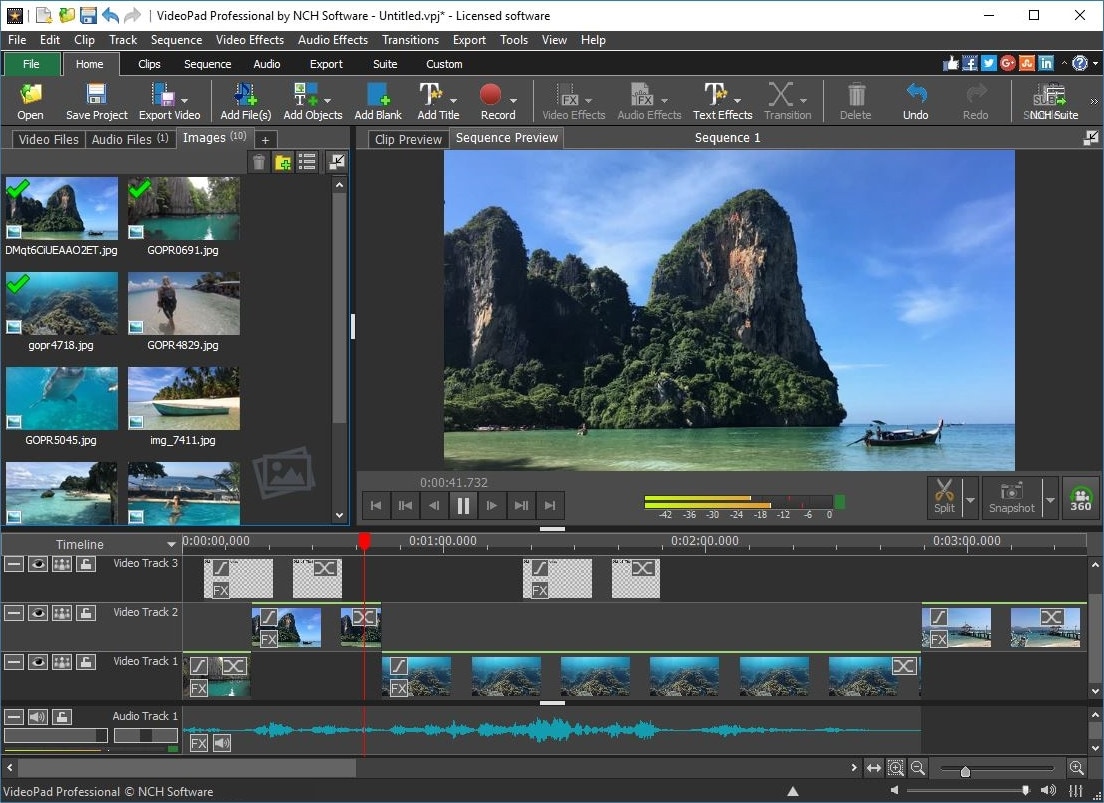
11. VideoPad Video Editor
VideoPad is a free video editor that can create stunning videos and perform basic editing tasks. A good video editor can help you to create videos for different social media platforms. You can make your videos look professional and polished with a few clicks and some simple editing skills. There’s nothing particularly exciting or advanced about this app; it’s simple enough for anyone new to video editing or even for seasoned editors. But the simple and easy-to-use interface makes the entire process very exciting.
Key features
- Text snippets
- Range of transitional effects
- Plug-ins Library
- Burn finished videos to Blu-Ray, DVD, etc.
- Color correction and light balance.
Price: Free
Pros
- Simple and clean interface
- Supports multiple file formats
- Includes video effects
- Lightweight on system resources
Cons
- Lack of advanced features
Supported OS: Windows , Mac , iPad/iPhone
Tom’s guide Ratings: 3.5 stars out of 5
Summary
Video pad is a free video editor designed for beginners that is lightweight and simple. VideoPad is also great for creating quick videos for social media purposes like Youtube and Facebook. The software has a high rating, as shown above, and it’s available on Windows.
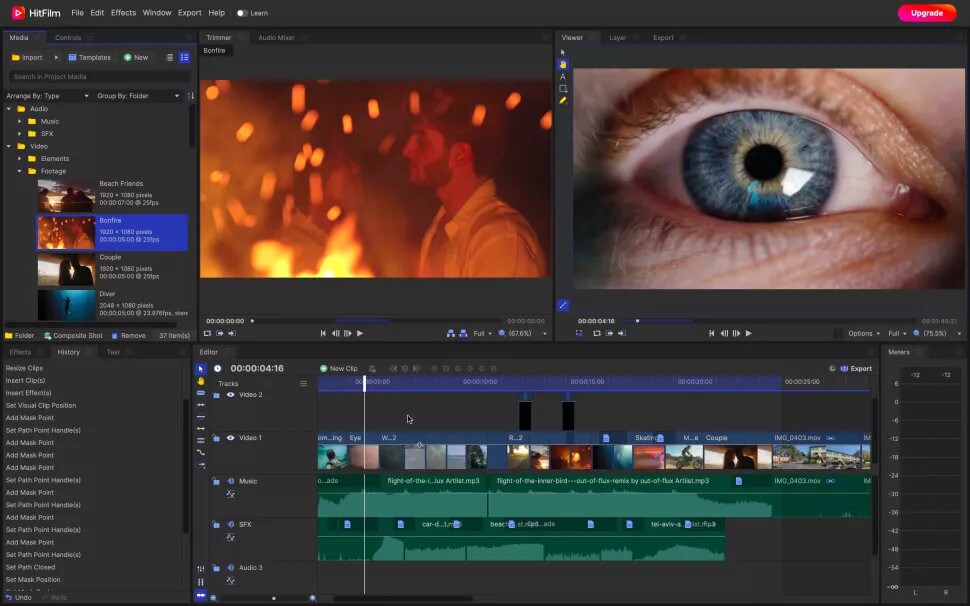
12. HitFilm
HitFilm is a helpful video editing software that makes editing easier for users. In addition to basic features, the program also provides advanced-level functions that make edited videos pop. Hitfilm Express Download has more than 400 features to help casual video editors save time. Features like: visual effects, cinematic elements, and compositing tools preset help unleash your creativity.
Key features
- Color Grading and correction
- Smart search
- Commentator recorder
- Lightning and lens flares
- 3D camera tracker
Price
- Free trial
- Creator: $7.50
- Pro: $12.50
- Enterprise: Custom pricing
Pros
- Intuitive interface
- It offers free tutorials and masterclasses
- Works on both Windows and Mac
Cons
- It requires heavy system requirements
TechRadar Ratings: 4.5 stars out of 5
Summary
HitFilm Express 15 is a powerful free video editing program that enables you to create high-quality videos in minutes with an intuitive interface. It offers advanced editing features such as advanced video trimming, 3D editing, and more.
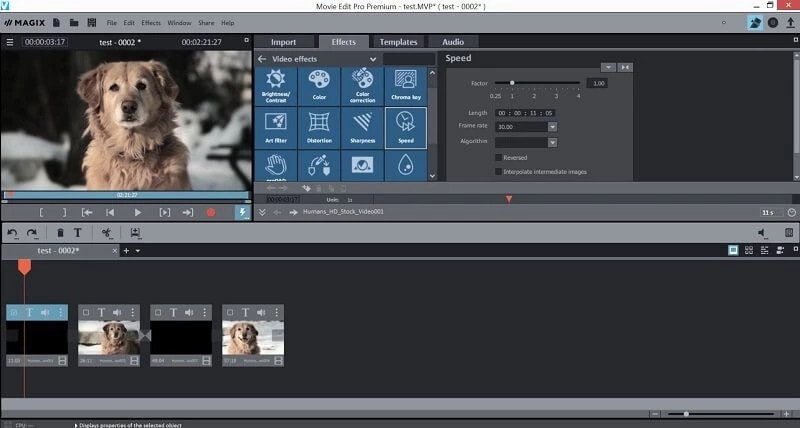
13. Magix Movie Studio
Magix is the world’s leading professional audiovisual media software, with Sequoia being its industry-standard audio editing software. This movie editor is an enthusiast-level video editing software that competes with software from Adobe and CyberLink, and it even boasts support for 4K content and 360 degrees. There are many reasons to upgrade. This year’s update includes stabilization, 8K editing, motion tracking, and an in-app plug-in store.
Key features
- NewBlue effects
- Fly-in animation
- New filter view
- Stabilization
- Motion tracking
- 8k support
Price
- Movie Studio 2024: $69.99 (30-day free trial)
- Movie Studio 2024 Platinum: $99.99 (30-day free trial)
- Movie Studio 2024 Suite: $129.00 (30-day free trial)
Pros
- Lots of video effects
- Responsive editing interface
- Multicam
- Trailer-like movie templates
- Solid audio editing
Cons
- Slower project rendering than others
- Lacks import and organization tools
Supported OS: Windows
PCMag Ratings: 3 stars out of 5
Summary
Magix movie studio is a powerful all-around video editing tool with many features that professional users have come to expect. It’s also relatively simple to use. But usability and performance are poor compared to other software programs like Filmora .
Part 4: How To Edit a Video With a Windows Movie Maker Alternative
Windows Movie Maker was great for editing a video, but it’s no match for some of the best video editing software. We’re talking about software capable of creating a cinematic experience in seconds, all on your computer.
When you need to edit a video with simple, quick edits, like adding a special effect or changing the background, try Filmora . Filmora is an easy-to-use application that allows you to create a movie using simple tools that don’t require additional training. You can’t beat this option if you want to create a professional-quality video for your blog or website.
Let’s dive into a quick tutorial on editing videos in Filmora:
Free Download For Win 7 or later(64-bit)
Free Download For macOS 10.14 or later
Step1 Open Wondershare Filmora on your PC or Mac
You can start a new project by clicking on ‘New Project’. And you can also change the ‘Aspect Ratio’ according to your project demand.
Step2 Import Videos
You can import your file by clicking the import tab on the upper-left side or clicking the import icon on the main window.
Step3 Drag and drop your footage to the timeline
After importing all the files, click and hold each individual video and drag and drop it to the timeline area according to your ideal sequence.
Step4 Add Audio
Go to the ‘Audio’ tab and select the audio file from the audio library. Once selected, drag and drop the audio file into the music timeline.
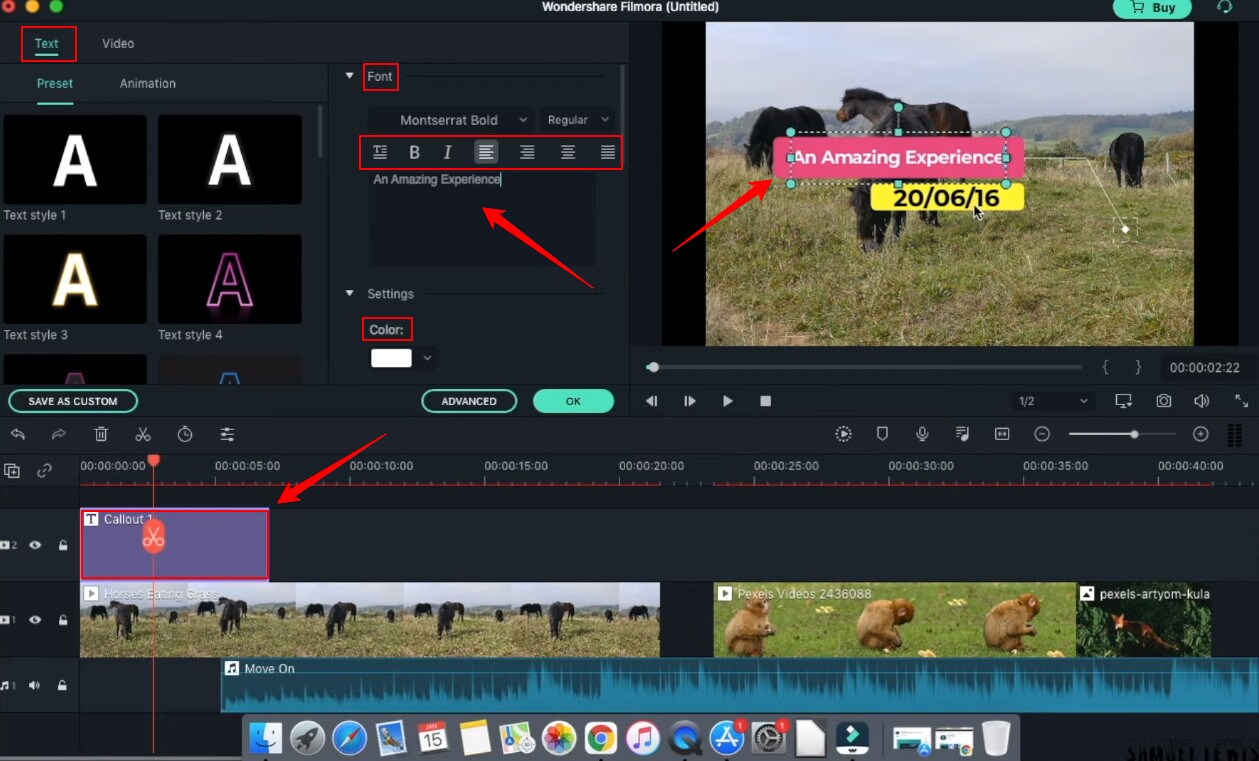
Step5 Add Titles
In your video intro, you can insert some title text. Go to the ‘Titles’ tab and select the one you like, and drag and drop it on top of the timeline. Double-click and edit the text and state your ideal statements. You can customize your text fonts and color too.
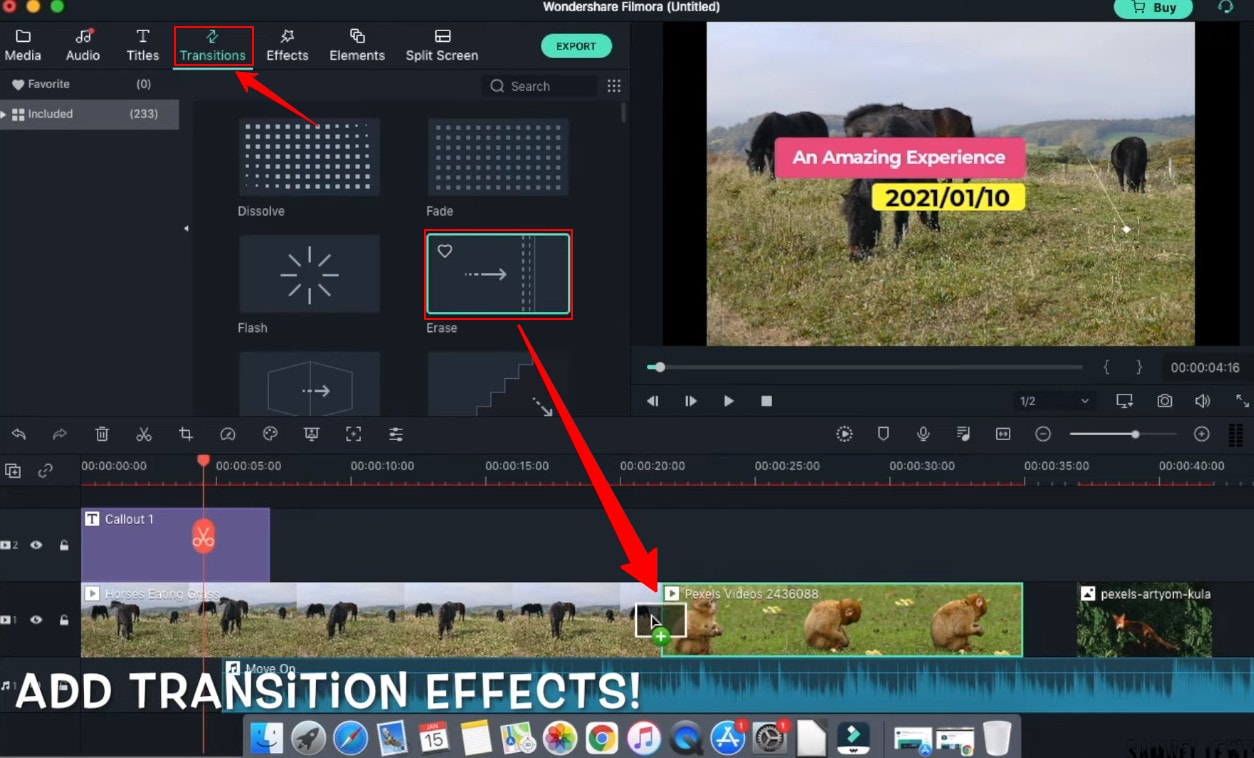
Step6 Add Transitions
You can add transition effects to ensure a smooth transition from one scene to another. The overall will get more professional look.
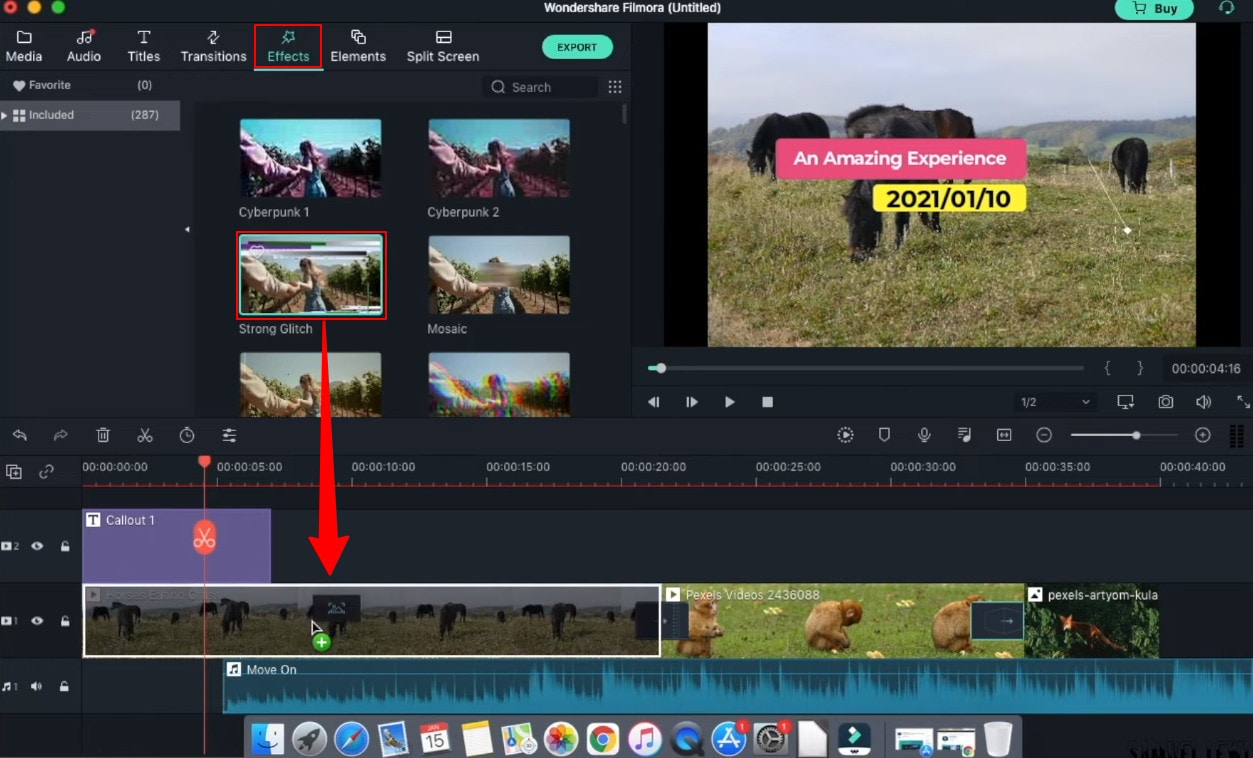
Step7 Add Effects
Next; you can get special effects to your video to make them more attractive and engaging to watch. Simple drag down the effect to your video and watch the effect take place in your selective scene.
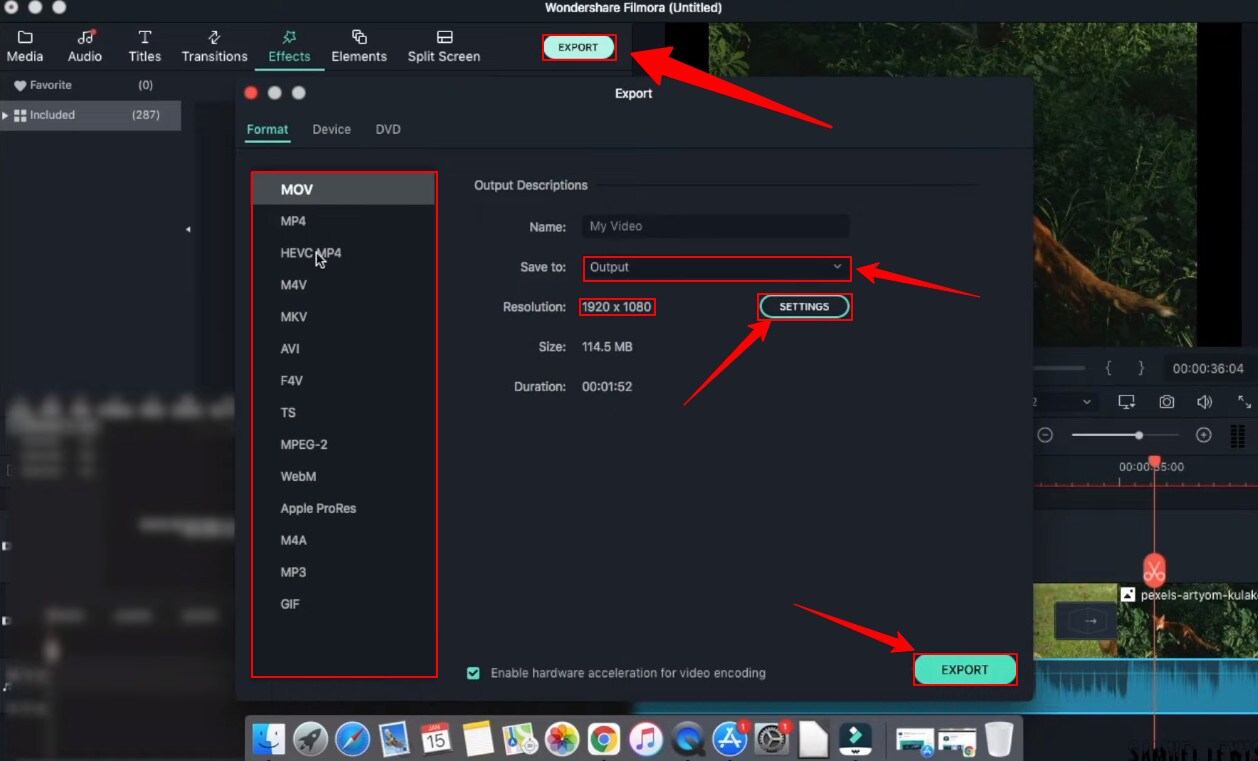
Step8 Export your work
Once all the changes have been made, hit ‘export’ from the top tab. A window will appear where you can change the settings, resolution, frame rate, bit rate, etc. Next, click the ‘export’ button down on that window, and then you can save the file in your drive.
Part 5: Hot FAQs on Windows Movie Maker Alternatives
1. Why is Windows Movie Maker discontinued?
Microsoft’s video editing program, Windows Movie Maker, did not become a big hit with the public because it failed to do well on the market. Microsoft couldn’t get the support they were looking for from the program’s users. As a result, Microsoft had to cease its support of the program.
2. Is there a free version of Windows Movie Maker?
Microsoft Windows Movie maker was always accessible and pre-installed every windows product. Microsoft has discontinued support for Movie Maker and warns about free downloads of Movie Maker provided by third parties that might contain malware, viruses, or other issues.
3. What are the best free Windows Movie Maker Alternatives for Mac?
After switching to a Mac, you’ll find that the Windows Movie Maker alternatives offer much more than just a simple video editor. They provide advanced features, easy transitions, and less technical know-how to create pro-quality results. You should try using these platforms on your Mac if you have a video to edit.
- Wondershare Filmora
- Movavi
- OpenShot
Final Words
Windows Movie Maker is an excellent Windows video editor application for Windows users. But in recent years, it has become outdated due to the continuous development of new technologies. There are many alternatives for Windows Movie Maker, and here we listed some of the best ones. Most of them are free and featured packs. Each program has its unique set of features and capabilities, and each one excels in different areas. Check them out and see what you think.
Free Download For Win 7 or later(64-bit)
Free Download For macOS 10.14 or later
Part 1: Top 3 Picks for Windows Movie Maker Alternatives
The world’s best video editing software is about to change. We look at three of the most popular and valuable alternatives to Windows Movie Maker.
You will need to consider these alternatives to ensure they meet your expectations and needs.
1. Wondershare Filmora - Best Overall
Filmora is the best Windows Movie Maker Alternative designed according to your convenience.
Ratings: 4.4 Stars out 5
Starting from $49.99
2. Magix Movie Studio - Best for Collages
This alternative offers a variety of tools and plugins for anyone who wants to create professional-level videos in under a minute.
Download on Windows
Ratings: 4 stars out of 5
30-day free trials, then starts from $69.99 all the way to $129
3. Avidemux Video Editor - Best Open-Source Editor
An open-source editor that supports a wide range of formats is free! Avidemux has an interface similar to Windows Movie Maker, which makes it a perfect alternative.
Download on Windows
Ratings: 4.0 stars out of 5
Free Trial
Part 2: Ultimate Overview on 13 Best Alternatives to Windows Movie Maker
We live in visual culture, and we constantly see, capture, upload, and share videos on our smartphones, tablets, and laptops. So, it is only natural that more people seek ways to edit their videos. Windows Movie Maker was one of the most popular video editing apps. So it’s time to dig into the best Windows Movie Maker alternatives, which are arguably better and feature-rich.
| Software | OS | Media Resources | AI editing | Easy to Use | Free Trial |
|---|---|---|---|---|---|
| Wondershare Filmora | WindowsMacMobile | Yes | Yes | Yes | Yes |
| Avidemux | WindowsOS XLinuxBSD | Yes | No | Yes | Yes |
| Virtual Dub | Windows | No | No | Yes | Yes |
| Vegas Movie Studio | Windows | Yes | Yes | No | No |
| WeVideo | Online | Yes | No | Yes | Yes |
| Lightworks | LinuxOS X Windows | Yes | Yes | No | No |
| ShotCut | WindowsMacLinuxBSD | Yes | No | No | Yes |
| OpenShot | WindowsMacLinuxChrome OS | Yes | No | Yes | Yes |
| Movavi Plus | WindowsMac | Yes | No | Yes | Yes |
| VSDC | Windows | Yes | No | Yes | Yes |
| VideoPad | WindowsMaciPad/iPhone | Yes | No | Yes | Yes |
| HitFilm | WindowsMac | Yes | Yes | Yes | Yes |
| Magix Movie Studio | Windows | Yes | Yes | No | Yes |
Part 3: 13 Best Windows Movie Maker Alternatives for Windows
As we all know, Windows Movie Maker is the most used and trusted tool for creating videos in Windows. With its unique features and user-friendly interface, people often use this software to develop short and entertaining videos.
However, the fact is that Windows Movie Maker is not the current best video editing software for creating complex video projects. For this reason, we compiled a list of the 12 best alternatives to offer you a better option for Windows Movie Maker.
1. Wondershare Filmora
Filmora 11 is a powerful, easy-to-use video editor specially designed to streamline your workflow and save you hours weekly. It supports everything from Windows, Mac, and IOS to Android. The latest update to the flagship app includes several key enhancements that result in a much more efficient video creation workflow and one that’s easier to use than its rivals.
Key features
- Preset Templates
- Instant Mode
- Motion Tracking
- AI Editing Effects
- Auto Synchronization
- Plug-ins
Price
- Annual Plan: $49.99
- Perpetual Plan: $79.99
Pros
- Seamless interface for beginners
- Great customer support
- Plenty of effects and preset templates
- 4K video output options
Cons
- Rendering requires too much time
- The mobile app requires separate subscription
Supported OS: Windows , Mac , iOS , Android , iPad
G2 Ratings: 4.4 stars out of 5
Summary
Filmora’s intuitive interface allows experienced and brand-new users to create incredible videos with flawless special effects. Its high ratings and multiple supported formats make it quite popular among users.
2. Avidemux Video Editor
If you are a beginner and want to use a free, open-source software program for basic video editing, then Avidemux is a good choice. The interface is not as fancy as it could be, but there are some presets that’ll save you a lot of time. Avidemux is a cross-platform video editor that allows you to create custom videos, but it doesn’t feature the ability to share the edited footage to social media directly,
Key features
- Video and Audio Filters
- Support Popular Formats
- Convert Video For Archiving or Publishing
Price: Free
Pros
- It can convert Video To A Smaller Size
- Easy cut, trim, split video
Cons
- Out-dated UI
- Lacks sharing option
Supported OS: Windows , OS X , Linux , BSD
Uptodown Ratings: 4.0 stars out of 5
Summary
An open-source video editor that supports most formats. Due to its obsolete UI and lack of sharing features, Avidemux has average ratings.
3. VirtualDub
This open-source software is user-friendly and allows users with little experience to navigate the software without much trouble. It supports 3rd party apps and also offers batch-processing, which means working on multiple videos simultaneously makes it possible.
Key features
- Integrated volume and histogram meter
- Optimized disk
- Noise reduction
- Fractional frame rates
Price: Free
Pros
- Clean interface, easy to use
- Keyboard and mouse shortcuts for faster operation
- Free to use
Cons
- Not suitable for 4K editing
- Lack learning material
- Obsolete Interface
Supported OS: Windows
Compare Camp Ratings: 4.0 stars out of 5
Summary
Virtual Dub supports multitasking, and its features are pretty helpful. However, it lacks 4k editing and a friendly interface. Overall Virtual Dub is a good choice.
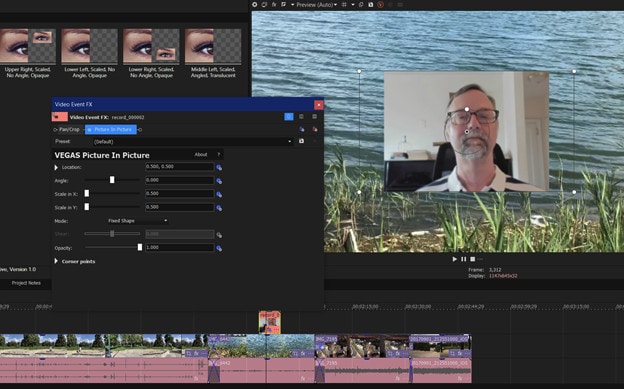
4. Sony Vegas Movie Studio
This video editing software makes it easy to create professional-looking videos in minimum time and effort. Vegas Movie Studio software is best for video editing professionals who have been doing it for some time and are looking for something a little more sophisticated than free alternatives. Not only does it has a high retail price, but its internal elements can be too complex for those just beginning.
Key features
- Color correction
- HDV and AVCHD-editing
- DV batch capture
- Wide variety of file formats and codecs
Price: Starting from $7.99 USD per month
Pros
- Customizable interface
- Multicam editing
- Lots of effects and transitions, with plug-in capability
- Good slow motion and warp flow transition tools
Cons
- Less intuitive interface than competitors
- Import from camcorder not ideal
- Some tools are complex
Supported OS: Windows
G2 Ratings: 4.4 out of 5
Summary
Vegas Movie Studio is the choice of professionals. It does all the work without taking up a lot of resources, and like most programs, there is a learning curve. It’s not always intuitive for beginners, but its professional and powerful features score decent in most reviews.
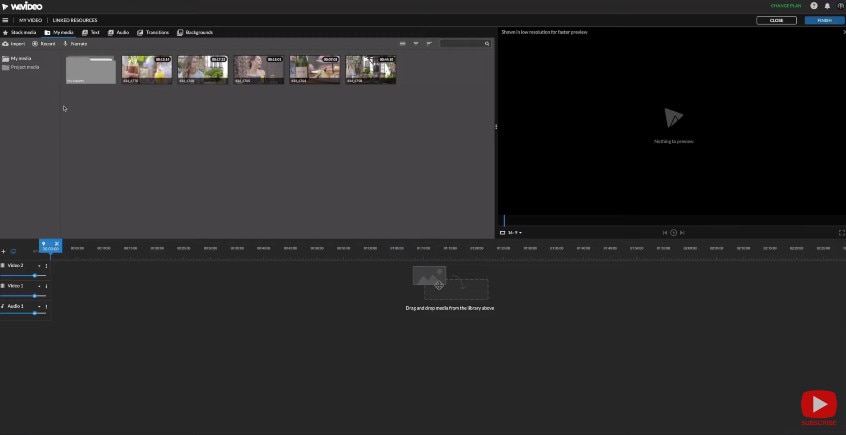
5. WeVideo
This cloud-based application is a simple-to-use video editing and sharing suite. WeVideo is a full-featured video editing application that uses JumpStart technology to create amazing videos. It’s an innovative app that offers a seamless editing experience as it supports multiple formats of video, images, audio, and graphics.
Key features
- WeVideo JumpStart
- Cloud storage
- Built-in graphics
- Customizable environment
- Advanced text editing
- Multi-track editing and storyboard
Price
- Free trial
- Power Plan: $9.99/month
- Unlimited Plan: $15.99/month
- Professional Plan: $39.99/month
- Business Plan: $73.99/month
Pros
- Constantly improving features
- Ease of use
- Storage is cloud-based
Cons
- Old fashion transition
- Leaves a watermark on free trial
Supported OS: Online
Trustpilot Ratings: 4 stars out of 5
Summary
WeVideo is a straightforward yet robust video editor. It offers a variety of features and supports multiple formats, plus its comprehensive pricing plan makes it useful for everyone.
6. Lightworks
Lightworks is the most powerful video editor in its class and an excellent tool for professionals who want to make amazing videos quickly. Lightworks is very fast and straightforward to use, and it has some great features you won’t find in any other video editor. It is available on all popular OS.
Key features
- Audio and Video Effect Plugin Support
- Cloud Connected
- Motion Graphics
- Advanced Metadata
- Proxy Workflows
- Apple ProRes decoding
Price
- Monthly Plan: $9.99/user
- Yearly Plan: $9.99/user
- Perpetual: $154.99
Pros
- High-resolution timeline rendering
- It has social media export templates
- Interfaces for multiple OS are consistent
- Instant autosave
Cons
- Commands are not always intuitive
- A bit pricey as compared to its competitors
Supported OS: Windows , Mac , Linux
Techradar Pro Ratings: 4 stars out of 5
Summary
Lightworks is not any other video editing tool available on the market of video editing tools. This video editing tool provides amateurs with the most sophisticated features in an optimized platform. Its scores are the highest on almost every review site.
7. ShotCut
Shotcut is a multiplatform video editor that lets you work with various formats for audio, video, image files, etc. This video editor makes it easy to mix and match the resolution and frame rates in a video file. All the changes you make in the editor can be undone and redone often. Shotcut is the best choice for video editing, without question.
Key features
- Webcam capture
- Audio scopes and filters
- Deinterlacing
- Eyedropper tool
- Video wipe transitions
- Keyframes for filter parameters
Price: Free
Pros
- Support for 4K resolutions
- Free
Cons
- Less intuitive than commercial apps
- Lacks built-in sharing to popular sites
Supported OS: Windows , Mac , Linux
GetApp Ratings: 4.5 out of 5 stars
Summary
Shotcut is an open-source video editor for creative professionals and is available on mac, Windows, and Linux. The free version of Shotcut has many excellent features, but it doesn’t have the slick interface or advanced techniques of the top paid editors.
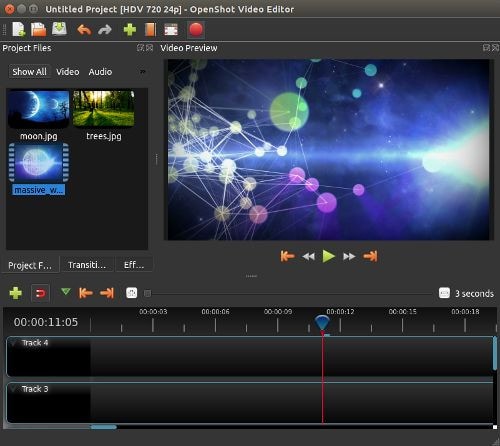
8. OpenShot
An award-winning open-source video editor that creates stunning videos. OpenShot is a fast, easy-to-use, and surprisingly powerful video editor. OpenShot Video Editor allows you to work with many different types of tracks so that your edits will seem natural. OpenShot Video Editor allows you to add your custom animations or titles. The options are endless, so it all depends on your time and interest. It is available in more than 70 languages, making it ideal for all types of users.
Key features
- 3D animations
- Animation and keyframes
- Multiple languages and formats
- Cross-platform
- Video-effects
Price: Free
Pros
- It is a non-linear editor with infinite tracks
- 100% free without watermark
- Frequent updates
Cons
- Obsolete interface
- Unstable performance
- Lacks some editing features
Supported OS: Window , Mac , Linux , Chrome OS
Getapp Ratings: 4.2 stars out of 5
Summary
Another open-source video-editor in the list is named OpenShot. It’s a multi-lingual and multi-supported app with unique features. Despite its unstable performance, OpenShot is still an ideal choice for many users.
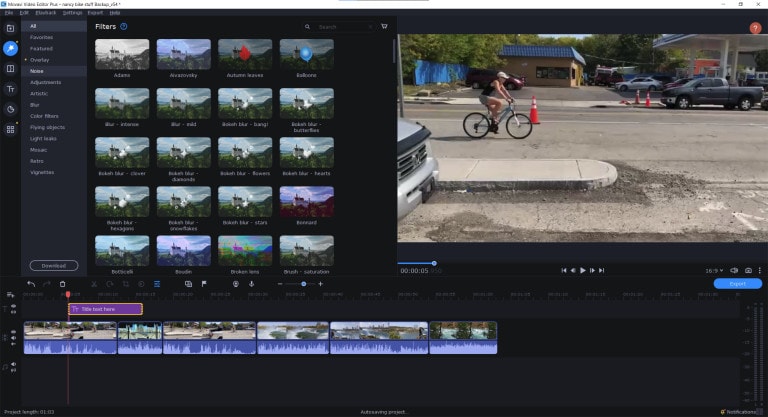
9. Movavi Video Editor Plus
Movavi Video Editor Plus is the perfect tool to bring your creative ideas to life. It has special effects, ready-made intros, and keyframe animation. Using chroma keying, you can change the background of your video clips to any color or pattern that suits your need. Movavi has now redesigned its user interface to make it easy to use.
Key features
- Effects and transitions
- Built-in media pack
- Fast processing of 4K videos
- Keyframe animation
- Automatic video creation
- Cutting, trimming, joining
Price
- Free version: 7 days
- Video Editor Plus 1 year /1 PC: $49.95
- Video Editor Plus Lifetime /1 PC: $69.95
- Video Suite Lifetime /1 PC: $89.95
Pros
- Easy-to-understand user interface
- Transitions with sound
- Motion tracking and picture-in-picture tools
- Chroma-key capability
- Quick movie-creation tool
Cons
- Lacks advanced trim modes
- Slow rendering
PCMag Ratings: 4.0 stars out of 5
Summary
If you want to edit your videos with a minimal learning curve, try Movavi. You get PiP, chroma-keying, titling, basic keying, and motion tracking. The program is simple to use but doesn’t have all the features and stands four stars.
10. VSDC Free Video Editor
VSDC Free Video Editor is an online tool that lets you edit audio and video files to make your creations like movies, YouTube tutorial videos, and more. The audio and video files supported are extensive, and the software includes a codec manager. The Pro version isn’t necessary if you’re using the free edition of the software; it’s more than enough to get the job done.
Key features
- Dark theme
- Subpixel Accuracy
- Powerful Chroma Key tool
- Trendy video effects, filters, and transitions
- Color Blending And Filters
- Built-In DVD Burning Tool
Price: Free
Pros
- Non-linear
- Video effects library
- Video stabilization
- Masking
Cons
- Outdated interface
- Lack keyboard shortcuts
- Only available on Windows
Supported OS: Windows
Capterra Ratings: 4.5 stars out 5
Summary
VSDC is a non-linear editor with extensive format support. It includes all the essential features an editor requires but with an obsolete UI. It is also ideal for many who need a powerful yet free video editor.
11. VideoPad Video Editor
VideoPad is a free video editor that can create stunning videos and perform basic editing tasks. A good video editor can help you to create videos for different social media platforms. You can make your videos look professional and polished with a few clicks and some simple editing skills. There’s nothing particularly exciting or advanced about this app; it’s simple enough for anyone new to video editing or even for seasoned editors. But the simple and easy-to-use interface makes the entire process very exciting.
Key features
- Text snippets
- Range of transitional effects
- Plug-ins Library
- Burn finished videos to Blu-Ray, DVD, etc.
- Color correction and light balance.
Price: Free
Pros
- Simple and clean interface
- Supports multiple file formats
- Includes video effects
- Lightweight on system resources
Cons
- Lack of advanced features
Supported OS: Windows , Mac , iPad/iPhone
Tom’s guide Ratings: 3.5 stars out of 5
Summary
Video pad is a free video editor designed for beginners that is lightweight and simple. VideoPad is also great for creating quick videos for social media purposes like Youtube and Facebook. The software has a high rating, as shown above, and it’s available on Windows.
12. HitFilm
HitFilm is a helpful video editing software that makes editing easier for users. In addition to basic features, the program also provides advanced-level functions that make edited videos pop. Hitfilm Express Download has more than 400 features to help casual video editors save time. Features like: visual effects, cinematic elements, and compositing tools preset help unleash your creativity.
Key features
- Color Grading and correction
- Smart search
- Commentator recorder
- Lightning and lens flares
- 3D camera tracker
Price
- Free trial
- Creator: $7.50
- Pro: $12.50
- Enterprise: Custom pricing
Pros
- Intuitive interface
- It offers free tutorials and masterclasses
- Works on both Windows and Mac
Cons
- It requires heavy system requirements
TechRadar Ratings: 4.5 stars out of 5
Summary
HitFilm Express 15 is a powerful free video editing program that enables you to create high-quality videos in minutes with an intuitive interface. It offers advanced editing features such as advanced video trimming, 3D editing, and more.
13. Magix Movie Studio
Magix is the world’s leading professional audiovisual media software, with Sequoia being its industry-standard audio editing software. This movie editor is an enthusiast-level video editing software that competes with software from Adobe and CyberLink, and it even boasts support for 4K content and 360 degrees. There are many reasons to upgrade. This year’s update includes stabilization, 8K editing, motion tracking, and an in-app plug-in store.
Key features
- NewBlue effects
- Fly-in animation
- New filter view
- Stabilization
- Motion tracking
- 8k support
Price
- Movie Studio 2024: $69.99 (30-day free trial)
- Movie Studio 2024 Platinum: $99.99 (30-day free trial)
- Movie Studio 2024 Suite: $129.00 (30-day free trial)
Pros
- Lots of video effects
- Responsive editing interface
- Multicam
- Trailer-like movie templates
- Solid audio editing
Cons
- Slower project rendering than others
- Lacks import and organization tools
Supported OS: Windows
PCMag Ratings: 3 stars out of 5
Summary
Magix movie studio is a powerful all-around video editing tool with many features that professional users have come to expect. It’s also relatively simple to use. But usability and performance are poor compared to other software programs like Filmora .
Part 4: How To Edit a Video With a Windows Movie Maker Alternative
Windows Movie Maker was great for editing a video, but it’s no match for some of the best video editing software. We’re talking about software capable of creating a cinematic experience in seconds, all on your computer.
When you need to edit a video with simple, quick edits, like adding a special effect or changing the background, try Filmora . Filmora is an easy-to-use application that allows you to create a movie using simple tools that don’t require additional training. You can’t beat this option if you want to create a professional-quality video for your blog or website.
Let’s dive into a quick tutorial on editing videos in Filmora:
Free Download For Win 7 or later(64-bit)
Free Download For macOS 10.14 or later
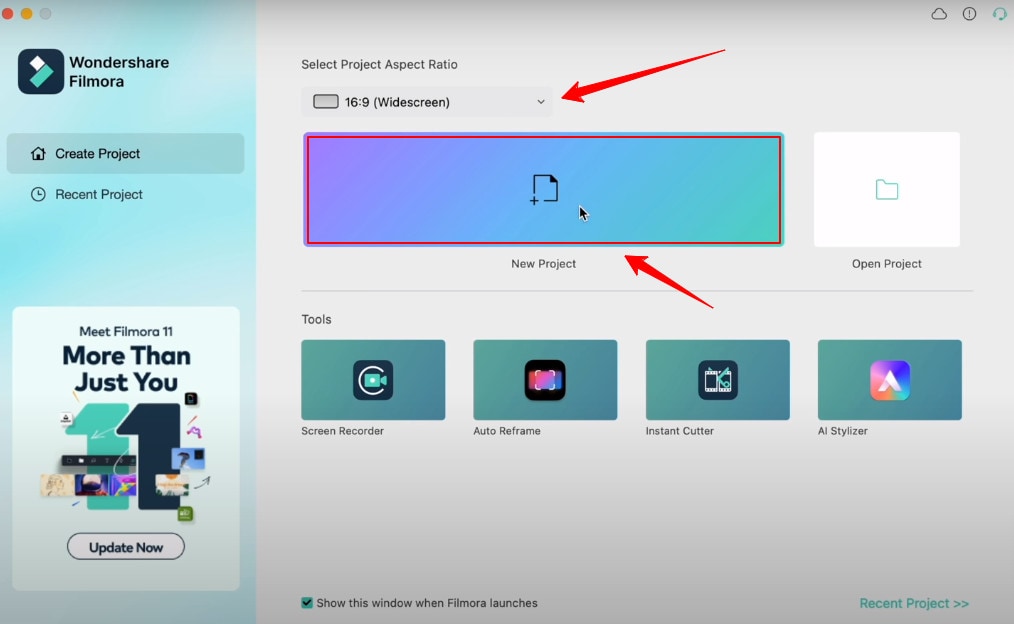
Step1 Open Wondershare Filmora on your PC or Mac
You can start a new project by clicking on ‘New Project’. And you can also change the ‘Aspect Ratio’ according to your project demand.
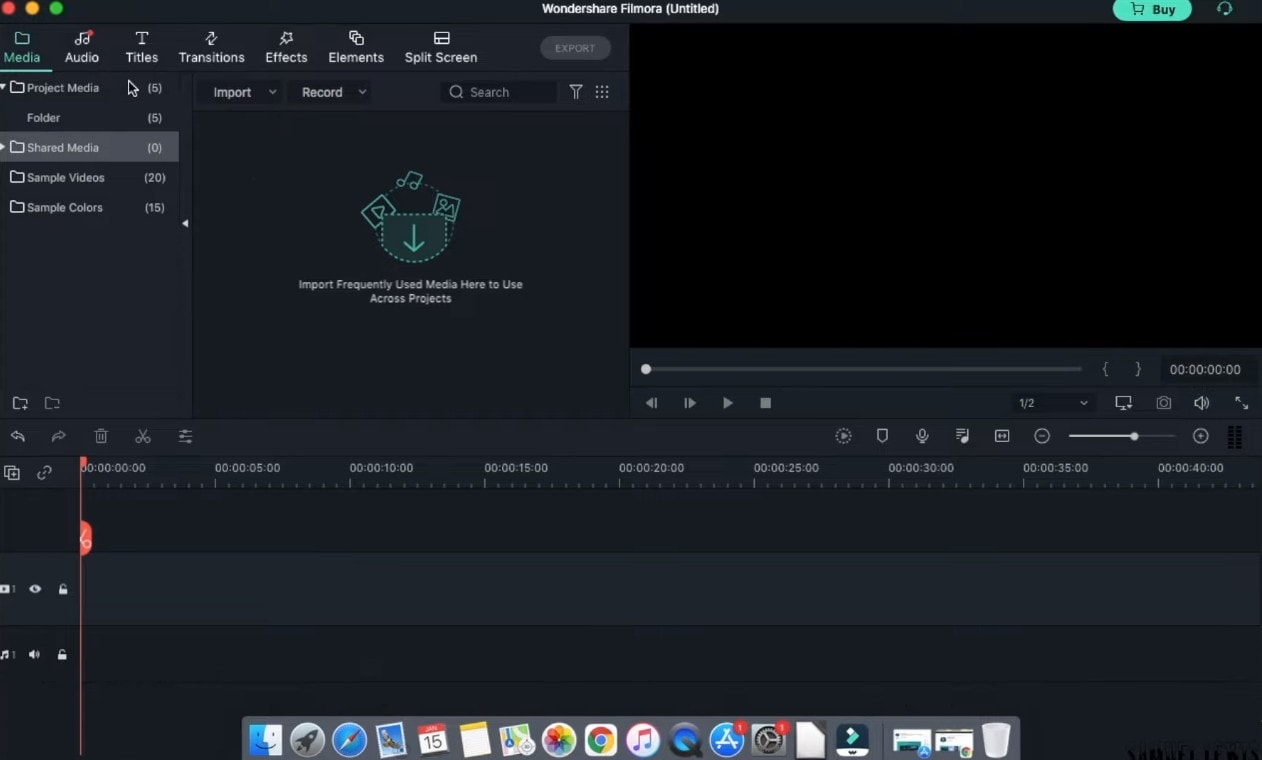
Step2 Import Videos
You can import your file by clicking the import tab on the upper-left side or clicking the import icon on the main window.
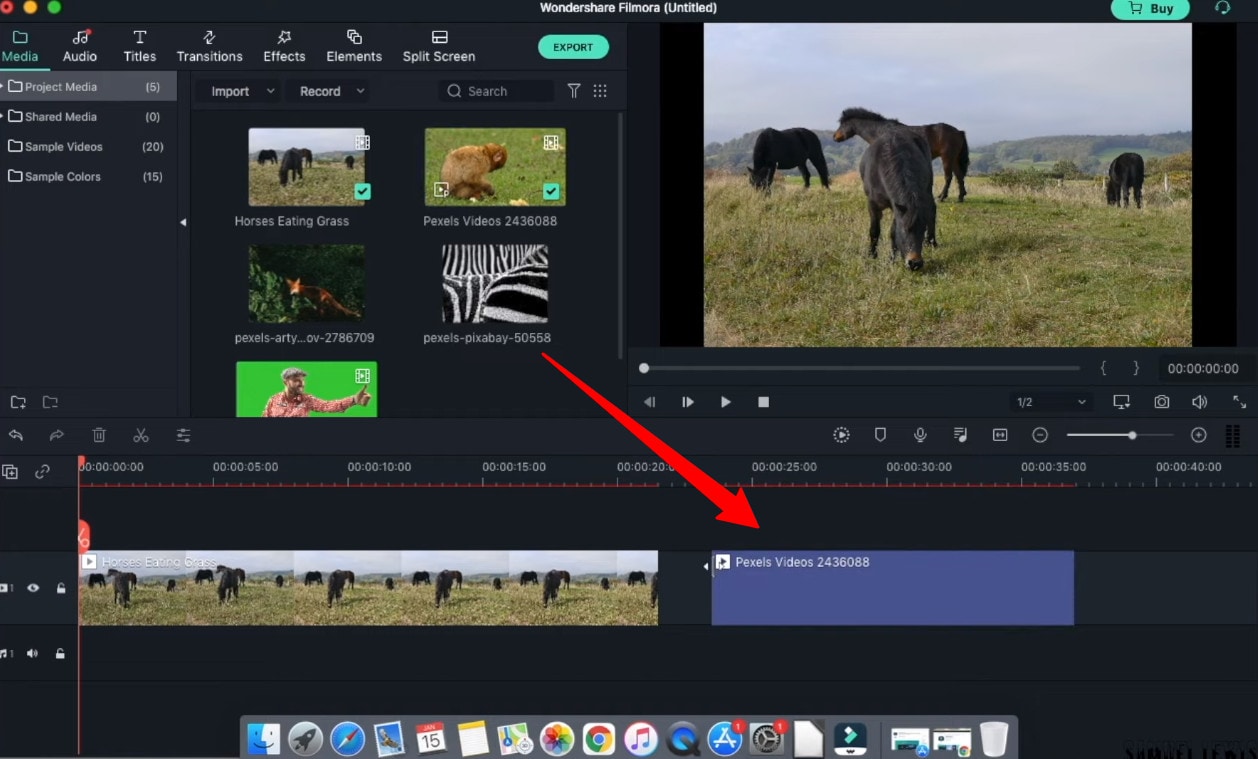
Step3 Drag and drop your footage to the timeline
After importing all the files, click and hold each individual video and drag and drop it to the timeline area according to your ideal sequence.
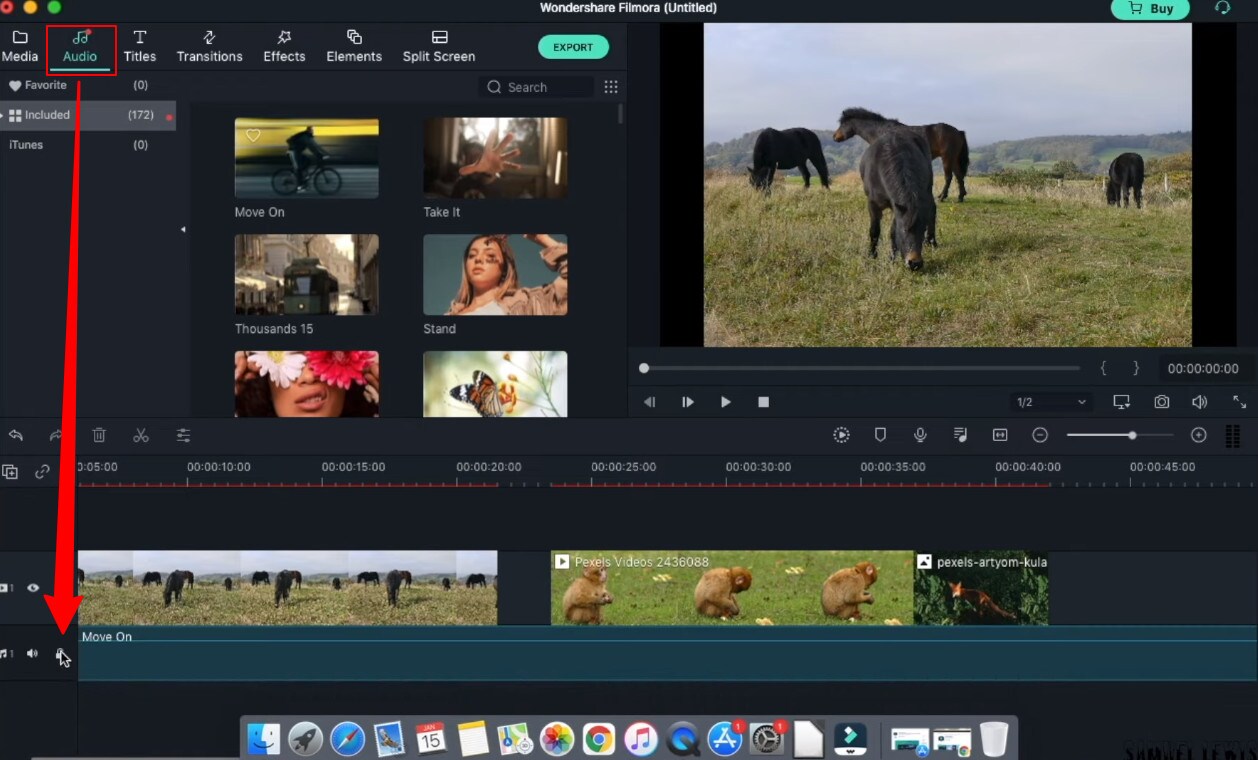
Step4 Add Audio
Go to the ‘Audio’ tab and select the audio file from the audio library. Once selected, drag and drop the audio file into the music timeline.
Step5 Add Titles
In your video intro, you can insert some title text. Go to the ‘Titles’ tab and select the one you like, and drag and drop it on top of the timeline. Double-click and edit the text and state your ideal statements. You can customize your text fonts and color too.
Step6 Add Transitions
You can add transition effects to ensure a smooth transition from one scene to another. The overall will get more professional look.
Step7 Add Effects
Next; you can get special effects to your video to make them more attractive and engaging to watch. Simple drag down the effect to your video and watch the effect take place in your selective scene.
Step8 Export your work
Once all the changes have been made, hit ‘export’ from the top tab. A window will appear where you can change the settings, resolution, frame rate, bit rate, etc. Next, click the ‘export’ button down on that window, and then you can save the file in your drive.
Part 5: Hot FAQs on Windows Movie Maker Alternatives
1. Why is Windows Movie Maker discontinued?
Microsoft’s video editing program, Windows Movie Maker, did not become a big hit with the public because it failed to do well on the market. Microsoft couldn’t get the support they were looking for from the program’s users. As a result, Microsoft had to cease its support of the program.
2. Is there a free version of Windows Movie Maker?
Microsoft Windows Movie maker was always accessible and pre-installed every windows product. Microsoft has discontinued support for Movie Maker and warns about free downloads of Movie Maker provided by third parties that might contain malware, viruses, or other issues.
3. What are the best free Windows Movie Maker Alternatives for Mac?
After switching to a Mac, you’ll find that the Windows Movie Maker alternatives offer much more than just a simple video editor. They provide advanced features, easy transitions, and less technical know-how to create pro-quality results. You should try using these platforms on your Mac if you have a video to edit.
- Wondershare Filmora
- Movavi
- OpenShot
Final Words
Windows Movie Maker is an excellent Windows video editor application for Windows users. But in recent years, it has become outdated due to the continuous development of new technologies. There are many alternatives for Windows Movie Maker, and here we listed some of the best ones. Most of them are free and featured packs. Each program has its unique set of features and capabilities, and each one excels in different areas. Check them out and see what you think.
Free Download For Win 7 or later(64-bit)
Free Download For macOS 10.14 or later
Get the Right Fit: How to Calculate Picture Aspect Ratios
How Do You Find the Picture Ratio Calculator?
An easy yet powerful editor
Numerous effects to choose from
Detailed tutorials provided by the official channel
Aspect ratios are critical elements in photography, although you don’t have to go that deep! Still, you are here as you understand the significance of using aspect ratios in your projects and thus are looking to find the best picture ratio calculator.

In this guide, we’ll talk about everything you need to know about the photo ratio calculator.
In this article
01 [What is Picture Size Ratio?](#Part 1)
02 [What is 1920x1080 in Ratio?](#Part 2)
03 [How Do You Find the Ratio of an Image?](#Part 3)
04 [1920x1080 Aspect Ratio and 16:9 Aspect Ratio Differences](#Part 4)
05 [The Resolution Calculator (image Ration Calculator)](#Part 5)
06 [A Practical Explanation about Aspect Ratios in Filmora](#Part 6)
Part 1 What is Picture Size Ratio?
As already mentioned, a picture size ratio refers to calculating or determining the Ratio of an image. And, it’s accomplished by using apicture ratio calculator. So, for example, the picture size ratio could vary from 1:1, 4:3, 3:2, 16:9, etc.
You can visualize this aspect ratio by allocating an image’s width and height units. For example, a 6×4 inch image has a 3:2 aspect ratio, whereas a 1920×1080 pixel video includes a 16:9 aspect ratio.
Fact Check:
An aspect ratio does not contain attached units—instead, it shows how large the width compared to the height, meaning that an image measured in centimeters will have the same aspect ratio even if measured in inches.
The relationship between its height and width decides the shape and Ratio instead of the image’s actual size.
Different aspect ratios consist of varying effects on the image you use. For example, an image set in a 1:1 ratio vs. a 5:4 ratio changes the composition and perception of the photo.
Types of picture size ratios
1:1 Ratio

A 1:1 ratio includes an image’s width and height are square and thus equal. Some standard 1:1 ratios are an 8″x8″ photo, a 1080 x 1080 pixel image generally used for mobile screens, print photographs, and social media platforms.
3:2 Ratio

The 3:2 Ratio is generally 35mm film and photography and is still extensively used for prints. Images framed at 6″x4″ or 1080×720 pixels set within this aspect ratio.
5:4 Ratio

Last but not least, this Ratio is standard in photography and art prints and photography.
In the following sections, let’s uncover more about the photo aspect ratio and its related calculator!
Part 2 What is 1920x1080 in Ratio?

1920 x 1080 is itself a 16:9 aspect ratio. By default, DSLRs, smartphones, and most modern camcorders record video at 1920 x 1080.
Part 3 How Do You Find the Ratio of an Image?
Before finding the image ratio, understand that there’s a difference between image size and image ratio.
Unlike aspect ratios, image size shows the actual width and height in pixels. Image size refers to the image dimensions. You can measure its dimensions in any unit, but you’ll generally see pixels used for digital or web images and inches used for print images.
It’s essential to note that two different images containing the same aspect ratio may not have the exact dimensions of an image. For instance, the image has 1920×1080 pixels has 16:9 aspect ratios, and an image sized at 1280×720 pixels has a 16:9 aspect ratio.
You can use thistool to measure the aspect ratio of images. Here, match either ratio width and ratio and height or pixel width and pixel height to find the aspect ratio in thisimage size ratio calculator.
Part 4 1920x1080 Aspect Ratio and 16:9 Aspect Ratio Differences
These are almost the same. The only difference is that of the pixels. If you cancel the numbers 1920 and 1080, they will automatically come as 16 and 9. 1920 x 1080 is a 16:9 aspect ratio.
Part 5 The Resolution Calculator (Image Ratio Calculator)
To use a picture aspect ratio calculator, you need to understand the following.
Understand the following five variables:
● H1 Height of the initial image
● W1 Width of the initial image
● H2 Height of the final image
● W2 Width of the final image
● A percentage - the proportion of the initial image’s ratio to the final image’s ratio.
The aspect ratio formulas that sync the quantities mentioned above for the ratio converter are:
H1/W1 = H2/W2,
H1 * A% = H2, and
W1 * A% = W2
You are not required to understand the details by heart; if the initial resolution is generally used, use the list to select the ideal ratio:
Proportions
● 4:3,
● 3:2,
● 16:9,
● 16:10,
● 1:1, square, in some social networks,
● 85:1,
Pixels
● 2048:1536, iPad with Retina screen;
● 1920:1080, HD TV, iPhone 6 plus; and
● 800:600, traditional television & computer monitor standard.
Part 6 A Practical Explanation about Aspect Ratios in Filmora
Want to find thephoto aspect ratio calculatorquickly? Waste no more time calculating formulas and launch Wondershare Filmora Video Editor for the purpose. It is a robust video editing platform within which you can change the aspect ratios of images and videos and do the same with different methods. You can even do it under the editing panel as well. However, we won’t suggest going much deep when you’re looking to find the idealpicture ratio calculator.
Wondershare Filmora
Get started easily with Filmora’s powerful performance, intuitive interface, and countless effects!
Try It Free Try It Free Try It Free Learn More >

The most standard aspect ratios of videos are 4:3 and 16:9. Despite these two, 9:16 and 1:1 get famous over social media platforms these days.
As far as you may know, various media players help you to transform the aspect ratio in real-time when playback. Yet this modification is temporary. You are required to change the aspect ratio again next time you open them.
But, changing the aspect ratios is pretty different than other media players. You need to launch the program and create a new project simply. But, before you do a new project, you can easily change it at the beginning panel.
The Filmora assists you in changing the aspect ratio of the project after downloading. Hit the drop-down tab, and you will choose the options among 16:9, 4:3, 1:1, 9:16, and 21:9 aspect ratios.

Key Takeaways from This Episode
● 1 –An overview of the picture aspect ratio.
● 2 – Formula to measure the aspect ratio of an image.
● 3 –Practical understanding of aspect ratios with WondershareFilmora
● So here, we end our topic byusinga picture ratio calculator. We’ve described how to measure the image aspect ratio in detail. By now, you must have got how important the concept of aspect ratio is in photography or video editing.
Aspect ratios are critical elements in photography, although you don’t have to go that deep! Still, you are here as you understand the significance of using aspect ratios in your projects and thus are looking to find the best picture ratio calculator.
In this guide, we’ll talk about everything you need to know about the photo ratio calculator.
In this article
01 [What is Picture Size Ratio?](#Part 1)
02 [What is 1920x1080 in Ratio?](#Part 2)
03 [How Do You Find the Ratio of an Image?](#Part 3)
04 [1920x1080 Aspect Ratio and 16:9 Aspect Ratio Differences](#Part 4)
05 [The Resolution Calculator (image Ration Calculator)](#Part 5)
06 [A Practical Explanation about Aspect Ratios in Filmora](#Part 6)
Part 1 What is Picture Size Ratio?
As already mentioned, a picture size ratio refers to calculating or determining the Ratio of an image. And, it’s accomplished by using apicture ratio calculator. So, for example, the picture size ratio could vary from 1:1, 4:3, 3:2, 16:9, etc.
You can visualize this aspect ratio by allocating an image’s width and height units. For example, a 6×4 inch image has a 3:2 aspect ratio, whereas a 1920×1080 pixel video includes a 16:9 aspect ratio.
Fact Check:
An aspect ratio does not contain attached units—instead, it shows how large the width compared to the height, meaning that an image measured in centimeters will have the same aspect ratio even if measured in inches.
The relationship between its height and width decides the shape and Ratio instead of the image’s actual size.
Different aspect ratios consist of varying effects on the image you use. For example, an image set in a 1:1 ratio vs. a 5:4 ratio changes the composition and perception of the photo.
Types of picture size ratios
1:1 Ratio
A 1:1 ratio includes an image’s width and height are square and thus equal. Some standard 1:1 ratios are an 8″x8″ photo, a 1080 x 1080 pixel image generally used for mobile screens, print photographs, and social media platforms.
3:2 Ratio
The 3:2 Ratio is generally 35mm film and photography and is still extensively used for prints. Images framed at 6″x4″ or 1080×720 pixels set within this aspect ratio.
5:4 Ratio
Last but not least, this Ratio is standard in photography and art prints and photography.
In the following sections, let’s uncover more about the photo aspect ratio and its related calculator!
Part 2 What is 1920x1080 in Ratio?
1920 x 1080 is itself a 16:9 aspect ratio. By default, DSLRs, smartphones, and most modern camcorders record video at 1920 x 1080.
Part 3 How Do You Find the Ratio of an Image?
Before finding the image ratio, understand that there’s a difference between image size and image ratio.
Unlike aspect ratios, image size shows the actual width and height in pixels. Image size refers to the image dimensions. You can measure its dimensions in any unit, but you’ll generally see pixels used for digital or web images and inches used for print images.
It’s essential to note that two different images containing the same aspect ratio may not have the exact dimensions of an image. For instance, the image has 1920×1080 pixels has 16:9 aspect ratios, and an image sized at 1280×720 pixels has a 16:9 aspect ratio.
You can use thistool to measure the aspect ratio of images. Here, match either ratio width and ratio and height or pixel width and pixel height to find the aspect ratio in thisimage size ratio calculator.
Part 4 1920x1080 Aspect Ratio and 16:9 Aspect Ratio Differences
These are almost the same. The only difference is that of the pixels. If you cancel the numbers 1920 and 1080, they will automatically come as 16 and 9. 1920 x 1080 is a 16:9 aspect ratio.
Part 5 The Resolution Calculator (Image Ratio Calculator)
To use a picture aspect ratio calculator, you need to understand the following.
Understand the following five variables:
● H1 Height of the initial image
● W1 Width of the initial image
● H2 Height of the final image
● W2 Width of the final image
● A percentage - the proportion of the initial image’s ratio to the final image’s ratio.
The aspect ratio formulas that sync the quantities mentioned above for the ratio converter are:
H1/W1 = H2/W2,
H1 * A% = H2, and
W1 * A% = W2
You are not required to understand the details by heart; if the initial resolution is generally used, use the list to select the ideal ratio:
Proportions
● 4:3,
● 3:2,
● 16:9,
● 16:10,
● 1:1, square, in some social networks,
● 85:1,
Pixels
● 2048:1536, iPad with Retina screen;
● 1920:1080, HD TV, iPhone 6 plus; and
● 800:600, traditional television & computer monitor standard.
Part 6 A Practical Explanation about Aspect Ratios in Filmora
Want to find thephoto aspect ratio calculatorquickly? Waste no more time calculating formulas and launch Wondershare Filmora Video Editor for the purpose. It is a robust video editing platform within which you can change the aspect ratios of images and videos and do the same with different methods. You can even do it under the editing panel as well. However, we won’t suggest going much deep when you’re looking to find the idealpicture ratio calculator.
Wondershare Filmora
Get started easily with Filmora’s powerful performance, intuitive interface, and countless effects!
Try It Free Try It Free Try It Free Learn More >
The most standard aspect ratios of videos are 4:3 and 16:9. Despite these two, 9:16 and 1:1 get famous over social media platforms these days.
As far as you may know, various media players help you to transform the aspect ratio in real-time when playback. Yet this modification is temporary. You are required to change the aspect ratio again next time you open them.
But, changing the aspect ratios is pretty different than other media players. You need to launch the program and create a new project simply. But, before you do a new project, you can easily change it at the beginning panel.
The Filmora assists you in changing the aspect ratio of the project after downloading. Hit the drop-down tab, and you will choose the options among 16:9, 4:3, 1:1, 9:16, and 21:9 aspect ratios.
Key Takeaways from This Episode
● 1 –An overview of the picture aspect ratio.
● 2 – Formula to measure the aspect ratio of an image.
● 3 –Practical understanding of aspect ratios with WondershareFilmora
● So here, we end our topic byusinga picture ratio calculator. We’ve described how to measure the image aspect ratio in detail. By now, you must have got how important the concept of aspect ratio is in photography or video editing.
Seasonal Steal: Wondershare Filmora Coupon Code - Valid in March 2024
Official 100% Valid Wondershare Filmora Coupon Code [Easter Sale]

Liza Brown
Mar 27, 2024• Proven solutions
Being a program with a plethora of unique features and pretty intuitive UI, Wondershare Filmora is liked by many amateurs and professional post-production enthusiasts. However, because the tool comes with a price tag and not many people may want to invest that kind of money in buying an application, sometimes they search for the Filmora coupon code to see if the app can be purchased at some discounted price.
That said, the following sections explain how you can avail Filmora at special rates as a student or a regular video editing processional using the Filmora discount code.
- Part 1: Filmora Easter Deals - Get Exclusive 20% Off Discount!
- Part 2: Filmora Discount Coupon for Students (Up to 50% OFF) - Now On!
- Part 3: Special Discount for Filmora Bundle Sales (Up to 40% OFF)
Part 1: Filmora Easter Deals - Exclusive 20% Off Discount
This Easter day, use Filmora to go back to childhood. Filmora offers the latest Easter templates for making videos, it’s a good choice to record the reunion with your family and friends. Besides, Filmora offers exclusive discount during this Easter holiday!
🐰 Get Exclusive 20% Off Discount on Easter Sale >>
From Mar 19, 2024 - Apr 10, 2024

1. Perpetual Win/Mac Plan - 20% Off: Filmora has upgraded to V13 and possesses plenty of AI features to help you expand your creativity! Don’t miss the time to try the free-limited Easter themes! Get the coupon now!
2. Annual Cross-Platform Plan - 15% Off: Filmora has launched the cross-platform version which means you can buy one license and activate this latest AI-based video editing tool on Windows, Mac, iOS, Android, and iPad! No matter where you are, you can create videos with Filmora’s powerful features!
3. Yearly Plan for Creative Assets - 20% Off: If you want to get more resources and templates for making Easter videos, you’d better get this largest and most versatile asset library. Filmora offers hundreds of pre-made templates, titles, effects, and more to polish your video. Get it now!
🐰 Get Exclusive 20% Off Discount on Easter Sale >>
From Mar 19, 2024 - Apr 10, 2024
Part 2: Filmora Discount Coupon for Students (Up to 50% OFF)
Wondershare encourages and supports education, and therefore it offers special discounts to scholars. All you need to do in order to avail of the Filmora discount code available for the students is, sign in with your Student Beans ID, and then follow the regular process to purchase the app at reduced rates.
The steps are given below explain how you can use the offer as a student:
Note: Before proceeding, make sure to keep the credentials of your Student Beans ID handy as these details would be needed to prove to Wondershare that you are a student, and are eligible to access the Filmora Special Offer for EDU.
To Enjoy the Exclusive Students Offer
Step 1: Pick Your PC Platform
Launch your favorite web browser on your computer (a Windows 10 PC is used here for illustration), and go to the Filmora E-Learning Tools page. From the top of this page, you can click Get The EDU Offer Now button to get the EDU offer directly, or if you would like to browse this page at you pace, you can choose at the sidebar menu on the left of this page, whenever you hope.
From the top of the Filmora’s Exclusive Offers For Academic box, click to choose your preferred platform, i.e., Mac or Windows (the Windows option is selected here for demonstration).

Step 2: Choose a Student Plan
From the available plans for the students on the right, evaluate and decide the best one for you. The details of each plan are listed below:
- Monthly Plan
Wondershare Filmora provides a monthly subscription for students at the price of 19.99/month. This subscription is the cheapest among all. When you buy this plan, it is renewed every month, and the price is debited from your account accordingly. You can cancel your subscription anytime if you are not satisfied with the program’s performance, or wish to switch to a different application. No questions asked!
- Annual Plan
This plan offers a 41% discount on the price of the regular annual subscription ($69.99/year), and you are billed annually. As with the previous plan, even this subscription can be canceled anytime as well.
- Perpetual Plan
This plan offers a 50% discount on the price of the regular perpetual subscription ($99.99). If the Licensee choose to purchase a perpetual license, you may use it until terminated.But the Licensee shall pay for the future major version update.
Step 3: Buy a Subscription
Click the Log into Student Beans button present next to the plan that you wish to subscribe for, choose your country, and populate the other fields with the correct values. Next, click Continue, and then follow the on-screen instructions to continue the validation.
After validation, you can see the Buy Now and PayPal pay button. Now, you can click the plan and get Filmora at discount.
🎁 Go and get the up to 50% discount EDU offer >>
To Get the Offer for Your Team/Institution
If you would like to know more about the EDU offer Filmora provides for Educators or Institutions, please fill in this form and get contact to our sales team! All the data will be protected and applied to customer support communications (Privacy Plolicy ).

Part 3: Special Discount for Filmora Bundle Sales (Up to 40% OFF)
Filmora offers a special big discount to get the program at comparatively cheap rates if you subscribe for any of the available creative video solution bundles. What these bundles are, you may ask. The answer is, when you buy a subscription for another product along with Filmora, both the apps form a bundle and are offered to you at a discounted price.
For instance, you can buy a subscription for both Filmora and others products at the same time, and when you subscribe to these two apps, you are offered a special discount to purchase the bundle.
You can follow the instructions given below to buy a Wondershare creative video solution bundle:
Step 1: Get to the Creative Video Solution Bundles Page
Open your favorite web browser, and go to the Filmora Creative Bundle link. Here you can notice the available packages to best suit all your production and post-production needs.
Step 2: Choose a Bundle Category
Click to select a bundle category from the navigation bar on the left of the page. If you want to see all the bundles offered by Wondershare, you can leave the All Bundles category selected The details of all the bundles are given below. If you are not familiar with the bundled product, here are some brief introductions.
- Filmora and PixCut : Image BG Remover and Video Editing Solution
| Filmora Annual Plan + PixCut Annual Plan | Bundle Price | Saving |
|---|---|---|
| $101.97 | $60.78 | $41.19 |
Editing photo background with Adobe Photoshop can be a little intimidating for beginners, owing to the crowded layout with hidden features. But now there’s a simpler and free Photoshop alternative in PixCut. You don’t need prior experience to make background transparent for your social media use.
- Filmora and DemoCreator: Capture, Record and Edit Videos Like a Pro
| Filmora Annual Plan + DemoCreator Annual Plan | Bundle Price | Saving |
|---|---|---|
| $91.23 | $71.98 | $19.25 |
DemoCreator allows you to record footage of your screen and then add visual effects, audio, and more in a simple, yet comprehensive editor quickly so that you can efficiently create informative and/or engaging videos for others to watch.
- Filmora and UniConverter: Edit and Convert Video as the Way You Like
| Filmora Annual Plan + UniConverter Annual Plan | Bundle Price | Saving |
|---|---|---|
| $89.98 | $71.98 | $18.00 |
Wondershare UniConverter, formerly known as Video Converter Ultimate, is a multipurpose application for all your production and post-production needs. The tool is equipped with features like a video compressor, trimmer, subtitle editor, and much more to give you everything under one roof. The table given below shows how much would you save if you go for this bundle.
Step 3: Choose Your Bundle and Platform, and Buy the Pack
From the main window, decide which bundle you wish to subscribe for, use the available button to pick your preferred platform, i.e., Mac or Windows, and click BUY NOW.
On the next page, populate the fields with your details and the required billing information, and click Secure Checkout from the bottom-right corner to proceed with the payment process to buy the bundle. Once all the financial formalities are complete, you can go ahead and instantaneously download the products to install them on your computer.
Note: Buying Download Insurance Service is absolutely optional. When you subscribe for this insurance, the products you paid for remain available for download for the next 24 months from the date of purchase.


Conclusion
You can easily get a Filmora coupon code as long as you are a student and can sign in to your Student Beans account for verification. Furthermore, if you are a professional and are looking forward to buying multiple products to make your post-production experience smooth and quick, picking any of the creative video solution bundles will help you not only in buying multiple products in a single go but it will also offer the apps at discounted rates.
Liza Brown
Liza Brown is a writer and a lover of all things video.
Follow @Liza Brown
Liza Brown
Mar 27, 2024• Proven solutions
Being a program with a plethora of unique features and pretty intuitive UI, Wondershare Filmora is liked by many amateurs and professional post-production enthusiasts. However, because the tool comes with a price tag and not many people may want to invest that kind of money in buying an application, sometimes they search for the Filmora coupon code to see if the app can be purchased at some discounted price.
That said, the following sections explain how you can avail Filmora at special rates as a student or a regular video editing processional using the Filmora discount code.
- Part 1: Filmora Easter Deals - Get Exclusive 20% Off Discount!
- Part 2: Filmora Discount Coupon for Students (Up to 50% OFF) - Now On!
- Part 3: Special Discount for Filmora Bundle Sales (Up to 40% OFF)
Part 1: Filmora Easter Deals - Exclusive 20% Off Discount
This Easter day, use Filmora to go back to childhood. Filmora offers the latest Easter templates for making videos, it’s a good choice to record the reunion with your family and friends. Besides, Filmora offers exclusive discount during this Easter holiday!
🐰 Get Exclusive 20% Off Discount on Easter Sale >>
From Mar 19, 2024 - Apr 10, 2024
1. Perpetual Win/Mac Plan - 20% Off: Filmora has upgraded to V13 and possesses plenty of AI features to help you expand your creativity! Don’t miss the time to try the free-limited Easter themes! Get the coupon now!
2. Annual Cross-Platform Plan - 15% Off: Filmora has launched the cross-platform version which means you can buy one license and activate this latest AI-based video editing tool on Windows, Mac, iOS, Android, and iPad! No matter where you are, you can create videos with Filmora’s powerful features!
3. Yearly Plan for Creative Assets - 20% Off: If you want to get more resources and templates for making Easter videos, you’d better get this largest and most versatile asset library. Filmora offers hundreds of pre-made templates, titles, effects, and more to polish your video. Get it now!
🐰 Get Exclusive 20% Off Discount on Easter Sale >>
From Mar 19, 2024 - Apr 10, 2024
Part 2: Filmora Discount Coupon for Students (Up to 50% OFF)
Wondershare encourages and supports education, and therefore it offers special discounts to scholars. All you need to do in order to avail of the Filmora discount code available for the students is, sign in with your Student Beans ID, and then follow the regular process to purchase the app at reduced rates.
The steps are given below explain how you can use the offer as a student:
Note: Before proceeding, make sure to keep the credentials of your Student Beans ID handy as these details would be needed to prove to Wondershare that you are a student, and are eligible to access the Filmora Special Offer for EDU.
To Enjoy the Exclusive Students Offer
Step 1: Pick Your PC Platform
Launch your favorite web browser on your computer (a Windows 10 PC is used here for illustration), and go to the Filmora E-Learning Tools page. From the top of this page, you can click Get The EDU Offer Now button to get the EDU offer directly, or if you would like to browse this page at you pace, you can choose at the sidebar menu on the left of this page, whenever you hope.
From the top of the Filmora’s Exclusive Offers For Academic box, click to choose your preferred platform, i.e., Mac or Windows (the Windows option is selected here for demonstration).
Step 2: Choose a Student Plan
From the available plans for the students on the right, evaluate and decide the best one for you. The details of each plan are listed below:
- Monthly Plan
Wondershare Filmora provides a monthly subscription for students at the price of 19.99/month. This subscription is the cheapest among all. When you buy this plan, it is renewed every month, and the price is debited from your account accordingly. You can cancel your subscription anytime if you are not satisfied with the program’s performance, or wish to switch to a different application. No questions asked!
- Annual Plan
This plan offers a 41% discount on the price of the regular annual subscription ($69.99/year), and you are billed annually. As with the previous plan, even this subscription can be canceled anytime as well.
- Perpetual Plan
This plan offers a 50% discount on the price of the regular perpetual subscription ($99.99). If the Licensee choose to purchase a perpetual license, you may use it until terminated.But the Licensee shall pay for the future major version update.
Step 3: Buy a Subscription
Click the Log into Student Beans button present next to the plan that you wish to subscribe for, choose your country, and populate the other fields with the correct values. Next, click Continue, and then follow the on-screen instructions to continue the validation.
After validation, you can see the Buy Now and PayPal pay button. Now, you can click the plan and get Filmora at discount.
🎁 Go and get the up to 50% discount EDU offer >>
To Get the Offer for Your Team/Institution
If you would like to know more about the EDU offer Filmora provides for Educators or Institutions, please fill in this form and get contact to our sales team! All the data will be protected and applied to customer support communications (Privacy Plolicy ).
Part 3: Special Discount for Filmora Bundle Sales (Up to 40% OFF)
Filmora offers a special big discount to get the program at comparatively cheap rates if you subscribe for any of the available creative video solution bundles. What these bundles are, you may ask. The answer is, when you buy a subscription for another product along with Filmora, both the apps form a bundle and are offered to you at a discounted price.
For instance, you can buy a subscription for both Filmora and others products at the same time, and when you subscribe to these two apps, you are offered a special discount to purchase the bundle.
You can follow the instructions given below to buy a Wondershare creative video solution bundle:
Step 1: Get to the Creative Video Solution Bundles Page
Open your favorite web browser, and go to the Filmora Creative Bundle link. Here you can notice the available packages to best suit all your production and post-production needs.
Step 2: Choose a Bundle Category
Click to select a bundle category from the navigation bar on the left of the page. If you want to see all the bundles offered by Wondershare, you can leave the All Bundles category selected The details of all the bundles are given below. If you are not familiar with the bundled product, here are some brief introductions.
- Filmora and PixCut : Image BG Remover and Video Editing Solution
| Filmora Annual Plan + PixCut Annual Plan | Bundle Price | Saving |
|---|---|---|
| $101.97 | $60.78 | $41.19 |
Editing photo background with Adobe Photoshop can be a little intimidating for beginners, owing to the crowded layout with hidden features. But now there’s a simpler and free Photoshop alternative in PixCut. You don’t need prior experience to make background transparent for your social media use.
- Filmora and DemoCreator: Capture, Record and Edit Videos Like a Pro
| Filmora Annual Plan + DemoCreator Annual Plan | Bundle Price | Saving |
|---|---|---|
| $91.23 | $71.98 | $19.25 |
DemoCreator allows you to record footage of your screen and then add visual effects, audio, and more in a simple, yet comprehensive editor quickly so that you can efficiently create informative and/or engaging videos for others to watch.
- Filmora and UniConverter: Edit and Convert Video as the Way You Like
| Filmora Annual Plan + UniConverter Annual Plan | Bundle Price | Saving |
|---|---|---|
| $89.98 | $71.98 | $18.00 |
Wondershare UniConverter, formerly known as Video Converter Ultimate, is a multipurpose application for all your production and post-production needs. The tool is equipped with features like a video compressor, trimmer, subtitle editor, and much more to give you everything under one roof. The table given below shows how much would you save if you go for this bundle.
Step 3: Choose Your Bundle and Platform, and Buy the Pack
From the main window, decide which bundle you wish to subscribe for, use the available button to pick your preferred platform, i.e., Mac or Windows, and click BUY NOW.
On the next page, populate the fields with your details and the required billing information, and click Secure Checkout from the bottom-right corner to proceed with the payment process to buy the bundle. Once all the financial formalities are complete, you can go ahead and instantaneously download the products to install them on your computer.
Note: Buying Download Insurance Service is absolutely optional. When you subscribe for this insurance, the products you paid for remain available for download for the next 24 months from the date of purchase.
Conclusion
You can easily get a Filmora coupon code as long as you are a student and can sign in to your Student Beans account for verification. Furthermore, if you are a professional and are looking forward to buying multiple products to make your post-production experience smooth and quick, picking any of the creative video solution bundles will help you not only in buying multiple products in a single go but it will also offer the apps at discounted rates.
Liza Brown
Liza Brown is a writer and a lover of all things video.
Follow @Liza Brown
Also read:
- 2024 Approved Top-Rated Free iPhone Video Rotators You Need
- Updated In 2024, The Ultimate List of 10 Free Online Video Trimmers 2023 Edition
- New Unlock FCP Xs Power Adding Effects in Just 3 Clicks for 2024
- In 2024, Unshakeable Mastering Video Stabilization Techniques in After Effects
- New In 2024, Splice Video Editing App An Exhaustive Review of Its Tools and Functionality
- Updated Video Editing Mastery Top 4K/8K Software for Beginners and Pros for 2024
- New Windows 8 FLV Editor A User-Friendly Video Editing Solution
- In 2024, Pro-Level Jump Cuts Made Easy A Final Cut Pro X Tutorial
- New YouTube Thumbnail Secrets Increase Engagement and Views for 2024
- In 2024, Unleash Pro-Level Video Editing on Windows 8 and Beyond
- New Perfect Exposure Top Video Brightness Editors and Adjusters for 2024
- Updated Transform Your Invitations Best Video Creation Apps for Mobile for 2024
- Updated 2024 Approved Unleash the Power of Public Domain Best Video Download Sites
- New 2024 Approved Make Stunning Videos in Minutes WeVideo Online Editor
- New 2024 Approved The Audio Explorers Handbook YouTube Download Secrets Revealed
- New 2024 Approved Lip Sync Videos Are a Great Source of Fun, and Producing Them Doesnt Require You to Have a Professional Video or Sound Equipment. In This Article, We Are Going to Introduce You to some of the Best Li
- In 2024, Recording Voice Overs Like a Pro Top Tips for Final Cut Pro Users
- 2024 Approved VN Video Editor for PC A Concise Review and Guide
- In 2024, No Budget? No Problem! 10 Free Video Editors for Ubuntu Users
- New 5 Best Free Video Compressor Apps That Reduce Video Sizes on iPhone and iPad for 2024
- New In 2024, No Fuss, No Muss 5 Simple Online Tone Generators Free
- Updated In 2024, Elevate Your Video Editing Skills 6 Must-Know Adobe Premiere Tricks
- New In 2024, Edit Like a Pro A Free Online Video Editing Course Using Jaycut
- In 2024, Whats Better Than Subtitle Edit for Mac? Explore These Alternatives
- New 2024 Approved Top 10 Explainer Video Tools to Boost Your Brand
- Updated Say Goodbye to Shaky Videos Top Free Android Stabilizers
- New AVS Video Editor Review Does It Live Up to Expectations, In 2024
- Updated 2024 Approved Live From Your Videos Best Apps and How-To Convert
- Updated Top Video Editing Software with Music Libraries
- New Top 5 Free Online iMovie Alternatives 2023 Update for 2024
- New 2024 Approved Take Your Videos to the Next Level Adding 3D Effects in Windows 10 and 11
- New In 2024, 10 Essential Apps for Creating Glitch Art Videos on iOS and Android
- New 2024 Approved Reframe, Resize, and Enhance Best Video Editor Options
- New How to Edit Videos with QuickTime on Mac Step-by-Step Guide for 2024
- New 2024 Approved Unleash Your Creativity Top Video Animation Apps for Android, iOS, and iPadOS
- New 2024 Approved Free Video Editing Apps for Chrome OS A Comprehensive List
- Unlock Viral Success TikTok Aspect Ratio Secrets for 2024
- 2024 Approved What to Look for in a YouTube to MP3 Conversion Tool
- 2024 Approved The Ultimate List 15 Best Adobe Premiere Pro Plugins to Download
- How to Fix It Xiaomi 13T Pro Wont Turn On | Dr.fone
- How to Unlock iPhone 12 without Passcode
- Gmail Not Working on Poco F5 Pro 5G 7 Common Problems & Fixes | Dr.fone
- Overview of the Best Honor Magic 5 Pro Screen Mirroring App | Dr.fone
- Updated The Most Popular Online Gaming Intro Makers
- 2 Ways to Transfer Text Messages from Huawei Nova Y91 to iPhone 15/14/13/12/11/X/8/ | Dr.fone
- 9 Solutions to Fix Oppo A58 4G System Crash Issue | Dr.fone
- Updated 2024 Approved Best 10 iPad Slideshow Apps to Create a Slideshow
- How to Unlock Samsung Galaxy M34 5G PIN Code/Pattern Lock/Password
- How to Transfer from Apple iPhone XR to iPhone 8/X/11 | Dr.fone
- New 2024 Approved How to Delete White Background in Photoshop. How to Create a Transparent Background in Photoshop? Steps to Get Rid of White Background in Photoshop
- How to Bypass iCloud Lock on iPhone SE (2022)
- 3 Effective Methods to Fake GPS location on Android For your Infinix Smart 8 Pro | Dr.fone
- How to Change Location On Facebook Dating for your Vivo V30 Pro | Dr.fone
- In 2024, Preparation to Beat Giovani in Pokemon Go For Samsung Galaxy S23 Ultra | Dr.fone
- In 2024, How to Unlock Vivo S17 Pro Phone without PIN
- In 2024, How to Unlock Apple iPhone 6 Plus with IMEI Code?
- How to Unlock Apple ID From your iPhone 7 without Security Questions?
- How to Transfer from Apple iPhone 12 mini to Samsung Galaxy S20? | Dr.fone
- Ways to trade pokemon go from far away On OnePlus 12? | Dr.fone
- How to Rescue Lost Photos from 21?
- Recover your messages after Smart 8 HD has been deleted
- In 2024, A Quick Guide to Vivo Y78 5G FRP Bypass Instantly
- In 2024, New Guide How To Check iCloud Activation Lock Status From Your Apple iPhone 12 Pro Max
- Why does the pokemon go battle league not available On Realme V30T | Dr.fone
- Complete Guide to Hard Reset Your Tecno Pop 7 Pro | Dr.fone
- In 2024, 4 Things You Should Know About Pinterest GIF
- Updated 2024 Approved Top 10 Coolest Plugins for Final Cut Pro X
- How to retrieve erased messages from Vivo S18 Pro
- Title: New In 2024, Sharpen Your Videos Top 10 Free Online Enhancement Solutions
- Author: MdadeLe
- Created at : 2024-06-08 12:39:59
- Updated at : 2024-06-09 12:39:59
- Link: https://smart-video-editing.techidaily.com/new-in-2024-sharpen-your-videos-top-10-free-online-enhancement-solutions/
- License: This work is licensed under CC BY-NC-SA 4.0.
