
:max_bytes(150000):strip_icc():format(webp)/GettyImages-155159821-8881bead1d894a0b95bca3c3e288ff54.jpg)
New In 2024, Best WebM to MP4 Converters for Seamless Video Conversion
Best WebM to MP4 Converters for Seamless Video Conversion
10 Best WebM to MP4 Converters

Liza Brown
Mar 27, 2024• Proven solutions
Reaching the widest audience possible is the goal of every video content creator, but achieving this goal might be impossible if the videos you share online are not saved in the right file format. MP4 is probably the most common video file there is, because it is compatible with a broad range of media players , as well as online video hosting and social media platforms.
WebM, on the other hand, is perfectly suited for videos that are viewed from Google Chrome or Mozilla Firefox, but only a handful of desktop-based media players offer support for this video file format. That is why in this article we are going to take a look at the 10 best WebM to MP4 converters on the market.
The 10 Best WebM to MP4 Converters
Changing the format of a video file is never a complicated process, regardless of the software or the web-based application you are using. However, the duration, speed, and quality of the conversion process depend on the converter you’ve selected for this task. Here are the ten best WebM to MP4 converters that make the file conversion process swift and smooth.
1. UniConverter
Price: Subscription plans start at $2.95 for the online version of UniConverter
Compatibility: Windows, Mac, web-based
This is a powerful file converter that is available both online and on desktop computers. You can choose from more than a thousand conversion formats, which enables you to convert your video files into virtually any format you want.
So, in order to convert a WebM video to MP4 you just need to add one or more WebM files to UniConverter and then set MP4 as the output file format. The amount of time you will have to wait for the conversion process to be completed varies on the desktop and online versions of UniConverter, and you can only convert two WebM files to MP4 at the same time with the online version of this file converter.
2. VLC
Price: Free
Compatibility: Windows, Mac, Linux, iOS, Android

Even though VLC is primarily a media player, you can still use it to convert WebM videos to MP4. Head over to the Media menu after you launch VLC and select the Convert/Save option or use the CTRL+R keyboard shortcut to bring up the Open Media window.
Afterward, you should click on the Add button and proceed to import the WebM file into the media player, and then click on the Browse button in order to specify the location on your hard drive where the converted file is going to be saved. When done, you should click on the Convert/Save button to initiate the file conversion process.
3. Any Video Converter
Price: Free, $69.95
Compatibility: Windows

As its name suggests, you can convert any video file with this software regardless of the format in which it is saved. Converting WebM files to MP4 with Any Video Converter is a simple three-step process that can be completed in just a few moments.
To import the WebM video files into Any Video Converter you must click on the Add Video button and then set MP4 as the output format. The software also allows you to adjust the Bit Rate, audio, and video codec settings, so once you are done fine-tuning these settings you should click on the Convert button. After the conversion process is completed, your files will be accessible from the Output Folder.
4. Online Converter
Price: Free
Compatibility: Web-based

This online file conversion platform enables you to convert a broad range of documents for free. It also supports nearly all commonly used video file formats, including the WebM format, which makes it a perfect choice if you want to convert WebM videos to MP4.
In order to convert a WebM file with Online Converter you just need to upload it to the platform either from an online source or from a local hard drive. Optionally you can set the frame size or cut a video clip before clicking on the Convert button. Uploading a WebM video file can be time-consuming, especially if your file is larger than a few hundred MB.
5. Convertio
Price: Free, pricing options start at $9.99 per month
Compatibility: Web-based

Changing the format of an image, audio and files or presentations is an effortless process that can be completed in just a few clicks. Convertio lets you upload WebM videos from a local hard drive, a URL or cloud storage platforms like Dropbox and Google Drive.
After the upload is completed you just have to change the output format to MP4 and click on the Convert button. The size of the files you can convert with the free version of the platform cannot exceed 100MB and you must opt for one of the available subscription models if you want to convert video files that exceed this limit. What’s more the number of concurrent conversions you can make depends on the subscription model you select.
6. Zamzar
Price: Free, pricing options start at $9.00 per month
Compatibility: Web-based

The fact that 480 million files have been converted with Zamzar since 2006, shows you just how popular this file conversion platform really is. Converting a video with this platform requires you to go through a simple three-step process, so you just have to upload a WebM video file, select the output format and click on the Convert Now button.
You cannot convert files larger than 150MB with the free version of Zamzar. Moreover, this file conversion platform doesn’t allow its users to convert videos that exceed 2GB limit even if they purchase the Business subscription plan. In addition, the maximum online storage capacity you will have at your disposal varies from one subscription plan to another.
7. CloudConvert
Price: Free, pricing options start at $9. 52 per month
Compatibility: Web-based

With the support for over 200 file formats, CloudConvert is easily one of the best file conversion platforms on the Internet. That is why it is hardly a surprise that converting a WebM video file to MP4 requires a minimum amount of effort. However, the platform also enables you to fine-tune the conversion settings by choosing video and audio codecs, setting the constant frame rate or selecting the resolution of the output video.
Trimming the WebM videos is yet another option you will have at your disposal if you choose to convert your files with CloudConvert. In case you’re planning on using this file conversion platform on a regular basis, you can choose how many conversion minutes you’re going to have every month.
8. Video2Edit
Price: Free, $15.00 per month
Compatibility: Web-based

Video2Edit offers a quick way to convert a WebM video to MP4, since you just have to upload a file, either from Google Drive, Dropbox or your hard drive and click on the Start button. Optionally, you can adjust the frame rate, choose a video codec or select a new resolution for the video you’re converting. What’s more, the Video2Edit platform lets you disable a video’s audio track or change the audio codec.
Creating a profile on this file conversion platform will enable you to convert WebM video files that are smaller than 400MB. Purchasing the premium version of Video2Edit will enable you to convert WebM files that don’t exceed a 1GB size limit.
9. Onlineconvertforfree
Price: Free, pricing options start at $6.99
Compatibility: Web-based

You don’t need any previous experience with the file conversion process to convert a WebM video to MP4 with the online file conversion platform. Simply upload a file from your computer or from an online source, choose MP4 as the output file format and then download your file after the conversion.
The platform offers batch conversion options, which can be quite useful if you are looking to convert multiple video files quickly. It is worth noting that converting a video larger than 500MB with this platform isn’t possible, regardless of the subscription model you choose. The number of daily conversions, however, is not limited.
10. Aconvert
Price: Free
Compatibility: Web-based

This is a simple online file conversion tool that lets you convert WebM videos that are stored locally on your computer or on the cloud. You just have to select the source from which you want to import the video, select the output format and decide if you want to change the video’s frame rate , aspect ratio or size.
When done, simply click on the Convert Now button and then after the conversion process is completed, proceed to download your video to your computer. The only downside is that you cannot convert WebM video files that are larger than 200MB with Aconvert.
WebM vs MP4: Which Video File Format is Better?
The file format in which a video is saved determines its compatibility with different media players. So, if your videos are only going to be played in web-browsers like Google Chrome or Mozilla Firefox, then it is better to save your video in WebM file format.
However, you should keep in mind that this file format isn’t used often outside of the online context and that finding a media player that is compatible with the WebM format can be a challenge. MP4 video files, on the other hand, can be played in virtually any macOS or Windows-based media player or uploaded to YouTube or any other video hosting service. That’s why MP4 is a more appealing option to video content creators who want to ensure that their videos can be played anywhere regardless of the device or the media player that is being used to open them.
Conclusion
Changing a video’s file format in 2020 no longer requires you to have access to a professional video editing software, because there are countless online file conversion platforms, that enable you to complete this process in just a couple of clicks. Even so, most online solutions limit the maximum size of the video files you can convert with them, which is why it is better to choose one of the desktop-based options if you are working with large video files. Which WebM to MP4 converter do you like to use the most? Share your opinions with us in the comments.
Liza Brown
Liza Brown is a writer and a lover of all things video.
Follow @Liza Brown
Liza Brown
Mar 27, 2024• Proven solutions
Reaching the widest audience possible is the goal of every video content creator, but achieving this goal might be impossible if the videos you share online are not saved in the right file format. MP4 is probably the most common video file there is, because it is compatible with a broad range of media players , as well as online video hosting and social media platforms.
WebM, on the other hand, is perfectly suited for videos that are viewed from Google Chrome or Mozilla Firefox, but only a handful of desktop-based media players offer support for this video file format. That is why in this article we are going to take a look at the 10 best WebM to MP4 converters on the market.
The 10 Best WebM to MP4 Converters
Changing the format of a video file is never a complicated process, regardless of the software or the web-based application you are using. However, the duration, speed, and quality of the conversion process depend on the converter you’ve selected for this task. Here are the ten best WebM to MP4 converters that make the file conversion process swift and smooth.
1. UniConverter
Price: Subscription plans start at $2.95 for the online version of UniConverter
Compatibility: Windows, Mac, web-based
This is a powerful file converter that is available both online and on desktop computers. You can choose from more than a thousand conversion formats, which enables you to convert your video files into virtually any format you want.
So, in order to convert a WebM video to MP4 you just need to add one or more WebM files to UniConverter and then set MP4 as the output file format. The amount of time you will have to wait for the conversion process to be completed varies on the desktop and online versions of UniConverter, and you can only convert two WebM files to MP4 at the same time with the online version of this file converter.
2. VLC
Price: Free
Compatibility: Windows, Mac, Linux, iOS, Android
Even though VLC is primarily a media player, you can still use it to convert WebM videos to MP4. Head over to the Media menu after you launch VLC and select the Convert/Save option or use the CTRL+R keyboard shortcut to bring up the Open Media window.
Afterward, you should click on the Add button and proceed to import the WebM file into the media player, and then click on the Browse button in order to specify the location on your hard drive where the converted file is going to be saved. When done, you should click on the Convert/Save button to initiate the file conversion process.
3. Any Video Converter
Price: Free, $69.95
Compatibility: Windows
As its name suggests, you can convert any video file with this software regardless of the format in which it is saved. Converting WebM files to MP4 with Any Video Converter is a simple three-step process that can be completed in just a few moments.
To import the WebM video files into Any Video Converter you must click on the Add Video button and then set MP4 as the output format. The software also allows you to adjust the Bit Rate, audio, and video codec settings, so once you are done fine-tuning these settings you should click on the Convert button. After the conversion process is completed, your files will be accessible from the Output Folder.
4. Online Converter
Price: Free
Compatibility: Web-based
This online file conversion platform enables you to convert a broad range of documents for free. It also supports nearly all commonly used video file formats, including the WebM format, which makes it a perfect choice if you want to convert WebM videos to MP4.
In order to convert a WebM file with Online Converter you just need to upload it to the platform either from an online source or from a local hard drive. Optionally you can set the frame size or cut a video clip before clicking on the Convert button. Uploading a WebM video file can be time-consuming, especially if your file is larger than a few hundred MB.
5. Convertio
Price: Free, pricing options start at $9.99 per month
Compatibility: Web-based
Changing the format of an image, audio and files or presentations is an effortless process that can be completed in just a few clicks. Convertio lets you upload WebM videos from a local hard drive, a URL or cloud storage platforms like Dropbox and Google Drive.
After the upload is completed you just have to change the output format to MP4 and click on the Convert button. The size of the files you can convert with the free version of the platform cannot exceed 100MB and you must opt for one of the available subscription models if you want to convert video files that exceed this limit. What’s more the number of concurrent conversions you can make depends on the subscription model you select.
6. Zamzar
Price: Free, pricing options start at $9.00 per month
Compatibility: Web-based
The fact that 480 million files have been converted with Zamzar since 2006, shows you just how popular this file conversion platform really is. Converting a video with this platform requires you to go through a simple three-step process, so you just have to upload a WebM video file, select the output format and click on the Convert Now button.
You cannot convert files larger than 150MB with the free version of Zamzar. Moreover, this file conversion platform doesn’t allow its users to convert videos that exceed 2GB limit even if they purchase the Business subscription plan. In addition, the maximum online storage capacity you will have at your disposal varies from one subscription plan to another.
7. CloudConvert
Price: Free, pricing options start at $9. 52 per month
Compatibility: Web-based
With the support for over 200 file formats, CloudConvert is easily one of the best file conversion platforms on the Internet. That is why it is hardly a surprise that converting a WebM video file to MP4 requires a minimum amount of effort. However, the platform also enables you to fine-tune the conversion settings by choosing video and audio codecs, setting the constant frame rate or selecting the resolution of the output video.
Trimming the WebM videos is yet another option you will have at your disposal if you choose to convert your files with CloudConvert. In case you’re planning on using this file conversion platform on a regular basis, you can choose how many conversion minutes you’re going to have every month.
8. Video2Edit
Price: Free, $15.00 per month
Compatibility: Web-based
Video2Edit offers a quick way to convert a WebM video to MP4, since you just have to upload a file, either from Google Drive, Dropbox or your hard drive and click on the Start button. Optionally, you can adjust the frame rate, choose a video codec or select a new resolution for the video you’re converting. What’s more, the Video2Edit platform lets you disable a video’s audio track or change the audio codec.
Creating a profile on this file conversion platform will enable you to convert WebM video files that are smaller than 400MB. Purchasing the premium version of Video2Edit will enable you to convert WebM files that don’t exceed a 1GB size limit.
9. Onlineconvertforfree
Price: Free, pricing options start at $6.99
Compatibility: Web-based
You don’t need any previous experience with the file conversion process to convert a WebM video to MP4 with the online file conversion platform. Simply upload a file from your computer or from an online source, choose MP4 as the output file format and then download your file after the conversion.
The platform offers batch conversion options, which can be quite useful if you are looking to convert multiple video files quickly. It is worth noting that converting a video larger than 500MB with this platform isn’t possible, regardless of the subscription model you choose. The number of daily conversions, however, is not limited.
10. Aconvert
Price: Free
Compatibility: Web-based
This is a simple online file conversion tool that lets you convert WebM videos that are stored locally on your computer or on the cloud. You just have to select the source from which you want to import the video, select the output format and decide if you want to change the video’s frame rate , aspect ratio or size.
When done, simply click on the Convert Now button and then after the conversion process is completed, proceed to download your video to your computer. The only downside is that you cannot convert WebM video files that are larger than 200MB with Aconvert.
WebM vs MP4: Which Video File Format is Better?
The file format in which a video is saved determines its compatibility with different media players. So, if your videos are only going to be played in web-browsers like Google Chrome or Mozilla Firefox, then it is better to save your video in WebM file format.
However, you should keep in mind that this file format isn’t used often outside of the online context and that finding a media player that is compatible with the WebM format can be a challenge. MP4 video files, on the other hand, can be played in virtually any macOS or Windows-based media player or uploaded to YouTube or any other video hosting service. That’s why MP4 is a more appealing option to video content creators who want to ensure that their videos can be played anywhere regardless of the device or the media player that is being used to open them.
Conclusion
Changing a video’s file format in 2020 no longer requires you to have access to a professional video editing software, because there are countless online file conversion platforms, that enable you to complete this process in just a couple of clicks. Even so, most online solutions limit the maximum size of the video files you can convert with them, which is why it is better to choose one of the desktop-based options if you are working with large video files. Which WebM to MP4 converter do you like to use the most? Share your opinions with us in the comments.
Liza Brown
Liza Brown is a writer and a lover of all things video.
Follow @Liza Brown
Rotate MOV Videos for Free: Best Solutions
Top 5 Best Free MOV Video Rotators

Ollie Mattison
Mar 27, 2024• Proven solutions
With the rise of smartphone-captured videos, you are more likely to come across videos that were filmed sideways. This can make viewing difficult. Luckily, rotating your video is a snap if you choose one of the top 5 free MOV video rotators below.
- Movie Rotator 2.0
- Video Rotator 1.0.7
- Rotate Video
- Freemake Video Converter
- Any Video Converter
- Recommended: Wondershare Filmora (originally Wondershare Video Editor)
Movie Rotator 2.0
The updated version of Movie Rotator allows users to convert films and movies into portrait mode from landscape, or vice versa. It’s perfect for moving MOV file formats onto your hand held devices so you can watch films there in comfort. Movie Rotator 2.0 is specifically for those that have upgraded their operating systems to Windows 7 or 8. If you are still using XP or Vista you should stick to the old version.

Pros:
- Easy-to-use.
Cons:
- Supported video formats are limited;
- Only available for Windows 7 and 8.
Video Rotator 1.0.7
This rotator can literally move your move upside down, at 90 degrees, or turn it into a film like you are looking at it in a mirror. It supports a whole lot more formats than Movie Rotator and can even support the iPhone, iPod Touch or iPad as well as the usual MOV, MP4 and WMV file formats. Video Rotator 1.0.7 can even supports mass flipping of videos, so if you have around 50 or more to do, it’ll rotate them all.

Pros:
- Supports various video formats;
- Straightforward and easy-to-use.
Cons:
- Crashed occasionally.
Rotate Video
What we liked about Rotate Video was the ability to rotate at just about any angle, with one simple click of your mouse. It supports all the major file formats including MPG, WMV or MP4 to name a few and it is remarkably simple to use. The only drawback we found was the 5MB limit on file size!

Pros:
- Supported various video formats;
- No need to download.
Cons:
- 5MB limit on file size.
Freemake Video Converter
This is a very easy piece of software to use and enables anyone to easily change the rotation of your movies. It supports various video formats like MOV, AVI, MP4, WMV, MKV, 3GP and more. Once you get going it’s easy to use, straightforward and uncomplicated.

Pros:
- Supports various video formats;
- Different video editing options;
- User-friendly interface and easy-to-use.
Cons:
- There is a charge to upgrade it to the Gold Version.
Any Video Converter
Very easy to use and a simple interface, this software does more than simply rotate your videos. It will also rotate in batches and allow you to do some smart editing like trimming, cropping, clipping as well as rotating. It’s a bit of all-singing, all-dancing rotating software as it also supports a huge amount of file formats, including MOV of course.

Pros:
- Supports almost any video formats;
- Different video editing functions.
Cons:
- Can’t convert audio files.
Recommended: Wondershare Filmora (originally Wondershare Video Editor)
If need more video editing functions besides rotation, Filmora Video Editor can help. This video editing tool enables you to easily crop, rotate, split, combine videos as well as add special video effects in minutes. Download and try it out.
 Download Mac Version ](https://tools.techidaily.com/wondershare/filmora/download/ )
Ollie Mattison
Ollie Mattison is a writer and a lover of all things video.
Follow @Ollie Mattison
Ollie Mattison
Mar 27, 2024• Proven solutions
With the rise of smartphone-captured videos, you are more likely to come across videos that were filmed sideways. This can make viewing difficult. Luckily, rotating your video is a snap if you choose one of the top 5 free MOV video rotators below.
- Movie Rotator 2.0
- Video Rotator 1.0.7
- Rotate Video
- Freemake Video Converter
- Any Video Converter
- Recommended: Wondershare Filmora (originally Wondershare Video Editor)
Movie Rotator 2.0
The updated version of Movie Rotator allows users to convert films and movies into portrait mode from landscape, or vice versa. It’s perfect for moving MOV file formats onto your hand held devices so you can watch films there in comfort. Movie Rotator 2.0 is specifically for those that have upgraded their operating systems to Windows 7 or 8. If you are still using XP or Vista you should stick to the old version.
Pros:
- Easy-to-use.
Cons:
- Supported video formats are limited;
- Only available for Windows 7 and 8.
Video Rotator 1.0.7
This rotator can literally move your move upside down, at 90 degrees, or turn it into a film like you are looking at it in a mirror. It supports a whole lot more formats than Movie Rotator and can even support the iPhone, iPod Touch or iPad as well as the usual MOV, MP4 and WMV file formats. Video Rotator 1.0.7 can even supports mass flipping of videos, so if you have around 50 or more to do, it’ll rotate them all.
Pros:
- Supports various video formats;
- Straightforward and easy-to-use.
Cons:
- Crashed occasionally.
Rotate Video
What we liked about Rotate Video was the ability to rotate at just about any angle, with one simple click of your mouse. It supports all the major file formats including MPG, WMV or MP4 to name a few and it is remarkably simple to use. The only drawback we found was the 5MB limit on file size!
Pros:
- Supported various video formats;
- No need to download.
Cons:
- 5MB limit on file size.
Freemake Video Converter
This is a very easy piece of software to use and enables anyone to easily change the rotation of your movies. It supports various video formats like MOV, AVI, MP4, WMV, MKV, 3GP and more. Once you get going it’s easy to use, straightforward and uncomplicated.
Pros:
- Supports various video formats;
- Different video editing options;
- User-friendly interface and easy-to-use.
Cons:
- There is a charge to upgrade it to the Gold Version.
Any Video Converter
Very easy to use and a simple interface, this software does more than simply rotate your videos. It will also rotate in batches and allow you to do some smart editing like trimming, cropping, clipping as well as rotating. It’s a bit of all-singing, all-dancing rotating software as it also supports a huge amount of file formats, including MOV of course.
Pros:
- Supports almost any video formats;
- Different video editing functions.
Cons:
- Can’t convert audio files.
Recommended: Wondershare Filmora (originally Wondershare Video Editor)
If need more video editing functions besides rotation, Filmora Video Editor can help. This video editing tool enables you to easily crop, rotate, split, combine videos as well as add special video effects in minutes. Download and try it out.
Download Mac Version ](https://tools.techidaily.com/wondershare/filmora/download/ )
Ollie Mattison
Ollie Mattison is a writer and a lover of all things video.
Follow @Ollie Mattison
The Ultimate Vlog Editor’s Guide: Free and Paid Software for Every Platform
Best 10 Vlog Video Editing Software [Free & Paid]
Ollie Mattison
Mar 27, 2024• Proven solutions
Nowadays, more and more people are tending to share their life with short videos on social media platforms such as YouTube, Facebook, Instagram TV and Vimeo. Consequently, aspiring and accomplished vloggers must have at least basic video editing tools at their disposal that enable them to produce captivating visual content which grabs the audience’s attention.
If you’re curious about what software vloggers use, what is the best video editing software for vlogging, or which video editor to choose for YouTube vlog videos, you will get some clues based on the information below.
We’ve researched the internet and picked up the top 10 best video editing software for vlogging, which allows to record as well as edit videos easily for vlogs.
- Part 1: Best Free Vlog Video Editing Software for Beginners
- Part 2: Advanced Vlog Video Editing Software Products on Mac & PC Computers for semi-pros and pros
- Part 3: How to Edit Vlog Videos [Video Tutorial: take travel vlog video as an example]
Best Free & Paid Vlog Editing Software for Vloggers on YT/FB/Ins/Vimeo in 2024
Besides shooting with a goodvlogging camera , the post-production process is very important to your vlogging as well. The complexity of the videos you intend to produce should be one of the first things you consider when choosing vlog video editing software. For instance, if you don’t have a lot of experience in the field and you’d just like to piece a few clips together, then there is no reason to spend extensive amounts of money on professional video editing software.
For Win 7 or later (64-bit)
 Secure Download
For macOS 10.12 or later
Secure Download
Here we’ve sorted out some of the best video editing software for vloggers available on the market depending on your skills and experience level. Some of them are totally free to use, while some still provide unlimited free trial version such as Filmora. You can identify with one which is right for your needs after trying. But at first, let’s have a look at some of the free vlog editing options novice and advanced video editors have at their disposal.
Part 1: Best Free Vlog Video Editing Software for Beginners
1. Windows Built-in Movie Maker for Windows 7 and Photos app for Windows 10
Price: Free
Compatibility: Windows OS
Windows Movie Maker used to be bundled with the Windows operating system and has been assisting amateurs for a very long time. It features the drag-n-drop functions and offers almost all the classic video editing functions including trim, rotate, split, combine as well as adding music track, filters, and themes. The windows movie maker is simple yet the function is limited. After you editing one or two vlog videos with it, you will find that.
However, Windows Movie Maker has been discontinued, and it is no longer available for download, but if you are using an older version of the Windows 7 operating system, you can still edit your videos with this iconic PC-based software. The newcomers to the world of vlogging can use this software to put several video clips together or to perform basic video editing actions like cutting or trimming. Windows Movie Maker never had much to offer to skilled video editors, so if you take vlogging seriously, you won’t spend too much time editing your videos with it. Check our Picks of theBest Free Video Editing Software for Windows in 2020 >>

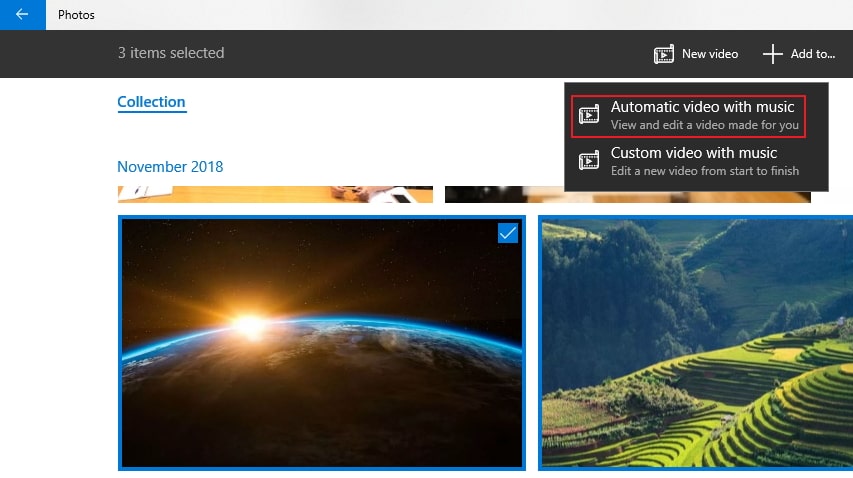
The latest news, Microsoft will stop supporting Windows 7 in January 2020. If you’re looking for some video editing software designed for Windows10, check some of the best movie makers for Windows 10 . If you’ve already updated and run to Windows10, you can also use the in-built Windows10 Photos app. The Photos app in Windows 10 allows you to pick up a theme, soundtrack to make a video easily. One of the interesting features of Photos is that you can choose a star and then it will create a video which focused on that person with videos and pics of your media collection. Learn more details about how to edit videos in the Photos app with Story Remix
What we like:
Totally free for windows users and the automatic video creation feature is interesting
What we don’t like:
Video Editing Features are limited
Only for Windows users
2. iMovie
Price: Free
Compatibility: MacOS and iOS
iMovie is a free video editing software for vloggers who using Mac to edit vidoes. It is equipped with an array of fantastic and practical video editing features, iMovie is an idea video editing tool for anyone. Comes with every new iMac, it’s free of charge and provides a wide range of effects and tools sets, thus it’s always considered as an essential tool for any Mac user to enhance their vologs.
Despite a somewhat limited scope of video editing features iMovie provides, the software is still powerful enough to enable you to edit footage captured in resolutions up to 4K . Additionally, you can create titles , apply visual effects and filters to video clips, or even record your own voiceovers. iMovie’s file sharing capabilities are perfectly suited for vlogging as you can upload a video to your YouTube channel or Facebook account directly from the software.
What we like:
Totally free for Mac users and you can also use it on iPhone or iPad to edit vlog videos
What we don’t like:
Limited features and effects
Only for Mac or iOS users
3. VSDC Free Video Editor
Price: Free
Compatibility: Windows
This non-linear editor seems to be a perfect solution for both established and aspiring vloggers because it offers a lot of video editing tools that are incredibly easy to use. Moreover, the software supports nearly all common image andvideo file formats , which means that you can record your vlog entries with any digital camera. The best part is that VSDC enables its users to export videos in HD and 4K resolutions directly to YouTube. The only downside is that you can only install this vlog editor on a PC computer.
What we like:
Anyone without previous knowledge can use this tool
What we don’t like:
Sometimes errors appear when opening the software
4. GoPro Quik Desktop app
Price: Free
Compatibility: Windows and MacOS
If you’re traveling around the world and spend a lot of time on the road shooting videos with a GoPro action camera, then you can try using the Quik desktop app to edit your vlog videos. The Quik video editor is perfectly optimized for editing footage captured with different models of GoPro cameras, but the amount of video editing options the app provides can be a bit underwhelming for professionals. This is a great option if the laptop you carry with you on your journeys doesn’t have enough processing power to run a more powerful video editing software. However, if you rarely use GoPro cameras to record your footage, then this video editing app won’t have a lot to offer you.
What we like:
It offers cloud storage
What we don’t like:
Some good features are paid and expensive
5. DaVinci Resolve
Price: Free and premium version
Compatibility: Windows and MacOS
Tools like Filmora and Adobe Premiere are full of great features, but these blessings come with a price. That’s why people love working on DaVinci, as most of its features are free. The good thing is that you can do all sorts of video editing using this software. While this editor is awesome for vlogs, it is already under significant usage in the Hollywood industry.
Although this software has a premium version with additional features, I have found everything I looked for in the free version. That includes color grading, animations, text, and effects. Moreover, it has a customizable and easy interface. But to be honest, you will find it a bit tricky at first. Also, you might need to watch some YouTube tutorials to get started with DaVinci Resolve.
What we like:
Complete video production tool with audio post-production options
What we don’t like:
4K video editing requires a premium version
6. VN Video Editor
Price: Free
Compatibility: iOS, Android, Mac, and Windows OS
Not many people have heard this name, but VN Video Editor is the best tool for cross-platform operating systems, including iOS and Android. You can also download this tool on your Mac and Windows.
Another fantastic thing about this software is that it’s free and doesn’t even leave a visible watermark on the edited stuff. Furthermore, it doesn’t demand any heavy system requirements whether you’re using it on a smartphone or computer.
You can use this tool on an Apple laptop or computer by downloading this tool from the Apps Store. However, the problem is that you can’t directly download VN Video Editor on your Windows PC. You have to go through a bit of struggle to use it on your system. First, you need to download BluesSacks and then search and install VN Video Editor through Google Play. Here’s a video for your reference.
So, is this struggle worth doing it? Let’s be realistic! I won’t tell you that you can edit an entire Christopher Nolan movie with it, but as a vlogging tool, this has almost everything you will need to make cool videos.
What we like:
No watermark and easy to use
What we don’t like
No direct download link
Not meant for professional editors
7. VideoPad
Price: Free and premium version
Compatibility: Mac and Windows OS
Despite being an old tool, VideoPad is still known to be an excellent pick if you’re looking for free editing software for vlogging. It has a simple interface and is extremely easy to use. Anyone with a bit of interest and knowledge can start editing videos without learning from tutorials.
In my experience, this software is almost similar to Filmora regarding easiness. However, compared to Filmora, it lacks some essential presets. Besides, the interface looks old. But it doesn’t mean that this tool lacks some modern traits.
Furthermore, the editor allows you to export videos in multiple formats, making it great for YouTube videos.
What we like:
The free version includes lots of exciting features
Affordable upgrade
What we don’t like:
Unable to export mp4 and limited audio tracks in free version
8. VideoProc Vlogger
Price: Free
Compatibility: Mac and Windows OS
VideoProc Vlogger is specially designed for vlogging. It is great for both beginners and professionals. It has an easy interface and options with lots of unique features, including 28 motion presets, pan & zoom, and motion cropping.
Likewise, you can also do color grading and color correction along with HSL color adjustment. In the same way, you can fix low light and overexposure and reduce noise.
A few more features of VideoProc Vlogger include fisheye removal, time-lapse, split screen, green screen, text addition, voice recording, audio extractor, and more.
What we like:
100% secure
Free tech – support
Video tutorials available
What we don’t like:
Minor issues with clips splitting
Part 2: Best Vlog Video Editing Software Products for Semi-pros & pros
1. Wondershare Filmora
Price: $79.99 for a perpetual license
Compatibility: Windows and MacOS
This vlog software is easy to edit videos for all creators. Both skilled video editing professionals and vlogging enthusiasts can use Filmora equally effectively to produce captivating videos. With its ability to record both Webcam and desktop screen, and voiceover directly and upload to YouTube and Vimeo social media platform, it has become one of the best solutions for Vloggers to edit their videos. Filmora is an easily mastered tool that enables users to join, cut, split, rotate, crop clips within clicks.

Besides a rich filter gallery and an impressive collection of royalty-free music , the Filmora’s latest update brings improved color correction and audio features. You can add up to a hundred video and audio tracks to the timeline and take full advantage of the software’s compositing capabilities.
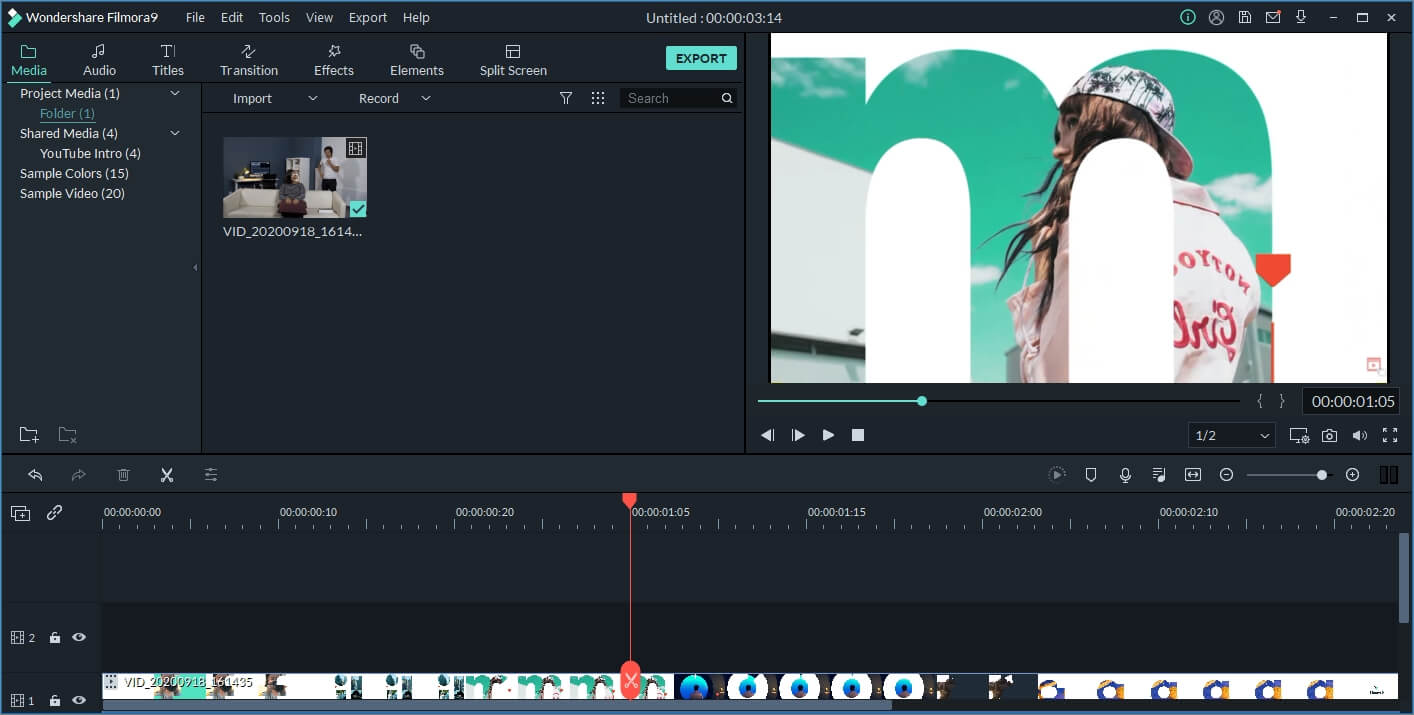
It also stocks a list of filters and options to add extra touches to your video. Vloggers can easily add annotations to their videos , create a PIP effect, or even stabilize shaky footage . The software’s file-sharing capabilities, as well as the fast rendering speeds, make it one of the best vlog video editors in 2020. What’s more, it offers you a lot of fashion and beautiful effects for Game, Beauty, Education, Travel, etc. It is now PC & Mac Cross-compatible, which means you can edit the Projects on either Operating system.
What we like:
Remove background noise easily
Record Voiceover, desktop, webcam simultaneously and change speed easily
Plenty Filters, Overlays, Effects (really important for vloggers)
Intuitive Interface & Easy to Use
What we don’t like:
Need to pay to remove the watermark
2. Lightworks
Price: Free version available $24.99 per month
Compatibility: Windows, Linus, and MacOS
Even the free version of this professional video editor offers the option to export 720p HD videos to Vimeo or YouTube. Furthermore, advanced Multicam editing features, as well as a rich effects library, make Lightwork an excellent choice for vlog editing even if you don’t want to purchase one of the available subscription plans. Vloggers who choose to purchase a monthly or an annual subscription have a much wider range of options at their disposal, so it is best to try the free version of Lightworks before you decide if you want to use it to edit your vlog entries on a constant basis.
What we like:
Proper support forum to get guidance
What we don’t like:
Some users find the interface extremely difficult
3. Adobe Premiere Pro
Price: $20.99 per month, as a single app
Compatibility: Windows and MacOS
Adobe Premiere is one of the best video editing apps ever created, if not the best, so if you’re looking for a reliable video editor with plenty of advanced video editing features, this is probably your best choice. The seemingly endless collection of tools, visual effects, and animation features will ensure that each video you edit in Adobe Premiere Pro meets the highest professional standards.

Vloggers in need of a powerful video editing app that is capable of performing even the most demanding video editing tasks will benefit from purchasing Adobe Premiere Pro as a single app or as a part of some other Creative Cloud plan.
It also supports manythird-party plug-ins for additional features. Please note that there is a 30-day limited trial period, so if you edit vlog videos with it, please remember to check before the trial expired, otherwise you can’t access the software anymore. And there will be a watermark in the free trial version as well.
What we like:
Gives you more controls over vlog footage
What we don’t like:
Expensive
Need some editing experience to handle it
4. Final Cut Pro:
Price: $299.99
Compatibility: MacOS
Over the course of the last couple of decades, Final Cut Pro has become one of the most frequently used video editing software packages in the film industry. That’s why it is hardly surprising that the Final Cut’s latest update is among the best vlog video editors you can use in 2020. A broad spectrum of video editing options grants you the creative freedom to visualize any idea, regardless of how complex that idea may be. However, if you are new to Final Cut Pro, you will need a lot of practice in order to be able to utilize its capabilities entirely.

Final Cut Pro is a sophisticated video editing program for professionals . It offers different almost all the video editing features and options you can imagine, such as multi-cam synchronization support, batch sequence capture as well as third-party plug-in support. However, it’s one of the most expensive video editing software available on the market. So think twice before you make the final decision. But professional video editing software costs much ($299) and need more time to learn how to edit with it. Check the video editing tips with Final Cut Pro >>
What we like:
Plugins available which makes it powerful
What we don’t like:
Available on Mac computer only
Professional and not easy to start
5. MAGIX Movie Studio 2024
Price: $69.99 – $99.99 for a lifetime
Compatibility: Windows and MacOS
MAGIX Movie Studio has two versions – advanced editing and simple editing.
You can work on projects in advance editing by creating multiple effects and layers. This version also allows you to edit your 4K videos, color correct them, and make them more stunning. Similarly, it also permits you to apply the green screen effect. However, this is suitable for professionals and takes a lot of time to do job.
On the contrary, the simple editing version comes with essential features, which are also best for quick vlog editing. So if you’re in a hurry and need to upload videos to your channel daily, you can use the simple mode.
And let me add a few more great things which make MAGIX Movie Studio wonderful. For example, there are lots of add-ons available. It has big effects and tools library best for pro vloggers.
What we like:
Affordable pricing for the features it has
What we don’t like:
The software crashes sometimes
6. Camtasia
Price: $299.99 per year
Compatibility: Mac and Windows OS
Camtasia is another kid on the block that is suitable for vloggers. The tool serves best on projects, including how-to-videos, tutorials, and instructional videos.
Camtasia has all the basic features you may need to edit YouTube videos, including animations, motion graphics, and more. Additionally, it comes with a screen recorder and green-screen effects.
What we like:
Simple interface
What we don’t like:
Expensive
Slow video rendering
Part 3: How to Edit Vlog Videos in Filmora Vlog Editing Software [Video Tutorial & Detailed Steps]
The video tutorial below will show you how to edit a travel vlog with this vlog editing software. If you don’t have time to watch the video tutorial right now, you can check our brief guide [3 steps] of how to edit vlog videos in Filmora below.
Bonus: More and more people are making money with videos, want to know how? Check our YouTube monetarization guide about How to make money on YouTube .
1. Importing Vlog Videos
Click the Import option or select Import Media Files Here to navigate to import your vlog video materials. It allows you to import folders from disks or from your iPhone or camera even from your social media account.

Then drag and drop the vlog media to the timeline to edit.
2. Editing Vlog Footage
It provides all the basic editing features such as trimming, cutting, deleting, rotating and flipping, as well as advanced features such as video stabilization, color grading, background noise removing and green screen compositing and blending. We know that most vloggers need filters and transition, all these effects are available on Filmora Effects library and Transition library, and you can also click Filmstock

3. Export vlog footage and share to YouTube/Vimeo or Save
Click the Export button to enter the Export window, here you can choose to save the video to popular formats on your computer, or save to mobile devices such as iPhone, iPad, and Android phone, or to TVs as well. You can also upload the vlog video to YouTube and Vimeo directly.

You can also check the step-by-step tutorial aboutHow to edit videos to know more details .
Related: How to create amazing food vlog or family vlog ?
Conclusion
Above are our picks of the best video editing software for vloggers, some are designed for free for video editing novices, while after editing several vlog videos, you may need professional ones, so I also introduced some video editing software for professionals. Having the right equipment is much more important than having the most expensive equipment. So instead of simply buying the priciest video editing software, you can find on the market, you should choose a video editor that provides all the tools you’ll need to create a vlog. Which video editing software are you going to be using to edit your vlogs in 2020?
FAQs About Vlog Video Editing
1. What Video Editing Software Do Vloggers Use?
Vloggers use a wide range of video editors based on their needs. Beginners who need a free & straightforward editor for light editing typically go for editors such as iMovie, Windows 10 Photos, etc. But consumer and pro-level Vloggers opt for more capable alternatives like Filmora. Drag-n-drop actions handle most of the editing in Filmora. Thanks to this, applying transitions, effects & filters is a breeze. There is an extensive library of stock content which is crucial for vloggers. Trendy filters & effects, Action Cam tool combined with 4K support makes it a must-have for vloggers.
2. What Is the Best Vlog Editing Software for Windows Free?
Microsoft Photos is the best free video editor for Windows. It delivers a solid video editing package in a simple interface. Since it comes built-in with Windows, no additional hassle is necessary. Microsoft Photos can create automatic videos from your media library. The videos don’t always turn out great, but they save a lot of time which you can dedicate to vlogging. You can choose from six themes to automatically take care of your text, filters, and soundtrack. The filters also come in eleven flavors to spice up your video.
For Win 7 or later (64-bit)
Secure Download
For macOS 10.12 or later
Secure Download
If you prefer to record vlog and edit it on your phones, you can check our picks of the Best Vlog Editor Apps [iOS & Android] .
Ollie Mattison
Ollie Mattison is a writer and a lover of all things video.
Follow @Ollie Mattison
Ollie Mattison
Mar 27, 2024• Proven solutions
Nowadays, more and more people are tending to share their life with short videos on social media platforms such as YouTube, Facebook, Instagram TV and Vimeo. Consequently, aspiring and accomplished vloggers must have at least basic video editing tools at their disposal that enable them to produce captivating visual content which grabs the audience’s attention.
If you’re curious about what software vloggers use, what is the best video editing software for vlogging, or which video editor to choose for YouTube vlog videos, you will get some clues based on the information below.
We’ve researched the internet and picked up the top 10 best video editing software for vlogging, which allows to record as well as edit videos easily for vlogs.
- Part 1: Best Free Vlog Video Editing Software for Beginners
- Part 2: Advanced Vlog Video Editing Software Products on Mac & PC Computers for semi-pros and pros
- Part 3: How to Edit Vlog Videos [Video Tutorial: take travel vlog video as an example]
Best Free & Paid Vlog Editing Software for Vloggers on YT/FB/Ins/Vimeo in 2024
Besides shooting with a goodvlogging camera , the post-production process is very important to your vlogging as well. The complexity of the videos you intend to produce should be one of the first things you consider when choosing vlog video editing software. For instance, if you don’t have a lot of experience in the field and you’d just like to piece a few clips together, then there is no reason to spend extensive amounts of money on professional video editing software.
For Win 7 or later (64-bit)
Secure Download
For macOS 10.12 or later
Secure Download
Here we’ve sorted out some of the best video editing software for vloggers available on the market depending on your skills and experience level. Some of them are totally free to use, while some still provide unlimited free trial version such as Filmora. You can identify with one which is right for your needs after trying. But at first, let’s have a look at some of the free vlog editing options novice and advanced video editors have at their disposal.
Part 1: Best Free Vlog Video Editing Software for Beginners
1. Windows Built-in Movie Maker for Windows 7 and Photos app for Windows 10
Price: Free
Compatibility: Windows OS
Windows Movie Maker used to be bundled with the Windows operating system and has been assisting amateurs for a very long time. It features the drag-n-drop functions and offers almost all the classic video editing functions including trim, rotate, split, combine as well as adding music track, filters, and themes. The windows movie maker is simple yet the function is limited. After you editing one or two vlog videos with it, you will find that.
However, Windows Movie Maker has been discontinued, and it is no longer available for download, but if you are using an older version of the Windows 7 operating system, you can still edit your videos with this iconic PC-based software. The newcomers to the world of vlogging can use this software to put several video clips together or to perform basic video editing actions like cutting or trimming. Windows Movie Maker never had much to offer to skilled video editors, so if you take vlogging seriously, you won’t spend too much time editing your videos with it. Check our Picks of theBest Free Video Editing Software for Windows in 2020 >>
The latest news, Microsoft will stop supporting Windows 7 in January 2020. If you’re looking for some video editing software designed for Windows10, check some of the best movie makers for Windows 10 . If you’ve already updated and run to Windows10, you can also use the in-built Windows10 Photos app. The Photos app in Windows 10 allows you to pick up a theme, soundtrack to make a video easily. One of the interesting features of Photos is that you can choose a star and then it will create a video which focused on that person with videos and pics of your media collection. Learn more details about how to edit videos in the Photos app with Story Remix
What we like:
Totally free for windows users and the automatic video creation feature is interesting
What we don’t like:
Video Editing Features are limited
Only for Windows users
2. iMovie
Price: Free
Compatibility: MacOS and iOS
iMovie is a free video editing software for vloggers who using Mac to edit vidoes. It is equipped with an array of fantastic and practical video editing features, iMovie is an idea video editing tool for anyone. Comes with every new iMac, it’s free of charge and provides a wide range of effects and tools sets, thus it’s always considered as an essential tool for any Mac user to enhance their vologs.
Despite a somewhat limited scope of video editing features iMovie provides, the software is still powerful enough to enable you to edit footage captured in resolutions up to 4K . Additionally, you can create titles , apply visual effects and filters to video clips, or even record your own voiceovers. iMovie’s file sharing capabilities are perfectly suited for vlogging as you can upload a video to your YouTube channel or Facebook account directly from the software.
What we like:
Totally free for Mac users and you can also use it on iPhone or iPad to edit vlog videos
What we don’t like:
Limited features and effects
Only for Mac or iOS users
3. VSDC Free Video Editor
Price: Free
Compatibility: Windows
This non-linear editor seems to be a perfect solution for both established and aspiring vloggers because it offers a lot of video editing tools that are incredibly easy to use. Moreover, the software supports nearly all common image andvideo file formats , which means that you can record your vlog entries with any digital camera. The best part is that VSDC enables its users to export videos in HD and 4K resolutions directly to YouTube. The only downside is that you can only install this vlog editor on a PC computer.
What we like:
Anyone without previous knowledge can use this tool
What we don’t like:
Sometimes errors appear when opening the software
4. GoPro Quik Desktop app
Price: Free
Compatibility: Windows and MacOS
If you’re traveling around the world and spend a lot of time on the road shooting videos with a GoPro action camera, then you can try using the Quik desktop app to edit your vlog videos. The Quik video editor is perfectly optimized for editing footage captured with different models of GoPro cameras, but the amount of video editing options the app provides can be a bit underwhelming for professionals. This is a great option if the laptop you carry with you on your journeys doesn’t have enough processing power to run a more powerful video editing software. However, if you rarely use GoPro cameras to record your footage, then this video editing app won’t have a lot to offer you.
What we like:
It offers cloud storage
What we don’t like:
Some good features are paid and expensive
5. DaVinci Resolve
Price: Free and premium version
Compatibility: Windows and MacOS
Tools like Filmora and Adobe Premiere are full of great features, but these blessings come with a price. That’s why people love working on DaVinci, as most of its features are free. The good thing is that you can do all sorts of video editing using this software. While this editor is awesome for vlogs, it is already under significant usage in the Hollywood industry.
Although this software has a premium version with additional features, I have found everything I looked for in the free version. That includes color grading, animations, text, and effects. Moreover, it has a customizable and easy interface. But to be honest, you will find it a bit tricky at first. Also, you might need to watch some YouTube tutorials to get started with DaVinci Resolve.
What we like:
Complete video production tool with audio post-production options
What we don’t like:
4K video editing requires a premium version
6. VN Video Editor
Price: Free
Compatibility: iOS, Android, Mac, and Windows OS
Not many people have heard this name, but VN Video Editor is the best tool for cross-platform operating systems, including iOS and Android. You can also download this tool on your Mac and Windows.
Another fantastic thing about this software is that it’s free and doesn’t even leave a visible watermark on the edited stuff. Furthermore, it doesn’t demand any heavy system requirements whether you’re using it on a smartphone or computer.
You can use this tool on an Apple laptop or computer by downloading this tool from the Apps Store. However, the problem is that you can’t directly download VN Video Editor on your Windows PC. You have to go through a bit of struggle to use it on your system. First, you need to download BluesSacks and then search and install VN Video Editor through Google Play. Here’s a video for your reference.
So, is this struggle worth doing it? Let’s be realistic! I won’t tell you that you can edit an entire Christopher Nolan movie with it, but as a vlogging tool, this has almost everything you will need to make cool videos.
What we like:
No watermark and easy to use
What we don’t like
No direct download link
Not meant for professional editors
7. VideoPad
Price: Free and premium version
Compatibility: Mac and Windows OS
Despite being an old tool, VideoPad is still known to be an excellent pick if you’re looking for free editing software for vlogging. It has a simple interface and is extremely easy to use. Anyone with a bit of interest and knowledge can start editing videos without learning from tutorials.
In my experience, this software is almost similar to Filmora regarding easiness. However, compared to Filmora, it lacks some essential presets. Besides, the interface looks old. But it doesn’t mean that this tool lacks some modern traits.
Furthermore, the editor allows you to export videos in multiple formats, making it great for YouTube videos.
What we like:
The free version includes lots of exciting features
Affordable upgrade
What we don’t like:
Unable to export mp4 and limited audio tracks in free version
8. VideoProc Vlogger
Price: Free
Compatibility: Mac and Windows OS
VideoProc Vlogger is specially designed for vlogging. It is great for both beginners and professionals. It has an easy interface and options with lots of unique features, including 28 motion presets, pan & zoom, and motion cropping.
Likewise, you can also do color grading and color correction along with HSL color adjustment. In the same way, you can fix low light and overexposure and reduce noise.
A few more features of VideoProc Vlogger include fisheye removal, time-lapse, split screen, green screen, text addition, voice recording, audio extractor, and more.
What we like:
100% secure
Free tech – support
Video tutorials available
What we don’t like:
Minor issues with clips splitting
Part 2: Best Vlog Video Editing Software Products for Semi-pros & pros
1. Wondershare Filmora
Price: $79.99 for a perpetual license
Compatibility: Windows and MacOS
This vlog software is easy to edit videos for all creators. Both skilled video editing professionals and vlogging enthusiasts can use Filmora equally effectively to produce captivating videos. With its ability to record both Webcam and desktop screen, and voiceover directly and upload to YouTube and Vimeo social media platform, it has become one of the best solutions for Vloggers to edit their videos. Filmora is an easily mastered tool that enables users to join, cut, split, rotate, crop clips within clicks.
Besides a rich filter gallery and an impressive collection of royalty-free music , the Filmora’s latest update brings improved color correction and audio features. You can add up to a hundred video and audio tracks to the timeline and take full advantage of the software’s compositing capabilities.
It also stocks a list of filters and options to add extra touches to your video. Vloggers can easily add annotations to their videos , create a PIP effect, or even stabilize shaky footage . The software’s file-sharing capabilities, as well as the fast rendering speeds, make it one of the best vlog video editors in 2020. What’s more, it offers you a lot of fashion and beautiful effects for Game, Beauty, Education, Travel, etc. It is now PC & Mac Cross-compatible, which means you can edit the Projects on either Operating system.
What we like:
Remove background noise easily
Record Voiceover, desktop, webcam simultaneously and change speed easily
Plenty Filters, Overlays, Effects (really important for vloggers)
Intuitive Interface & Easy to Use
What we don’t like:
Need to pay to remove the watermark
2. Lightworks
Price: Free version available $24.99 per month
Compatibility: Windows, Linus, and MacOS
Even the free version of this professional video editor offers the option to export 720p HD videos to Vimeo or YouTube. Furthermore, advanced Multicam editing features, as well as a rich effects library, make Lightwork an excellent choice for vlog editing even if you don’t want to purchase one of the available subscription plans. Vloggers who choose to purchase a monthly or an annual subscription have a much wider range of options at their disposal, so it is best to try the free version of Lightworks before you decide if you want to use it to edit your vlog entries on a constant basis.
What we like:
Proper support forum to get guidance
What we don’t like:
Some users find the interface extremely difficult
3. Adobe Premiere Pro
Price: $20.99 per month, as a single app
Compatibility: Windows and MacOS
Adobe Premiere is one of the best video editing apps ever created, if not the best, so if you’re looking for a reliable video editor with plenty of advanced video editing features, this is probably your best choice. The seemingly endless collection of tools, visual effects, and animation features will ensure that each video you edit in Adobe Premiere Pro meets the highest professional standards.
Vloggers in need of a powerful video editing app that is capable of performing even the most demanding video editing tasks will benefit from purchasing Adobe Premiere Pro as a single app or as a part of some other Creative Cloud plan.
It also supports manythird-party plug-ins for additional features. Please note that there is a 30-day limited trial period, so if you edit vlog videos with it, please remember to check before the trial expired, otherwise you can’t access the software anymore. And there will be a watermark in the free trial version as well.
What we like:
Gives you more controls over vlog footage
What we don’t like:
Expensive
Need some editing experience to handle it
4. Final Cut Pro:
Price: $299.99
Compatibility: MacOS
Over the course of the last couple of decades, Final Cut Pro has become one of the most frequently used video editing software packages in the film industry. That’s why it is hardly surprising that the Final Cut’s latest update is among the best vlog video editors you can use in 2020. A broad spectrum of video editing options grants you the creative freedom to visualize any idea, regardless of how complex that idea may be. However, if you are new to Final Cut Pro, you will need a lot of practice in order to be able to utilize its capabilities entirely.
Final Cut Pro is a sophisticated video editing program for professionals . It offers different almost all the video editing features and options you can imagine, such as multi-cam synchronization support, batch sequence capture as well as third-party plug-in support. However, it’s one of the most expensive video editing software available on the market. So think twice before you make the final decision. But professional video editing software costs much ($299) and need more time to learn how to edit with it. Check the video editing tips with Final Cut Pro >>
What we like:
Plugins available which makes it powerful
What we don’t like:
Available on Mac computer only
Professional and not easy to start
5. MAGIX Movie Studio 2024
Price: $69.99 – $99.99 for a lifetime
Compatibility: Windows and MacOS
MAGIX Movie Studio has two versions – advanced editing and simple editing.
You can work on projects in advance editing by creating multiple effects and layers. This version also allows you to edit your 4K videos, color correct them, and make them more stunning. Similarly, it also permits you to apply the green screen effect. However, this is suitable for professionals and takes a lot of time to do job.
On the contrary, the simple editing version comes with essential features, which are also best for quick vlog editing. So if you’re in a hurry and need to upload videos to your channel daily, you can use the simple mode.
And let me add a few more great things which make MAGIX Movie Studio wonderful. For example, there are lots of add-ons available. It has big effects and tools library best for pro vloggers.
What we like:
Affordable pricing for the features it has
What we don’t like:
The software crashes sometimes
6. Camtasia
Price: $299.99 per year
Compatibility: Mac and Windows OS
Camtasia is another kid on the block that is suitable for vloggers. The tool serves best on projects, including how-to-videos, tutorials, and instructional videos.
Camtasia has all the basic features you may need to edit YouTube videos, including animations, motion graphics, and more. Additionally, it comes with a screen recorder and green-screen effects.
What we like:
Simple interface
What we don’t like:
Expensive
Slow video rendering
Part 3: How to Edit Vlog Videos in Filmora Vlog Editing Software [Video Tutorial & Detailed Steps]
The video tutorial below will show you how to edit a travel vlog with this vlog editing software. If you don’t have time to watch the video tutorial right now, you can check our brief guide [3 steps] of how to edit vlog videos in Filmora below.
Bonus: More and more people are making money with videos, want to know how? Check our YouTube monetarization guide about How to make money on YouTube .
1. Importing Vlog Videos
Click the Import option or select Import Media Files Here to navigate to import your vlog video materials. It allows you to import folders from disks or from your iPhone or camera even from your social media account.
Then drag and drop the vlog media to the timeline to edit.
2. Editing Vlog Footage
It provides all the basic editing features such as trimming, cutting, deleting, rotating and flipping, as well as advanced features such as video stabilization, color grading, background noise removing and green screen compositing and blending. We know that most vloggers need filters and transition, all these effects are available on Filmora Effects library and Transition library, and you can also click Filmstock
3. Export vlog footage and share to YouTube/Vimeo or Save
Click the Export button to enter the Export window, here you can choose to save the video to popular formats on your computer, or save to mobile devices such as iPhone, iPad, and Android phone, or to TVs as well. You can also upload the vlog video to YouTube and Vimeo directly.
You can also check the step-by-step tutorial aboutHow to edit videos to know more details .
Related: How to create amazing food vlog or family vlog ?
Conclusion
Above are our picks of the best video editing software for vloggers, some are designed for free for video editing novices, while after editing several vlog videos, you may need professional ones, so I also introduced some video editing software for professionals. Having the right equipment is much more important than having the most expensive equipment. So instead of simply buying the priciest video editing software, you can find on the market, you should choose a video editor that provides all the tools you’ll need to create a vlog. Which video editing software are you going to be using to edit your vlogs in 2020?
FAQs About Vlog Video Editing
1. What Video Editing Software Do Vloggers Use?
Vloggers use a wide range of video editors based on their needs. Beginners who need a free & straightforward editor for light editing typically go for editors such as iMovie, Windows 10 Photos, etc. But consumer and pro-level Vloggers opt for more capable alternatives like Filmora. Drag-n-drop actions handle most of the editing in Filmora. Thanks to this, applying transitions, effects & filters is a breeze. There is an extensive library of stock content which is crucial for vloggers. Trendy filters & effects, Action Cam tool combined with 4K support makes it a must-have for vloggers.
2. What Is the Best Vlog Editing Software for Windows Free?
Microsoft Photos is the best free video editor for Windows. It delivers a solid video editing package in a simple interface. Since it comes built-in with Windows, no additional hassle is necessary. Microsoft Photos can create automatic videos from your media library. The videos don’t always turn out great, but they save a lot of time which you can dedicate to vlogging. You can choose from six themes to automatically take care of your text, filters, and soundtrack. The filters also come in eleven flavors to spice up your video.
For Win 7 or later (64-bit)
Secure Download
For macOS 10.12 or later
Secure Download
If you prefer to record vlog and edit it on your phones, you can check our picks of the Best Vlog Editor Apps [iOS & Android] .
Ollie Mattison
Ollie Mattison is a writer and a lover of all things video.
Follow @Ollie Mattison
Cutting-Edge Text Tracking Technology
Best Text Motion Tracking Software
Ollie Mattison
Mar 27, 2024• Proven solutions
Have you ever been mesmerized by a video with text or emoji’s moving together with objects? That effect is produced using motion tracking and isn’t very complicated. Today, we will introduce some text motion tracking software (free & paid) tools that allow you to pin text to video with minimum effort. There will also be detailed tutorials on how to utilize each tool. Let’s get started.
Best Text Motion Tracking Software [+Howtos]
Note: The list below is in no particular order.
1. Filmora
Pricing: Free (watermark) /starts at $49.99/year
Operating System: Windows & Mac
The newly released Wondershare Filmora X version has added the motion tracking features, which allows you to track moving objects in a video clip, and attach images, texts, elements and videos to follow the movement path.
How to Use Filmora Video Editor To Do Text Motion Tracking?
- Import the video footage to the timeline and then click the Motion Track icon in the tool bar to enable the Motion Tracking option.
![]()
- In the preview window, drag and adjust the tracking box to select a moving object as the target.
![]()
- Click the Start Tracking menu to start the moton tracking render, and Filmora video editor will compute the moving path automatically
- Now, go to the Titles tab and drag a subtitle, titles, lower 3rd, or callout to the track just above the motion-tracked video. Customize your texts, adjust its size, position, etc. in the preview window.
![]()
- Next, double click the video footage to enter the Motion Track option. Select the title as a follower. Playback the video, and you will see the text will move accordingly.
Below is a step by step video tutorial about how to use the motion tracking feature in Filmora. Keep watching.
2. Premiere Pro CC
Pricing: 14-day trial, minimum $20.99/month
Operating System: Windows, Mac
Adobe Premiere Pro is an industry-leading video editor. Premiere Pro CC has all the editing tools a pro video editor needs.
There is no automatic tracking feature in Premiere Pro to pin text to video. Therefore, you need to manually position your text and add keyframes frame by frame. But the overall effort required and the final result isn’t much different from traditional editors.
How To Do Text Motion Tracking In Premiere Pro CC? [Main Steps]
- Import your video to the timeline
- Add text by Pressing ‘T’ on your keyboard and clicking on the preview window (your footage)
- Change the position & duration of the text layer on the timeline according to the position & duration of motion tracking
- Make sure you’re on the frame you want to start tracking from
- Click on your text layer → then go to effects controls
- Change the position of the text to the point you want to track → click on the stopwatch icon to add a keyframe
- Move a few frames forward → adjust the position again → add another keyframe
- Don’t put the keyframes too close or too farther apart
- Play through to check it out → adjust the position and number of keyframes if any issues arise
The whole process is relatively easy, although tedious. But the process becomes very complicated when you have more dynamic motion in your clip
3. After Effects
Pricing: 7-day trial, $20.99/month (individual)
Operating System: Windows & Mac
Adobe After Effects is an editor that focuses on animation & creative composition. This app has been developed as a companion to Premiere Pro for creating short & flashy motion graphics and visual effects for projects.
Motion tracking in After Effects can be done using the Point Tracker, which has one-point and up to four-point tracking. Other tracking options include the built-in 3D Camera Tracker that lets you reverse engineer a scene and the spline tracker that enables you to track masks on an object. There is also Mocha AE, a planar tracker from BorisFX. The Point Tracker is the most flexible and versatile in After Effects. We’ll use it to pin text to video.
How To Do Text Motion Tracking In After Effects? [Main Steps]
- Create a new composition/open an old one and make sure your clip is imported
- Create a null object by right-clicking on the window (screenshot below)
- Select your clip → click on tracker → click on track motion
- Two square boxes will appear
- Move the squares to the point you want to track (make sure to select an object with relatively high contrast for easier tracking)
- Position the smaller square on the object you want to track
- Make the second box is big enough (not too big) so that the tracked object stays within this square in the next frame
- Click on the analyze forward button (screenshot above)
- If the square box fails to track the object at any frame, reposition it and move on
- Make sure motion target is set to null object (e.g., Null 1)
- Now add the text
- While clicking on the pick whip tool of the text layer, drag it to the null object
- Play through to check the result
- You can manually change the position of the text in any frame by adjusting its position and adding a keyframe
We’re done. As we stated above, other types of trackers are also available for you to experiment with. The overall tracking functionality is much better than Premiere Pro.
4. Sony Vegas Pro
Pricing: 30-day trial, minimum $19.99/month
Operating System: Windows
Sony Vegas Pro is a non-linear video editor with the so-called “power of Artificial Intelligence.” It is one of the few editors out there that has acquired popularity among professionals and amateurs alike.
Text motion tracking in Vegas Pro is done using Bézier Masking FX (new update introduces a separate tab for motion tracking). The tracking process is automatic. Keyframes are created automatically frame by frame. It isn’t perfect, but it gets the job done in most cases. When it fails to track objects correctly, you can manually edit the keyframes.
How To Do Text Motion Tracking In Sony Vegas Pro? [Main Steps]
- Import your video
- Click on your video → go to the starting point of text motion tracking
- Click on Bézier Masking → drag the default one to your video
- A new options tab will appear & a square box with a circle (tracking box) will appear in the preview window
- Go to General options → set blend to 1,000
- Go to Mask 1 → Tracking → options → set the precision to high → set keyframe interval between 1 & 5
- Position the black dot of the tracking box to the point you want to track
- Click on start below the keyframe interval option
- After processing is complete → go to tools → extensions → add text to motion track → click on ok in the text position tab
- Enter your text, edit it if you want
- Play through to check the result
Conclusion:
As we’ve seen above, all the editors have some kind of automatic tracking feature, Premiere Pro being the only manual exception. All of them do a reasonably good job when it comes to pinning text to video. Professionals would be more satisfied with the added versatility and control in After Effects. Filmora, Filmora, Vegas Pro and Premiere Pro, on the other hand, are better suited for amateurs.
Ollie Mattison
Ollie Mattison is a writer and a lover of all things video.
Follow @Ollie Mattison
Ollie Mattison
Mar 27, 2024• Proven solutions
Have you ever been mesmerized by a video with text or emoji’s moving together with objects? That effect is produced using motion tracking and isn’t very complicated. Today, we will introduce some text motion tracking software (free & paid) tools that allow you to pin text to video with minimum effort. There will also be detailed tutorials on how to utilize each tool. Let’s get started.
Best Text Motion Tracking Software [+Howtos]
Note: The list below is in no particular order.
1. Filmora
Pricing: Free (watermark) /starts at $49.99/year
Operating System: Windows & Mac
The newly released Wondershare Filmora X version has added the motion tracking features, which allows you to track moving objects in a video clip, and attach images, texts, elements and videos to follow the movement path.
How to Use Filmora Video Editor To Do Text Motion Tracking?
- Import the video footage to the timeline and then click the Motion Track icon in the tool bar to enable the Motion Tracking option.
![]()
- In the preview window, drag and adjust the tracking box to select a moving object as the target.
![]()
- Click the Start Tracking menu to start the moton tracking render, and Filmora video editor will compute the moving path automatically
- Now, go to the Titles tab and drag a subtitle, titles, lower 3rd, or callout to the track just above the motion-tracked video. Customize your texts, adjust its size, position, etc. in the preview window.
![]()
- Next, double click the video footage to enter the Motion Track option. Select the title as a follower. Playback the video, and you will see the text will move accordingly.
Below is a step by step video tutorial about how to use the motion tracking feature in Filmora. Keep watching.
2. Premiere Pro CC
Pricing: 14-day trial, minimum $20.99/month
Operating System: Windows, Mac
Adobe Premiere Pro is an industry-leading video editor. Premiere Pro CC has all the editing tools a pro video editor needs.
There is no automatic tracking feature in Premiere Pro to pin text to video. Therefore, you need to manually position your text and add keyframes frame by frame. But the overall effort required and the final result isn’t much different from traditional editors.
How To Do Text Motion Tracking In Premiere Pro CC? [Main Steps]
- Import your video to the timeline
- Add text by Pressing ‘T’ on your keyboard and clicking on the preview window (your footage)
- Change the position & duration of the text layer on the timeline according to the position & duration of motion tracking
- Make sure you’re on the frame you want to start tracking from
- Click on your text layer → then go to effects controls
- Change the position of the text to the point you want to track → click on the stopwatch icon to add a keyframe
- Move a few frames forward → adjust the position again → add another keyframe
- Don’t put the keyframes too close or too farther apart
- Play through to check it out → adjust the position and number of keyframes if any issues arise
The whole process is relatively easy, although tedious. But the process becomes very complicated when you have more dynamic motion in your clip
3. After Effects
Pricing: 7-day trial, $20.99/month (individual)
Operating System: Windows & Mac
Adobe After Effects is an editor that focuses on animation & creative composition. This app has been developed as a companion to Premiere Pro for creating short & flashy motion graphics and visual effects for projects.
Motion tracking in After Effects can be done using the Point Tracker, which has one-point and up to four-point tracking. Other tracking options include the built-in 3D Camera Tracker that lets you reverse engineer a scene and the spline tracker that enables you to track masks on an object. There is also Mocha AE, a planar tracker from BorisFX. The Point Tracker is the most flexible and versatile in After Effects. We’ll use it to pin text to video.
How To Do Text Motion Tracking In After Effects? [Main Steps]
- Create a new composition/open an old one and make sure your clip is imported
- Create a null object by right-clicking on the window (screenshot below)
- Select your clip → click on tracker → click on track motion
- Two square boxes will appear
- Move the squares to the point you want to track (make sure to select an object with relatively high contrast for easier tracking)
- Position the smaller square on the object you want to track
- Make the second box is big enough (not too big) so that the tracked object stays within this square in the next frame
- Click on the analyze forward button (screenshot above)
- If the square box fails to track the object at any frame, reposition it and move on
- Make sure motion target is set to null object (e.g., Null 1)
- Now add the text
- While clicking on the pick whip tool of the text layer, drag it to the null object
- Play through to check the result
- You can manually change the position of the text in any frame by adjusting its position and adding a keyframe
We’re done. As we stated above, other types of trackers are also available for you to experiment with. The overall tracking functionality is much better than Premiere Pro.
4. Sony Vegas Pro
Pricing: 30-day trial, minimum $19.99/month
Operating System: Windows
Sony Vegas Pro is a non-linear video editor with the so-called “power of Artificial Intelligence.” It is one of the few editors out there that has acquired popularity among professionals and amateurs alike.
Text motion tracking in Vegas Pro is done using Bézier Masking FX (new update introduces a separate tab for motion tracking). The tracking process is automatic. Keyframes are created automatically frame by frame. It isn’t perfect, but it gets the job done in most cases. When it fails to track objects correctly, you can manually edit the keyframes.
How To Do Text Motion Tracking In Sony Vegas Pro? [Main Steps]
- Import your video
- Click on your video → go to the starting point of text motion tracking
- Click on Bézier Masking → drag the default one to your video
- A new options tab will appear & a square box with a circle (tracking box) will appear in the preview window
- Go to General options → set blend to 1,000
- Go to Mask 1 → Tracking → options → set the precision to high → set keyframe interval between 1 & 5
- Position the black dot of the tracking box to the point you want to track
- Click on start below the keyframe interval option
- After processing is complete → go to tools → extensions → add text to motion track → click on ok in the text position tab
- Enter your text, edit it if you want
- Play through to check the result
Conclusion:
As we’ve seen above, all the editors have some kind of automatic tracking feature, Premiere Pro being the only manual exception. All of them do a reasonably good job when it comes to pinning text to video. Professionals would be more satisfied with the added versatility and control in After Effects. Filmora, Filmora, Vegas Pro and Premiere Pro, on the other hand, are better suited for amateurs.
Ollie Mattison
Ollie Mattison is a writer and a lover of all things video.
Follow @Ollie Mattison
Also read:
- Updated In 2024, Final Cut Pro Essentials Creating Breathtaking Time Lapses
- New 2024 Approved Slow Motion Magic Unlocking the Power of Windows Live Movie Maker
- New In 2024, Flipping Out A Step-by-Step Guide to Rotating Clips in Final Cut Pro
- Updated How to Download Windows Movie Maker A Beginners Guide for 2024
- New Comcast Xfinity vs TiVo Which DVR Reigns Supreme for 2024
- New 2024 Approved Chromebook Video Editing Made Easy Top 10 Free Apps to Get Started
- The Countdown Begins 3 Simple Steps to FCPX Timer Success for 2024
- Updated Best Free Video Editors with No Watermark for 2024
- New Top Tricks for Downloading Soundcloud Tracks as MP3
- New 2024 Approved Make a Splash with These Top 10 Gaming Intro Generators for Windows and Mac
- Updated 2024 Approved Say Goodbye to iMovie Top Windows Video Editing Software
- Updated In 2024, Transform MP4 Videos Into MP3 Audio Files Top Converters
- Updated 2024 Approved Top 10 Free Online Subtitle Generators
- In 2024, The Fastest Way to Trim AVI Files A Quick and Easy Guide
- S Best Free Video Compression Solutions for Windows 10 Users for 2024
- Updated In 2024, Unleash Your Creativity Advanced Video Editing Techniques and Effects
- Updated The Ultimate List of Free Online Photo Background Blur Tools
- Updated Mastering TikToks Visuals A Comprehensive Aspect Ratio Guide for 2024
- New In 2024, Instant Image Resize Online Aspect Ratio Converters
- Updated Cut, Clip, and Perfect Trimming Videos with Kapwing Online for 2024
- New From Zero to Hero A Beginners Guide to Stop Motion Animation for 2024
- New Maximize Your GoPro Content Efficient Video Editing on MacBook with Quik for 2024
- New In 2024, Unlocking the Power of Titles in Final Cut Pro X 2023 Update
- Updated Optimizing Vertical Video Tips for Smartphone Creators
- New In 2024, The Ultimate Guide to Choosing the Best Pro Audio Editing Software
- Updated Free MP4 Video Editing Software with Cutting Capabilities for 2024
- New In 2024, Download Windows Movie Maker Free The Ultimate Installation Guide
- Top-Rated Adobe Premiere Title Templates Free for Your Next Project for 2024
- Updated In 2024, Discover the Best 3D Video Production Tools for Stunning Visuals
- Updated In 2024, Fix Avidemux Audio Issues Latest Solutions
- 2024 Approved The Ultimate Showdown After Effects vs Adobe Premiere Pro
- Updated Get Noticed on LinkedIn The Ideal Video Aspect Ratio Guide for 2024
- New In 2024, Vertical Victory Mastering Phone Aspect Ratios for Maximum Impact
- In 2024, Unleash Your Creativity Best Android Video Editor Apps for Chrome OS
- New In 2024, Create Unforgettable Videos Top 5 Photo Slideshow Makers Revealed
- Updated 2024 Approved From Beginner to Expert The Wav Converter Blueprint
- In 2024, Is pgsharp legal when you are playing pokemon On Poco C50? | Dr.fone
- Update drivers with Device Manager on Windows 11/10
- 6 Proven Ways to Unlock Vivo Y27 5G Phone When You Forget the Password
- Repair broken or corrupt video files of Redmi Note 12T Pro
- In 2024, How to Screen Mirroring Poco C51 to PC? | Dr.fone
- 2024 Approved Top Fixes to Resolve Issues with Premiere Pro Slow Playback
- In 2024, Proven Ways in How To Hide Location on Life360 For Poco C50 | Dr.fone
- New What Is ChatGPT?
- How Do I SIM Unlock My iPhone 14 Plus?
- In 2024, How to Mirror Apple iPhone 14 to Mac? | Dr.fone
- Apply These Techniques to Improve How to Detect Fake GPS Location On Vivo Y100 5G | Dr.fone
- Top 12 Prominent Samsung Galaxy S23 Ultra Fingerprint Not Working Solutions
- FRP Hijacker by Hagard Download and Bypass your Oppo A58 4G FRP Locks
- Updated 2024 Approved Free and Easy The Top Online Video Stabilization Software
- How to Flash Dead Oppo A1x 5G Safely | Dr.fone
- In 2024, Full Guide on Mirroring Your Vivo Y100i Power 5G to Your PC/Mac | Dr.fone
- Updated 2024 Approved Transform Your Videos Easy Editing with Microsoft Video Editor on Windows
- How to Flash Dead Xiaomi Redmi Note 12 Pro 5G Safely | Dr.fone
- In 2024, Three Ways to Sim Unlock Xiaomi 13 Ultra
- In 2024, How to Transfer Data from Itel A05s to Samsung Phone | Dr.fone
- In 2024, Top 5 Car Locator Apps for Apple iPhone 11 Pro Max | Dr.fone
- In 2024, Two Ways to Track My Boyfriends Xiaomi Redmi 12 without Him Knowing | Dr.fone
- How to Stop Google Chrome from Tracking Your Location On OnePlus Nord N30 5G? | Dr.fone
- Title: New In 2024, Best WebM to MP4 Converters for Seamless Video Conversion
- Author: MdadeLe
- Created at : 2024-05-19 08:28:11
- Updated at : 2024-05-20 08:28:11
- Link: https://smart-video-editing.techidaily.com/new-in-2024-best-webm-to-mp4-converters-for-seamless-video-conversion/
- License: This work is licensed under CC BY-NC-SA 4.0.
